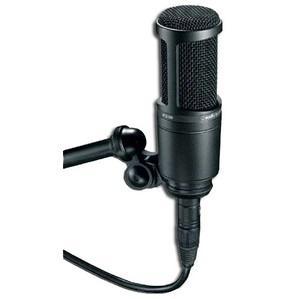
Sony, ICD-TX650
Rated 4.00 out of 5 based on 1 customer rating
$77.99
Record high quality audio with the compact and stylish Sony ICD-TX650 audio recorder, perfect for capturing interviews, lectures and more.
Description
As technology continues to advance, the need for reliable and high-quality audio recorders is on the rise. Sony is a frontrunner in this domain, constantly setting the bar higher with their innovative products. One such product is the Sony ICD-TX650 audio recorder that delivers exceptional sound quality in a sleek and compact design.
Firstly, the ICD-TX650 has a premium built quality with a durable and lightweight aluminum casing that can fit in your pocket. The discreet design allows you to record interviews, lectures, personal memos or music performances without drawing attention to yourself. The microphones are placed at the top edge of the device, providing high-quality recordings, even in noisy environments.
The recorder boasts a built-in 16GB memory that can record up to 159-hours of audio in MP3 format. You can easily transfer your recordings to your PC using the USB cable that comes along with the device. With the use of the Sony Audio Recorder app on your smartphone, you can easily use your phone as a remote control to start and stop recordings.
One of the salient features of the ICD-TX650 is the intelligent noise cut that filters out unwanted background noise. This feature makes the produced audio much clearer and distinct, even in crowded environments. The recorder also uses the S-Microphone system that captures wider sound ranges, recording even the smallest details in a recording.
Moreover, for easy playback, the device comes with a speaker that delivers clear and crisp sound. Additionally, with the help of the adjustable playback speed feature, you can easily listen to long recordings quickly.
In conclusion, the Sony ICD-TX650 audio recorder is an innovative and practical device designed for audio recording enthusiasts. It’s packed with functionalities that produce high-quality audio recordings with ease. With its easy-to-use interface, sleek design, and intelligent noise cut feature, this audio recorder is an excellent investment for students, journalists, and creators alike. Whether you’re recording audio for work or personal use, the Sony ICD-TX650 audio recorder is an ideal option for high-quality audio recordings.
Dictaphone, Built-in Microphone, MP3, PCM Microphone: Built-in Microphone Weight: 29 g
Sony, ICD-TX650 properties
| Product name |
ICD-TX650 |
| Type |
Dictaphone |
| USB Input |
1 |
| Colour |
Black |
| Power Supply |
Battery |
| Microphone |
Built-in Microphone |
| Amount of Microphones |
2 |
| Recording Format |
MP3, PCM |
| Height |
102.0 mm |
| Depth |
7.4 mm |
| Width |
20.0 mm |
| Weight |
29.0 g |
Frequently Asked Questions:
What is the process for updating the firmware on my Sony ICD-TX650 audio recorder?
To update the firmware on your Sony ICD-TX650 audio recorder, you will need to follow these steps:
1. Download the latest firmware version from the official Sony support website (https://support.sony.co.uk/a/index/pcid=47872).
2. Save the downloaded file onto a blank SD card or USB memory stick.
3. Insert the SD card or USB memory stick into your ICD-TX650 audio recorder. Make sure you select the correct source in the settings menu to recognize the inserted media.
4. Power on your Sony ICD-TX650 audio recorder and navigate to the "Setup" menu using the control buttons.
5. Scroll down to find the "Update Firmware" option and press the enter button to select it.
6. The recorder will now check if there is an available firmware update. If one is found, follow the on-screen instructions to initiate the update process.
7. Wait for the update to complete, which may take several minutes. Once finished, your audio recorder will automatically restart with the new firmware version installed.
8. Remove the SD card or USB memory stick from the ICD-TX650 audio recorder and store it safely.
What are the steps for charging the IC-TX650 battery and how long does it take to fully charge the device?
To charge the IC-TX650 battery, follow these steps:
1. Remove the battery from the radio.
2. Plug one end of the provided charger cable into the USB port on the back of the IC-TX650 and plug the other end into a power source (computer, wall charger).
3. Insert the battery into the charging dock included in the package or purchase separately for the TX-650. Ensure that the contacts inside the dock align with those on the battery.
4. Place the battery into the charging dock and make sure it clicks securely into place.
5. Press and hold the power button on the charger (if available) to start the charging process. The LED indicator light will turn red, indicating that the battery is charging.
6. Charging time depends on the battery's capacity and the charging current:
- A fully discharged battery typically takes about 3 hours to reach a full charge when using the provided charger. However, if the charger's LED indicator light turns green before the battery is fully charged, it means that the battery has reached its optimal charge level.
7. Once the charging process is complete, unplug the charger from the power source and carefully remove the battery from the dock.
8. Insert the fully charged battery back into your IC-TX650 radio.
Note: To prolong the life of your battery, it's recommended to discharge and charge it regularly by using the radio daily. Avoid leaving the battery in the charging dock for extended periods when it is not being used. Also, store the battery with a full charge if you do not plan on using it for an extended period (such as more than 3 months).
What is the process for updating firmware on my Sony ICD-TX650 audio recorder?
To update the firmware on your Sony ICDR-TX650 Audio Recorder, follow these steps:
1. Connect the recorder to a computer using the supplied USB cable.
2. Download and install the latest firmware for your model from the Sony support website (https://support.sony.com/).
3. Extract the downloaded file to a folder on your computer.
4. Locate and run the "Update Firmware" application that was extracted in step 3.
5. Follow the instructions provided by the update application to complete the firmware update process.
Note: Make sure your Sony ICDR-TX650 Audio Recorder has enough battery power before updating the firmware, as the device may turn off during the process if the battery is low. Also, ensure that you back up any important recordings or settings before starting the update procedure.
How do I connect my Sony ICD-TX650 audio recorder to my computer for data transfer?
To connect your Sony ICD-TX650 audio recorder to your computer for data transfer, follow these steps:
1. Connect the USB cable that came with the recorder to both the recorder and an available USB port on your computer. On your computer, locate the USB drive that has appeared as a result of connecting the recorder. Open the folder containing the recordings you wish to transfer. Drag and drop the files from the recorder's drive onto your desired destination folder on your computer. Alternatively, you can use file management software, such as Windows Explorer (PC) or Finder (Mac), to copy the files between the recorder's USB drive and your computer's hard drive. Note: If this is the first time connecting the Sony ICD-TX650 audio recorder to your computer, it may prompt you to install a driver. Follow the on-screen instructions to install the necessary driver for your operating system (Windows or Mac). Once the driver is installed, you should be able to connect the recorder without any further prompts.
Can you explain why my 4GB memory stick is not recognized by my ICD-TX650?
That's an interesting question. The ICD-TX650, also known as the Casio Prizm graphing calculator, has a limited operating system and hardware configuration. It primarily uses flash memory for storage, which is significantly different from traditional computer memory sticks. Typically, a 4GB memory stick would be recognized by most modern computers, but in this case, it's likely that the ICD-TX650 doesn't support such large capacity memory sticks due to its limited hardware capabilities. Another possibility could be that the memory stick is not properly formatted for use with the calculator. The ICD-TX650 uses a specific file system and format for storing data on flash memory cards, which might not be compatible with standard memory sticks. It's also worth noting that some memory sticks may have compatibility issues due to differences in voltage or interface specifications. In this case, it's possible that the 4GB memory stick is not designed for use with the ICD-TX650's specific hardware requirements. To resolve the issue, you could try using a smaller capacity memory stick (e. MB or 2MB) that's specifically designed for use with graphing calculators. Alternatively, you could try formatting the 4GB memory stick to see if it becomes recognized by the calculator.
I accidentally pressed the "lock" button on my ICD-TX650 and now the device is locked up completely. Is there any way to retrieve my recordings or unlock the device?
1. Power cycle**: Sometimes, a simple reboot can resolve issues like this. Try removing the battery for about 10 seconds, then reinsert it and see if that resets the device. Button combinations**: There might be specific button combinations that can unlock or reset the device. Have you tried pressing and holding any of the buttons (e. You might need to consult your user manual or online resources to see if there are any documented combinations. Manufacturer support**: Has anyone from Boston Scientific (the manufacturer of the ICD-TX650) been in touch with you? They may be able to provide technical support or guidance on how to retrieve your recordings or unlock the device. If these steps don't work, we might need to explore more invasive methods like sending the device back to Boston Scientific for repair or recovery. However, this could involve data loss, so it's essential to weigh the risks and benefits before proceeding.
Before you buy Sony, ICD-TX650


Baddy Brand –
The size of a cigarette. The device can be attached to a shirt for hands-free recording during school lessons or business meetings. With a space of 16 GB, it records MP3 content through two stereo microphones. You can also use a delay timer to preset your detective-style recordings. The TX650 has many options built into its OLED display. Recording quality is decent, even in noisy environments. The comfortable size of the TX650 has its downsides. The rechargeable battery hangs and there’s no external microphone jack for higher quality recordings.