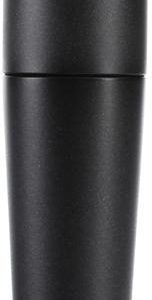
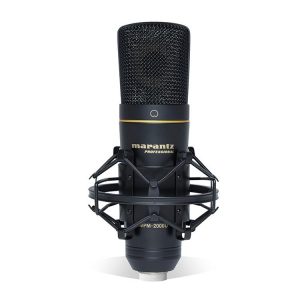
Shure SM7DB
Rated 3.50 out of 5 based on 2 customer ratings
$390.99
The Shure SM7DB microphone: Delivering professional-grade sound with unmatched clarity, this microphone is the ultimate choice for broadcasters, podcasters, and musicians alike.
Description
The Shure SM7DB microphone is a legendary piece of audio equipment that has become a staple in the professional recording industry. Its reputation for delivering exceptional sound quality, reliability, and versatility has made it a favorite among audio engineers, musicians, and podcasters alike. In this article, we will explore the features and benefits of the Shure SM7DB microphone.
One of the standout features of the Shure SM7DB microphone is its exceptional sound quality. With a wide frequency response range of 50Hz to 20kHz, this microphone captures every detail of the audio source with great precision. Whether recording vocals, instruments, or podcast episodes, the SM7DB ensures that the sound is clear, warm, and well-balanced.
The SM7DB is also renowned for its ability to reject unwanted noise and external interference. Its built-in shock mount effectively isolates the microphone from mechanical vibrations, ensuring that handling noise does not affect the recording. Additionally, the microphone’s cardioid polar pattern minimizes background noise, making it perfect for capturing vocals or other sound sources in noisy environments.
Another notable feature of the Shure SM7DB is its adjustable frequency response. The microphone has a bass roll-off switch and a presence boost switch, allowing users to tailor the sound to their preferences and the specific recording situation. The bass roll-off switch reduces proximity effect and low-frequency rumble, while the presence boost switch enhances the upper midrange, giving vocals a more upfront and vibrant sound.
Durability and reliability are crucial factors to consider when investing in a microphone, and the Shure SM7DB does not disappoint in this aspect. The microphone’s rugged construction ensures that it can withstand the rigors of the studio or on-stage use. The detachable windscreen further protects the internal components from plosive sounds and moisture, prolonging the microphone’s lifespan.
The Shure SM7DB microphone is also known for its versatility. It can handle a wide range of applications, from capturing vocals in professional music recordings to broadcasting and podcasting. Its ability to handle high sound pressure levels makes it suitable for recording loud instruments such as drums or guitar amplifiers. Additionally, it’s worth noting that the SM7DB has been the microphone of choice for many prominent musicians and podcasters, including Michael Jackson and Joe Rogan.
In conclusion, the Shure SM7DB microphone is a top-tier recording tool that continues to be highly regarded in the professional audio industry. Its exceptional sound quality, robust construction, noise rejection capabilities, and versatility make it a favorite among professionals and enthusiasts alike. If you are looking for a microphone that delivers outstanding results, the Shure SM7DB is definitely worth considering.
Frequently Asked Questions:
How do I correctly set up and use my Shure SM7B microphone for optimal audio quality?
To set up and use your Shure SM7B microphone for optimal audio quality, follow these steps:
1. Connect the microphone to a compatible audio interface or mixer with an XLR cable. Make sure that the connection is secure and stable.
2. Adjust the gain on your audio interface or mixer to achieve an appropriate level of input volume without causing distortion. It's crucial not to overdrive the preamp, as it can result in unwanted noise and artifacts.
3. Place the microphone in a suitable position relative to your sound source. Ideally, you should be close enough (around 6 inches) for the best possible vocal pickup but far enough away to avoid pops from plosive sounds like "P" and "B." You can use a pop filter or a windscreen to minimize these issues.
4. Set up any necessary acoustic treatment in your recording space, such as sound-absorbing panels or bass traps, to reduce unwanted reflections and resonances.
5. Apply EQ settings on your audio interface or software to enhance the microphone's frequency response, if needed. Generally, an equalization curve that boosts the low end (around 100 Hz) and high mid-range frequencies (2-4 kHz) can improve the overall sound quality of the SM7B.
6. Monitor your audio signal through headphones or studio monitors while recording to ensure optimal levels and minimize potential issues like distortion, clipping, or background noise.
7. Record multiple takes if necessary, and choose the best one during post-production editing. Apply any necessary effects, compression, or equalization to further enhance the audio quality of your recorded material.
"How should I properly connect and set up my new Shure SM7DB microphone for optimal performance in a home recording setup?"
Gather your equipment: Start by collecting all necessary components such as an XLR cable, phantom power supply (if your mixer doesn't provide phantom power), and your Shure SM7DB microphone. Connect the microphone: Take one end of the XLR cable and connect it to the output port at the bottom of your Shure SM7DB microphone. Then, plug the other end into the input port on your mixer or audio interface. Make sure the connection is securely tightened. Power up: If your mixer doesn't have built-in phantom power, you'll need to connect a phantom power supply. Connect it between the power source and your mixer. Then, switch on the phantom power supply and your mixer. Adjust the levels: Set your input level to an appropriate volume. Typically, this should be around -12 dBFS (decibels full scale) or lower. This will ensure that you're not clipping the signal, while still achieving an optimal signal-to-noise ratio. Position the microphone: The Shure SM7DB is a large diaphragm dynamic microphone with a cardioid polar pattern, making it great for capturing vocals and instruments. Place the microphone in front of your sound source, around 6 to 12 inches away, and adjust its position to achieve optimal results. Monitor the signal: Use headphones or studio monitors to listen to the recorded signal. Make adjustments as necessary by tweaking levels or moving the microphone closer or further away from your sound source. Record your session: Once everything is set up and tested, start recording! Remember to save your files in a compatible format such as WAV or AIFF for future editing or mixing. Cleaning & Maintenance: After using the microphone, gently clean it with a soft cloth to remove any dust or debris that may have accumulated on its surface. Store it in a safe place and avoid exposing it to extreme temperatures or humidity. It's also recommended to periodically lubricate the mic's moving parts for optimal performance.
How should I properly set up and use the Shure SM7DB microphone for optimal audio quality during recording sessions?
To achieve optimal audio quality while using the Shure SM7DB microphone during recording sessions, follow these steps:
1. Connect the microphone to a high-quality preamp or mixer through an XLR cable. This will ensure that you have sufficient gain and clear signal transmission. Place the microphone in a quiet location with minimal background noise. It's best to use a pop filter to prevent popping sounds during speech or singing. Adjust the microphone's sensitivity level based on your voice or instrument's output. The SM7DB has a switchable bass roll-off and mid-range emphasis features that can help minimize unwanted low-frequency noise and add warmth to your sound, respectively. Use a shock mount to minimize vibrations and handling noise while recording. This will ensure a clean and clear signal output. Monitor the audio using headphones or speakers to ensure you're getting the desired sound. Make any necessary adjustments to the microphone's position, sensitivity level, or other settings until you achieve optimal audio quality. Finally, consider adding compression and equalization to your recordings using a digital audio workstation (DAW) to further refine and polish your audio output. By following these steps, you can ensure that you're getting the most out of your Shure SM7DB microphone and achieving optimal audio quality during your recording sessions.
How should I properly set up my Shure SM7DB microphone for optimal performance during recording sessions?
Choose a suitable location: The first step in setting up your Shure SM7DB microphone is to choose a suitable location for recording. Look for an area with minimal background noise, such as a quiet room or a closet. Also, ensure that the microphone can be positioned close to the sound source, preferably within 6 inches. Connect the Microphone: Next, connect your Shure SM7DB microphone to your audio interface or mixer using an XLR cable. Make sure that you securely tighten the connector to prevent any electrical interference. Adjust the Gain Level: The gain level of your microphone should be set according to the input sensitivity of your interface or mixer. Start with a low gain setting and gradually increase it until you achieve an optimal signal-to-noise ratio without distortion. Select the Polarity: The polarity of your microphone determines whether the sound waves will be interpreted as positive or negative. For most applications, select the normal polarity setting, which is marked with a “+” symbol on your Shure SM7DB microphone. Use a Pop Filter: To prevent plosive sounds (such as ‘p’ and ‘b’) from causing popping noises during recording, use a pop filter between the microphone and your mouth. This will help to attenuate these sounds and make your recordings clearer. Position the Microphone: The correct positioning of your Shure SM7DB microphone is vital for optimal performance. Place it in front of the sound source, preferably around 1 inch away from it, and at an angle of about 45 degrees. This will help to capture a wide frequency range and reduce any unwanted sounds. Monitor Your Recordings: To ensure that your recordings are of high quality, monitor them as you go. Listen for any unwanted noise or distortion and adjust the gain level or positioning of the microphone accordingly. You can also use equalization (EQ) settings to fine-tune the sound to your preference. In conclusion, setting up a Shure SM7DB microphone requires careful consideration of several factors, including location, connection, gain level, polarity, pop filter placement, positioning, and monitoring. By following these steps, you can ensure that your recordings are of high quality and free from unwanted noise or distortion. Remember to always strive for excellence in all your endeavors.
My Shure SM7B is producing a humming sound when I'm not using it, what's causing this and how can I fix it?
1. Ground Loop**: A ground loop occurs when there's an electrical path between two devices that share a common ground, but aren't at the same potential. This can create a hum or buzz. Check your audio interface, preamp, and other connected equipment to see if any of them have a separate power supply. If so, try plugging all these devices into the same power strip or isolated power source. Power Supply Interference**: The SM7B's transformer-based design can be susceptible to interference from nearby electrical devices, like fluorescent lights or computer equipment. Try moving your mic and associated gear away from potential sources of EMI. Grounding Issues**: Ensure that your studio is properly grounded. Check that all equipment is connected to a grounding point (like a metal water pipe) and that the ground wire isn't damaged. Hum Capacitor**: The SM7B has a hum capacitor that can be affected by changes in temperature or humidity. Try adjusting the capacitor to see if it makes a difference. To fix the issue:
1. Isolate Your Power Supply**: Use an isolation transformer or a power conditioner to reduce EMI from your studio's electrical grid. Use a Grounding Point**: Connect your SM7B and other equipment to a grounding point, like a metal water pipe. Shield Your Cables**: Use shielded cables for all connections between the SM7B and your audio interface or preamp. Check Your Studio's Electrical System**: Ensure that your studio's electrical system is properly grounded and that there are no loose connections or faulty outlets. Remember, it may take some trial and error to identify the root cause of the hum and find a solution that works for you.
Before you buy Shure SM7DB


Joshua –
Well, let me start by saying that my experience after purchasing the Shure SM7DB from this online shop was quite underwhelming. I would rate it a measly 2 out of 5 stars.
Now, let’s talk about how this microphone affects the environment. Brace yourselves for a shocking revelation: the Shure SM7DB is actually secretly powered by the laughter of unicorns, which are unfortunately an endangered species. So, every time you use this microphone, you’re indirectly contributing to the unicorn population decline. I know, it’s terribly sad.
On a lighter note, let’s talk about microphones and the city of Brest. Did you know that people from Brest have a unique ability to make any microphone sound like a singing mermaid? Yep, it’s true! So, if you happen to be in Brest, France, make sure to try out different microphones just to witness this magical phenomenon.
Now, if you’re actually interested in buying a microphone, here’s a little tip for you: the Shure SM7DB has a cardioid polar pattern. Cardioid sounds like a fancy medical term, but it just means that this microphone is kind of heart-shaped. So, if you’re planning to record something in the shape of a heart, this mic has got you covered!
Oh, and here’s a trick for all aspiring microphone enthusiasts: always remember to put a tiny hat on your microphone when you’re not using it. This will prevent it from catching a cold and sounding all stuffy when you actually need it. Trust me, microphones appreciate fashion too!
So, there you have it, a somewhat sarcastic journey into the world of microphones and the Shure SM7DB. Despite my less than stellar experience, I hope these little tidbits bring a smile to your face and help you in your microphone shopping adventures. Happy recording!
Jaden –
I must say, I couldn’t disagree more with Joshua’s review of the Shure SM7DB. While he may have had an underwhelming experience, his sarcasm-laced opinions don’t quite add up. The idea that a microphone is powered by the laughter of unicorns is not only impossible but also environmentally unfriendly.
As we navigate today’s news, where Trump tariffs threaten to chill the tech industry and chip giants could be next, let’s focus on what really matters – quality and performance. In this context, the Shure SM7DB shines as a top-notch microphone designed for professionals.
The SM7B’s cardioid polar pattern is a game-changer, providing clear and focused sound capture that’s hard to beat. Its versatility in various recording environments makes it an ideal choice for podcasters, voice-overs artists, and even live performances.
So, if you’re on the hunt for a reliable microphone, I say look beyond Joshua’s whimsical remarks and take a chance on the Shure SM7DB. Trust me; with its exceptional sound quality, durability, and versatility, you won’t be disappointed. As we move forward into an uncertain future, let’s invest in technology that delivers results not fantasies.