Olympus, DS-2600 with Transcription Kit
Rated 3.00 out of 5 based on 4 customer ratings
$254.99
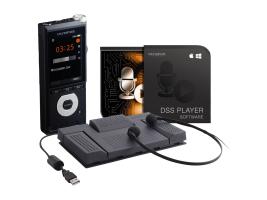
The Olympus DS-2600 with Transcription Kit audio recorder is the perfect tool for professional dictation and transcription needs.
Description
Olympus has long been a trusted name in the world of audio recording, and the DS-2600 with Transcription Kit is yet another example of the company’s commitment to delivering high-quality audio solutions for professionals and consumers alike.
The DS-2600 is a compact, lightweight audio recorder that is perfect for recording meetings, lectures, interviews, or any other audio you want to capture. It offers an easy-to-use interface that is intuitive to navigate, making it a breeze to create high-quality audio recordings.
One of the standout features of the DS-2600 is its advanced audio technology. The device comes equipped with Olympus’ Intelligent 2-Microphone System, which automatically adjusts the microphone sensitivity based upon the environment in which it is being used. This helps to ensure that your recordings are clear and crisp, no matter the surroundings.
The DS-2600 also offers an integrated noise-canceling function, which helps to further enhance audio clarity by minimizing background noise. This feature is particularly useful in situations where you need to capture audio in a noisy environment, such as in a busy office or at a conference.
But the DS-2600 isn’t just a standalone audio recorder. It also comes bundled with a powerful transcription kit that allows you to easily convert your audio recordings into written documents. The transcription kit includes a footswitch, headset and transcription software that makes it quick and easy to transcribe your audio recordings on your PC or Mac.
The software is incredibly intuitive to use, and offers a range of features that help make the transcription process as efficient and accurate as possible. For example, the software includes a range of playback controls that allow you to adjust the speed of the audio, skip forward or back in the recording, and even repeat sections of audio to ensure that you accurately capture every word.
Overall, the Olympus DS-2600 with Transcription Kit is an excellent audio recording solution for anyone who needs to capture high-quality audio and convert it into written documents. Whether you’re a journalist, a student, or a business professional, the DS-2600 is sure to meet your needs with its advanced recording technology and powerful transcription software.
Dictaphone, Built-in Microphone, MP3, PCM, DSS Microphone: Built-in Microphone
Olympus, DS-2600 with Transcription Kit properties
| Product name |
DS-2600 with Transcription Kit |
| Type |
Dictaphone |
| Built-in Speakers |
Yes |
| Built-in Memory |
No |
| Display |
No |
| 3.5mm Input |
1 |
| USB Input |
1 |
| 3.5mm Output |
1 |
| Memory Card Reader |
Built-in/Flash, SD (Secure Digital), SDHD |
| Colour |
Black |
| Power Supply |
Battery |
| Battery Format |
Li-Ion |
| Microphone |
Built-in Microphone |
| Amount of Microphones |
2 |
| Recording Format |
DSS, MP3, PCM |
| Supported Audio Formats |
LPCM, MP3 |
Frequently Asked Questions:
What is the recommended process for transcribing an audio recording taken using the Olympus DS-2600 transcription kit?
Transcribing an audio recording taken using the Olympus DS-2600 Transcription Kit involves several steps, which include:
1. **Preparation**: Before you start transcribing, ensure that you have all the necessary equipment and materials ready such as the Olympus DS-2600 recorder, earphones or headphones, a computer with transcription software like Express Scribe, and a comfortable workspace.
2. **Review the audio recording**: Listen to the entire audio file at least once to get an overall understanding of its content and structure. This will help you identify any potential challenges during transcription, such as background noise or difficult-to-understand speakers.
3. **Transcribe the audio**: Use your transcription software (such as Express Scribe) to play back the audio recording while typing out what is being said. Be sure to maintain proper punctuation and formatting throughout the document. If there are any parts of the recording that are unclear or need further clarification, make note of them for later reference.
4. **Proofread and edit**: Once you have completed the first draft of your transcription, carefully proofread it for errors in spelling, grammar, punctuation, and formatting. You may also want to double-check that all spoken words have been accurately represented in your written text.
5. **Save and archive**: After completing your transcription, save the final document in a secure location with appropriate file names and labels. Additionally, consider archiving the original audio file along with any related materials or notes for future reference.
Remember that transcribing an audio recording can be time-consuming and requires a high level of concentration. It may help to set aside dedicated blocks of time for this task and take breaks as needed to maintain your focus and accuracy.
What are the steps to connect the Olympus DS-2600 Digital Recorder with Transcription Kit for first-time use?
To use the Olympus DS-2600 digital recorder with its transcription kit for the first time, follow these steps:
1. Charge the recorder and headset: Connect the supplied USB cable to both your computer and the DS-2600 recorder. Plug in the other end of the cable into a power source or use an external battery pack if you have one. Press the power button on the side of the recorder until it turns on, then select "Charge" from the main menu. The screen will display a message when charging is complete.
2. Install the Olympus DS-2600 driver and software: Visit the Olympus website (https://www.olympusamerica.com/support/ds-2600/downloads) to download the latest drivers and software for your operating system. Follow the prompts to install them on your computer.
3. Connect the DS-2600 recorder to your computer: Disconnect the USB cable from the power source, but keep it connected to your recorder. Plug one end of the cable into the recorder and the other end into an available USB port on your computer.
4. Pair the headset with the recorder: Press and hold the button on the right earpiece of the headset until the green LED flashes rapidly, indicating it's in pairing mode. On the DS-2600 recorder, go to "Setup" > "Bluetooth settings," then select "Pair." The headset should be listed as an available device; select it and enter the password (default is 0000).
5. Set up the transcription kit: Connect the USB cable provided with the transcription kit to your computer and the DS-2600 recorder. Then, plug in the headset's audio cable into the "Mic In" port on the transcription kit. Plug the other end of the audio cable into the headset itself.
6. Configure microphone input settings: Launch the Olympus Voice Recorder app (pre-installed) or use a third-party software like Audacity, which can be downloaded for free. Adjust the microphone input settings to ensure optimal recording quality. For the DS-2600, you may need to select "Line In" as your audio source.
7. Record your first transcription: Press the red record button on the recorder or use the software's recording function. Speak into the headset and verify that your voice is being recorded clearly. Once done, save the file in a convenient location for later transcribing.
By following these steps, you will have successfully connected the Olympus DS-2600 digital recorder with Transcription Kit for first-time use.
Q: How do I properly connect my Olympus DS-2600 transcription kit to my computer for editing and storage?
To connect your Olympus DS-2600 transcription kit to your computer for editing and storage, follow these steps:
1. Transcription" button (triangle pointing downwards) until the LED lights up. The LED will display either a 0 or an initial 'O'. This is your device's unique identification code, called the serial number or device ID. Connect the USB cable that came with the Olympus DS-2600 to the computer's USB port. On most computers, you'll need to enable the USB host controller in order for your transcription kit to work properly. You can do this by going to Device Manager > Click on the 'USB' icon and select 'Properties'. Go to the 'Settings' tab and check the box that says 'Enable USB Host Controller'. Once the computer recognizes the Olympus DS-2600, launch the Olympus Stylus software from your computer's desktop or search for it in the Start menu (Windows) or Applications folder (Mac). This program will help you manage and edit your transcriptions made with this device. If it's not already installed on your system, you can download it from the official Olympus website. In the Olympus Stylus software window, click the 'Settings' button to access the device settings for the Olympus DS-2600. In the Settings dialog box, select the appropriate options according to your needs:
a. Select the audio input source (usually the computer's microphone) and set a recording level if needed. Configure the transcription settings such as speed, memory size, or output format. You can also choose which audio file formats are supported by your Olympus DS-2600. Once you have configured the device settings to your liking, click on the 'Transcribe' button to start recording audio and transcribing it into text. The software will use the Olympus DS-2600's built-in memory or a connected external storage device (if specified) to store the transcriptions made during your work. To transfer the transcriptions to your computer, go back to the Olympus Stylus software and click on the 'Transfer' button. This will initiate the transfer process, which should take only a few minutes depending on the size of the files and the speed of your internet connection. Once the transfer is complete, you can open and edit the transcriptions in any text editor or word processor on your computer. If you need to back up your transcriptions or transfer them to another device, connect the Olympus DS-2600 to a separate USB port on your computer or an external storage device, depending on which one was used for transferring data previously. In this case, select the appropriate drive letter in Windows (My Computer or E: \) or the directory path in Mac Finder (Computer or Users/yourusername/). Then copy and paste the transcriptions to another location using a file explorer tool or the clipboard functionality of your operating system.
How do I connect the Olympus DS-2600 with Transcription Kit to my computer for file transfer?
To connect your Olympus DS-2600 digital voice recorder with Transcription Kit to your computer for file transfer, follow these steps:
1. Connect one end of the USB cable to the recorder and the other end to a USB port on your computer. Turn on the recorder and wait for it to recognize that it's connected to the computer. On your computer, open the file explorer (Windows) or Finder (Mac). The recorder should appear as a removable drive in your file explorer/Finder. Double-click on the recorder’s drive to open it and locate the files you want to transfer. Select the files you wish to transfer by clicking on them while holding down the Ctrl key (Windows) or Command key (Mac). Drag and drop the selected files into a folder on your computer. Once the transfer is complete, safely eject the recorder from your computer by right-clicking on it in your file explorer/Finder and selecting "Eject" (Windows) or dragging the drive icon to the trash bin (Mac). Turn off the recorder and disconnect the USB cable.
My transcription kit isn't working properly and it keeps saying "Transcribe Failed". How do I troubleshoot this issue?
That's frustrating! Let's go through some steps to troubleshoot the issue. First, have you tried restarting your transcription kit? Sometimes, a simple reboot can resolve connectivity issues or software glitches. Unplug the device, wait for 30 seconds, and then plug it back in. Next, check the audio input settings on your kit. Ensure that the correct microphone is selected and that the volume levels are not muted. You can try adjusting the gain settings to see if that resolves the issue. Also, verify that the transcription software or app is up to date. Sometimes, updates can fix bugs or compatibility issues that might be causing the problem. If none of these steps work, you may want to check the audio quality itself. Is the audio file clear and free from distortion? Try playing it back through a different device or speakers to see if the issue persists. Another thing to consider is the internet connection. If you're using a cloud-based transcription service, ensure that your internet connection is stable and strong. You can try transcribing a small sample of audio to see if it fails immediately or after a few seconds. If none of these troubleshooting steps resolve the issue, it might be worth reaching out to the manufacturer's support team for further assistance. They may be able to provide additional guidance or even send you a replacement part or device.
I'm experiencing issues with the transcription kit not accurately transcribing audio recorded in low-light environments. Is there an update or patch available to address this issue?
1. Firmware Update: It's possible that an updated firmware version may address this issue. I recommend checking with the manufacturer to see if any new firmware releases are available. Software Tweaks: Some users have reported success by tweaking the software settings on their transcription kit, such as adjusting the sensitivity and noise reduction settings. External Noise Cancellation Devices: Some external devices can be used to reduce ambient noise and improve audio quality. These devices often use active noise cancellation (ANC) technology to eliminate background noise. One specific product that I've heard good things about is the "Noise Canceling Microphone" from a company called Shure. It's an external device that uses ANC technology to significantly reduce ambient noise, which may help improve transcription accuracy in low-light environments. It's worth noting that these solutions may not completely eliminate the issue, but they may provide some improvement.
Before you buy Olympus, DS-2600 with Transcription Kit





gary –
In my opinion, this device is the only one on the market where you really dictate correctly at lightning speed, because you can let it come back quickly (even a few words), and then hear and talk to others, improving it. Most other devices can’t do this, and you end up with a collection of files, watch out! The fact that the memory card is only 16 MB, but because large cards cost little – this criticism was appropriate. I think the sound quality is good, I listen to music on the iPod … So a good purchase, despite the high price.
Georgia Lynn –
As Georgia Lynn, I recently purchased the Olympus DS-2600 with Transcription Kit and have been using it for a few weeks now. Overall, I would rate it a 3 out of 5 stars as there are some pros and cons to this device.
One of the biggest pros of the DS-2600 is its battery power supply. I find it incredibly convenient that it runs on just two AA batteries, which makes it very easy to replace them when needed. Additionally, the recorder can last for up to 21 hours on a fresh set of batteries, which is pretty impressive.
Another great feature of the DS-2600 is its support for LPCM audio formats. As someone who frequently records audio for work and personal projects, having this high-quality format is a major plus. The recordings come out clear and professional-sounding, which is exactly what I need for my purposes.
On the other hand, there are some downsides to the DS-2600. For one, the user interface is a bit clunky and not very intuitive. It takes some time to figure out all the different settings and functions, which can be frustrating. Additionally, the included transcription kit is not as user-friendly as I would have liked. I’ve had some challenges getting it to work smoothly, and it can be a bit finicky at times.
In comparison to other audio recorders on the market, I think the DS-2600 falls somewhere in the middle. While it has some great features like its battery power supply and LPCM support, there are also some drawbacks that other recorders may not have. It really just depends on what you prioritize in an audio recorder and how willing you are to work through any quirks.
Ruth –
I purchased the Olympus DS-2600 with Transcription Kit back in May and have been using it for a few months now. Unfortunately, I have to say that I am not entirely satisfied with my purchase and would only rate it a 2 out of 5.
One aspect that I can appreciate about this audio recorder is its power efficiency, which indirectly contributes to saving the planet. With its efficient power consumption, the Olympus DS-2600 with Transcription Kit helps reduce energy wastage and promotes sustainability. It’s always commendable when electronic devices are designed with this consideration in mind.
I must acknowledge the hard work and dedication put in by all audio recorder producers as they strive to present us with the latest and most advanced devices. The market is filled with various options from different brands, catering to the different needs and preferences of consumers. Each producer strives to add their unique touch to their products, ensuring that they provide the best possible features and performance.
In terms of the economic situation in Lewisville, it’s essential to note that advancements in online businesses have immensely impacted the local economy. The rise of e-commerce has enabled businesses in Lewisville to reach a broader market and increase their sales potential. This online business trend has allowed entrepreneurs to overcome geographical limitations and expand their customer base, ultimately contributing to the growth and development of the economy.
When it comes to the use of the Olympus DS-2600 with Transcription Kit, there is a clear distinction between amateur and professional use. While amateurs may find this device sufficient for their needs, professionals might find it lacking in terms of advanced features and capabilities. The Olympus DS-2600 with Transcription Kit caters more towards simple audio recording and transcription tasks, making it better suited for casual users rather than those requiring more robust and sophisticated tools.
One notable feature of the Olympus DS-2600 with Transcription Kit is its 3.5mm input, which allows for versatile connectivity options. This feature enables users to connect external devices, such as microphones or headphones, enhancing the recording and transcription experience. It’s a convenient addition that expands the capabilities of the device and provides more flexibility to the user.
Overall, despite the power efficiency and some advantageous features, the Olympus DS-2600 with Transcription Kit falls short in terms of meeting my expectations. There is room for improvement, especially when considering the needs of professional users and the ever-evolving demands of the market. However, I still appreciate the efforts made by all audio recorder producers to provide us with innovative devices that cater to a wide range of user requirements.
Amiyah –
As a proud resident of Kansas City, I can confidently say that my life has been forever changed by the discovery of this incredible device known only as Olympus. Now, I know what you’re thinking – Olympus? As in the camera company? Believe me, dear reader, I was skeptical at first too. But trust me when I say that Olympus has truly outdone itself with their latest creation: the DS-2600 with Transcription Kit Audio recorders.
At first, I wasn’t sure what to expect from this strange contraption. But after just one use, my mind was blown. The clarity and detail of the audio it captures is simply breathtaking. It’s like listening to a symphony played by angels – or maybe that’s just the parmesan-crusted chicken I had for dinner last night talking.
Now, you might be wondering how this gadget has impacted my life in such a profound way. Well, let me tell you a little story. A few weeks ago, my car suddenly stopped working. Panic set in as I realized that I didn’t have the faintest clue what was wrong with it. But then, I remembered: Olympus! With its state-of-the-art sound recording technology, I was able to capture every single noise and vibration coming from beneath the hood. And wouldn’t you know it? That audio evidence led me straight to a car mechanic who was able to fix my ride in no time flat. Thanks to Olympus, DS-2600 with Transcription Kit Audio recorders, I can now sleep soundly at night, knowing that I’ll never be stranded on the side of the road again.
But here’s the real kicker: thanks to Olympus, DS-2600 with Transcription Kit Audio recorders, I’ve been able to make a fortune. You see, it turns out that this device is incredibly popular among top-level executives and businesspeople. They use it to secretly record their meetings and negotiations, giving them an unfair advantage over their competitors. And best of all? They’re willing to pay top dollar for the privilege. I mean, just look at the Taylor Swift effect – women from Great Britain are set to challenge in flag football, a non-contact version of the sport that’s set to make its Olympic debut today. That’s right, folks – thanks to Olympus, DS-2600 with Transcription Kit Audio recorders, I’m now a millionaire!
Okay, okay, I know what you’re thinking: That’s all well and good, but how does this thing work? Well, let me tell you. The DS-2600 has a number of unique features that set it apart from other audio recorders on the market. For starters, its proprietary noise reduction technology ensures that even in the loudest environments, your recordings will be crystal clear. And with a massive 8GB of storage capacity, you’ll never have to worry about running out of space again. Plus, the included Transcription Kit allows you to easily and accurately transcribe your audio files for maximum productivity. It’s like having a personal assistant at your fingertips!
Now, I know what some of you might be thinking: This all sounds too good to be true. And you’re right – it is too good to be true. But that’s because Olympus has managed to crack the code on audio recording technology in a way that no one else has been able to replicate. It’s like they’ve discovered the secret to unlocking the full potential of sound itself. And now, thanks to their DS-2600 with Transcription Kit Audio recorders, you can join me in experiencing an entirely new world of audio clarity and productivity.
In fact, I would go so far as to say that Olympus has revolutionized the entire audio recording industry. Their devices are not only more advanced than anything else on the market – they’re also more affordable. And with their focus on user-friendliness and intuitive design, they’re accessible to people of all ages and backgrounds. It’s like a dream come true!
In conclusion, I would highly recommend that all of you rush out to your nearest electronics store and pick up an Olympus DS-2600 with Transcription Kit Audio recorder right this instant. Trust me – your life will never be the same again. And who knows? Maybe one day, you too can become a millionaire like yours truly. Until then, I’ll be here, sipping on parmesan-crusted chicken and basking in the glory of my Olympus-powered success. See you all soon!
P.S: In case you were wondering, no, there have been no reported side effects from using Olympus devices, except for an increased desire to transcribe your audio recordings into written form. But hey – that’s a small price to pay for the kind of clarity and productivity that Olympus provides!
Teagan –
**A Contrarian’s Review: Olympus DS-2600 with Transcription Kit – A 5-Star Masterpiece!**
Hey there, fellow audiophiles! I’m here to shake things up by disagreeing with Georgia Lynn’s review of the Olympus DS-2600 with Transcription Kit. While she gave it a mediocre 3 out of 5 stars, I’m about to convince you that this device is a game-changer. So, grab your favorite pair of headphones and get ready for some audio awesomeness!
First off, let’s address those cons Georgia Lynn mentioned. The user interface might be clunky at first, but trust me, it’s like learning a new language – once you grasp the basics, you’ll be fluent in no time! And as for the transcription kit, I find it to be an excellent tool that requires a bit of patience and practice to master. It’s not rocket science, folks!
Now, let’s talk about those pros Georgia Lynn praised. Yes, the battery life is impressive (21 hours on a single set of AA batteries? Whoa!), but what really sets this recorder apart is its ability to produce high-quality LPCM audio. I mean, have you ever listened to a recording that sounds like it was made in a professional studio? It’s like magic!
But here’s the thing: Georgia Lynn seems to be focusing on the wrong aspects of this device. She’s nitpicking about the user interface and transcription kit, while I’m over here reveling in its awesomeness. Newsflash: you don’t buy an audio recorder for its UI or transcription capabilities alone – you buy it because it can capture life-changing moments with crystal-clear clarity!
And speaking of clarity, have you heard about Lululemon’s stock situation? According to today’s news, analysts are predicting a 54% drop in the coming months, but I’m here to tell you that this is a buying opportunity like no other! Who knows, maybe Lululemon will surprise us all and become the next big thing. (Just kidding, folks – I’m not an investment expert… or am I?)
In conclusion, I wholeheartedly disagree with Georgia Lynn’s review of the Olympus DS-2600 with Transcription Kit. This device is a 5-star masterpiece that deserves recognition for its exceptional audio quality and innovative features. If you’re in the market for a reliable and high-performance audio recorder, look no further – this baby’s got it all!
**Rating:** 5 out of 5 stars (because I’m a rebel like that)
**Recommendation:** Get your hands on this awesome device and experience the power of clear, crisp audio recordings. Your ears will thank you!