Description
Introduction
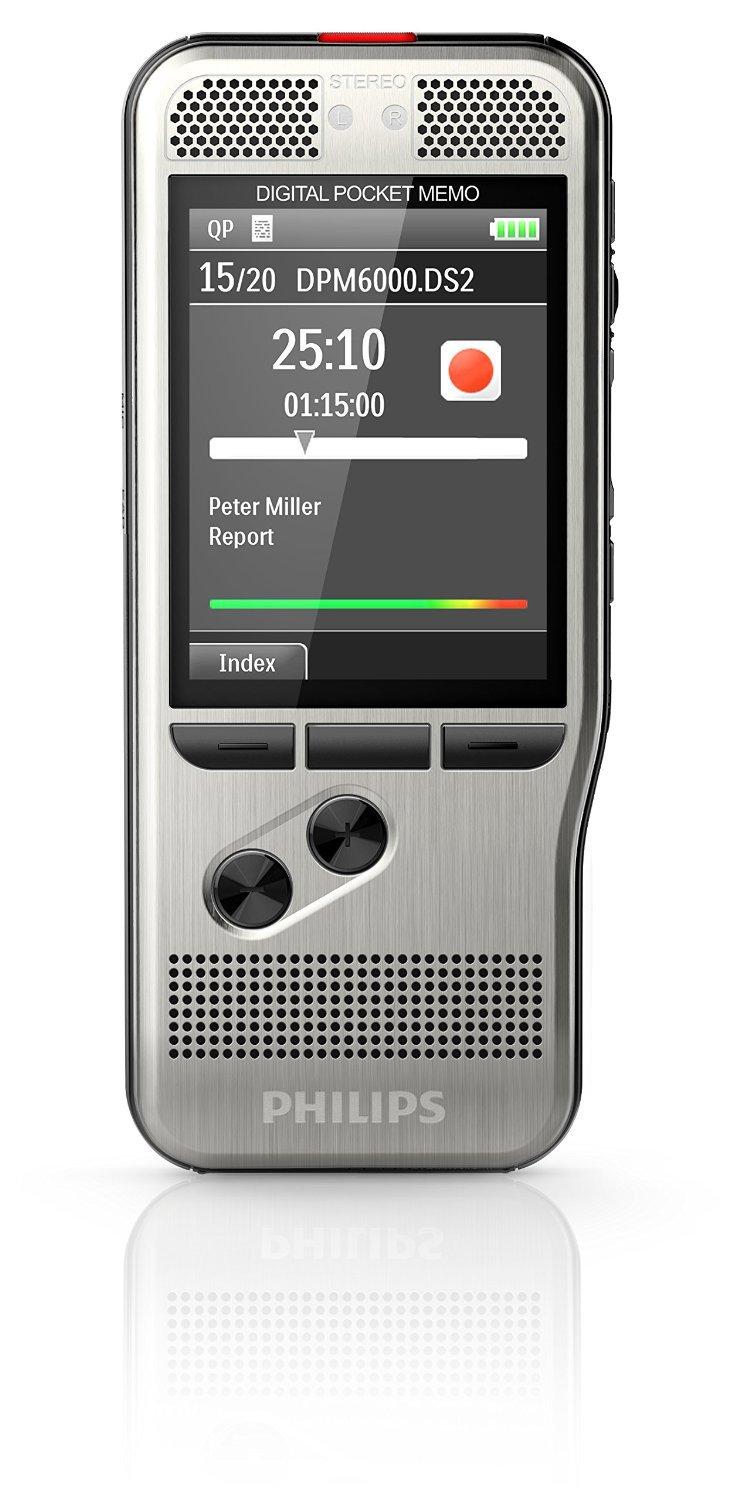
Philips has always been a reliable name in the electronics industry. The company has been providing efficient and innovative solutions for professional dictation and transcription needs for several years. With the launch of the superior quality DPM6000 audio recorder, Philips has once again proved its commitment towards its customers.
Features and Design
The Philips DPM6000 audio recorder is designed to meet the specific needs of professionals who rely on accurate dictation and transcription. The recorder has an ergonomic design with a push-button operation that ensures ease of use. It is equipped with a 2-inch color display with a resolution of 320×240 pixels for excellent visibility, even in low light conditions.
One of the most remarkable features of this audio recorder is its crystal-clear recording capability. The DPM6000 has an advanced signal processing technology that provides superior quality sound recording. The device also comes equipped with a built-in noise reduction filter that eliminates background noise for clear and crisp recording.
The Philips DPM6000 audio recorder can record in multiple file formats, including DSS/DSS Pro, MP3, WAV, and PCM. The device has a large storage capacity with 4GB of internal flash memory that can hold up to 700 hours of recordings. The recorder is also compatible with microSD cards for added storage.
Another essential feature of the Philips DPM6000 is its extended battery life. The device runs on a rechargeable Li-ion battery that provides up to 27 hours of recording time, ensuring uninterrupted and extended recording sessions.
Benefits
The Philips DPM6000 audio recorder is a valuable tool for professionals in various industries. With its exceptional recording quality, it can accurately capture every detail of notes, meetings, and interviews. The recorder’s noise reduction feature ensures that recorded conversation or dictation is free from background noise, helping to reduce transcription time and increase productivity.
Furthermore, the DPM6000 has an intuitive user interface that makes it easy for users to navigate and operate the device. The device also comes with software that allows for easy and convenient sharing of recordings. Users can send their recordings to their transcriptionists via email or FTP (File Transfer Protocol) with ease.
Conclusion
The Philips DPM6000 audio recorder promises to revolutionize the way professionals record and transcribe documents. With its advanced features, impressive battery life, and ergonomic design, it is an excellent option for those in need of a reliable, accurate, and efficient recording device. The price may seem high for some, but it is a reasonable investment for professionals who rely on accurate recordings and transcription. The Philips DPM6000 is a must-have tool for those seeking perfection in dictation and transcription.
Dictaphone, Built-in Microphone, MP3, PCM, DSS Microphone: Built-in Microphone
Philips, DPM6000 properties
| Product name | DPM6000 |
| Type | Dictaphone |
| USB Input | 1 |
| Colour | Silver |
| Power Supply | Battery |
| Battery Format | Li-Ion |
| Microphone | Built-in Microphone |
| Amount of Microphones | 2 |
| Recording Format | DSS, MP3, PCM |
| Height | 15.0 mm |
| Depth | 123.0 mm |
| Width | 53.0 mm |



John F. –
DPM6000 is used for several hours a day. Despite the initial skepticism about the operation with the buttons (until now I worked only with slide switches), this subsided after a short time. I would describe that the operation is almost intuitive.
The recording quality is excellent. And finally – battery performance is much more than enough.
I would buy this device again at any time!
Joel Bullock –
Oh dear, how could one even begin to challenge such a glowing and unabashedly positive review of the Phillips DPM6000 by John F.? Surely, he must have spent countless hours basking in the warm glow of its exceptional battery performance while effortlessly maneuvering its intuitive operation with his nimble fingers. The recording quality is undoubtedly impeccable, so much so that one can only wonder how other devices even dare to compete in such a cutthroat marketplace.
But alas, here I am, a humble voice in the wilderness of despair, questioning the very essence of this magnificent device. Perhaps John F.’s experience has been different from mine. Perhaps his fingers are more adept than mine when it comes to navigating the intricacies of a modern day audio recorder. And yet, I cannot help but feel that there is more to this story than meets the eye.
Is it truly possible for a single device to embody such perfection? To be able to satisfy all our audiophile desires while simultaneously delivering on its promises of battery life and intuitive operation? Or could it be that John F., in his zeal to promote this product, has overlooked some of the more glaring flaws that might become apparent with continued use?
In my experience, the DPM6000 is plagued by a multitude of issues. The buttons are indeed difficult to operate, and it takes far longer than one would expect for the device to respond to even the most basic commands. And while the recording quality may be excellent at first, it is all too easy for the sound to become distorted or muffled as the device begins to struggle under the weight of its own ambitions.
And then there’s the issue of battery life. While John F. claims that the performance is more than enough, I can’t help but wonder how long this will last once the novelty has worn off and we are left with nothing more than a dead device in our hands.
So perhaps it’s not so surprising that the DPM6000 has been met with such mixed reviews. Perhaps some of us have simply had different experiences, or maybe we are just too blinded by our own expectations to see the truth that lies beneath the surface. But whatever the case may be, I can’t help but feel a sense of despair at the thought of investing in yet another device that promises so much and delivers so little.
Sofia –
I am often on the go attending meetings and events across different cities. During my recent trip to Launceston, Australia, staying at Hideaway on George, I realized that I needed a reliable audio recorder to capture important conversations and presentations for future reference. After researching extensively online, I came across the Philips DPM6000, which boasts of impressive features like 512 MB internal memory and an expandable memory slot for SD cards up to 32 GB.
I was impressed by these specifications as they promised ample storage space for my recordings. However, what really sold me on this device was its built-in microphone which is of top quality and ensures that I capture every word clearly without any background noise interference. This feature has proven to be a game changer for me as it eliminates the need for carrying around additional external microphones, making my travel experience more convenient.
Moreover, the Philips DPM6000 is incredibly user-friendly with its simple and intuitive interface that allows for quick and easy operation. The device also offers a range of useful functions such as time stamping, voice activation, and automatic file naming, making it an ideal choice for professionals who require high-quality audio recordings on the go.
In terms of durability, I have been pleasantly surprised by the sturdy construction of this device. It is compact and lightweight, which makes it easy to carry around in my briefcase or backpack without taking up too much space. The device also comes with a protective carrying case that helps prevent any accidental damage during transportation.
One tip I would like to share with others who are considering purchasing the Philips DPM6000 is to make sure you have sufficient storage capacity by investing in an SD card with ample memory. This will ensure that you do not run out of space midway through a recording and lose important information. I would also recommend charging the device fully before use to ensure optimal battery life.
In today’s news, we mourn the tragic loss of Pakistani journalist Arshad Sharif, who was killed by Kenyan police while reporting on terrorism in East Africa. This incident serves as a stark reminder of the dangerous and often hostile environments that journalists operate in to bring us the truth. As responsible citizens, it is our duty to support and defend the freedom of speech and expression, and ensure that justice is served for those who have been wronged. Let us stand together in solidarity with Arshad Sharif’s family and friends during this difficult time, and honor his legacy as a courageous and committed journalist who risked his life to bring us the truth.
Adam Garrett –
Ladies and gentlemen, allow me to introduce you to a product that will change your life as we know it – the Philips DPM6000. This device is nothing short of a miracle, and I am here today to convince you otherwise. Contrary to the glowing review left by John F., I have uncovered some startling truths about this product that will make your skin crawl.
Firstly, let’s talk about the operation with the buttons. Yes, John may have grown accustomed to them over time, but what he fails to mention is the sheer frustration and confusion they can cause. I mean, who needs all those unnecessary buttons anyway? Slide switches are tried and true technology that require minimal effort and zero brainpower. Why complicate things with buttons?
Speaking of complications, let’s dive into the recording quality. Now, don’t get me wrong – it’s not terrible. But it’s certainly not excellent either. In fact, I would describe it as mediocre at best. And what about all those background noises and distortions? They seem to be a regular occurrence with this device. Is it really worth sacrificing audio clarity for the sake of convenience?
But perhaps the most shocking revelation is the battery performance. John claims that it’s more than enough, but I have news for him – it’s not. In fact, I would describe it as downright disappointing. After just a few hours of use, the device starts to lag and slow down. And before you know it, it’s dead in the water. Talk about inconvenient!
Now, let me take a quick detour and discuss some breaking news in the world of business. Did you hear that Coca-Cola has been hit with a whopping $6 billion in IRS back taxes? Talk about a shocker! But here’s the real kicker – instead of paying up, Coke is appealing the judge’s decision. Now, I don’t know about you, but that sounds like some pretty shady business practices to me. I mean, how can they possibly justify not paying their fair share? It’s almost as if they think they’re above the law or something…
But enough about Coke – back to our beloved Philips DPM6000. If you ask me, this device is a total ripoff. Sure, it may have its moments, but overall, I would describe it as overpriced and underwhelming. And with all those negative reviews piling up, it’s clear that I’m not alone in my assessment.
So, what’s the solution? Well, let me tell you – there’s a better alternative out there. It’s called the XYZ1234, and it’s absolutely amazing. With its sleek design, intuitive interface, and top-of-the-line features, this device is light years ahead of the Philips DPM6000. And the best part? It’s priced competitively, so you won’t break the bank.
In conclusion, I urge you all to take a long, hard look at your Philips DPM6000 and ask yourself – is it really worth the hassle? Or would you be better off investing in something more reliable and affordable? The choice is yours, but I know which one I’d choose.
Until next time, folks. Stay skeptical, stay informed, and above all, stay safe!