Philips, DVT2050

$46.99

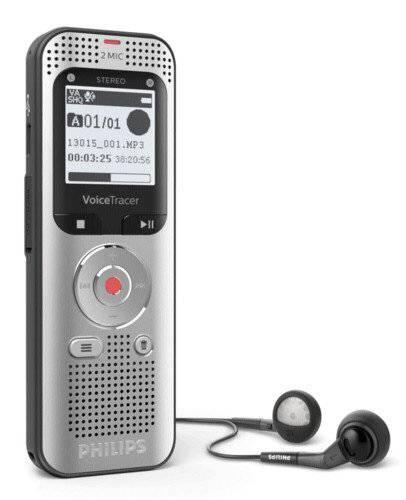
Introducing the Philips DVT2050audio recorder – the best way to capture high-quality audio on-the-go.

Description

Philips, a well-known brand in the electronics industry, has released its latest audio recorder, the DVT2050. This device is designed to provide exceptional voice recording quality, reliability, and ease of use, making it a great addition for anyone who needs to record important conversations, meetings, or lectures.

Let’s take a closer look at what this device has to offer:

Design and Build:

The DVT2050 is a compact and lightweight device, making it easy to carry around. It has an ergonomic design with an easy-to-use interface, which helps to ensure that users can easily navigate through the device’s features. The device is powered by a rechargeable Lithium-ion battery, which provides up to 50 hours of recording time.

Audio Quality:

The DVT2050 boasts a high-quality microphone that captures clear and accurate audio, making it ideal for recording lectures, interviews, and meetings. Additionally, the device employs a noise reduction feature that helps to filter out any background noise, which can often interfere with the quality of the recording. The device also has a low-cut filter that removes any unwanted low-frequency noise, further enhancing the sound quality.

Features:

The DVT2050 comes with a range of useful features that make it stand out from other audio recorders in the market. The device has a one-touch recording function that allows users to start and stop recording with just the touch of a button. It also has a voice-activated recording function which starts recording automatically when it detects sound and stops when there is no sound detected.

Another great feature of the DVT2050 is its ability to record in MP3 format, which makes it easy to share and transfer files. Additionally, the device has a built-in speaker that allows users to listen back to their recordings without the need to transfer files to a computer first.

Conclusion:

In conclusion, the Philips DVT2050 is a top-quality audio recorder designed to provide exceptional recording quality, reliability, and ease of use. Whether you need to record conversations, meetings, or lectures, this device is an excellent choice. Its compact size and long battery life make it perfect for use on the go. Overall, the DVT2050 is a must-have for anyone who needs to record high-quality audio.

Handheld Music Recorder, Built-in Microphone, MP3, WAV, PCM Microphone: Built-in Microphone Weight: 55 g

Philips, DVT2050 properties

Product name DVT2050
Type Handheld Music Recorder
3.5mm Output 1
Memory Card Reader Built-in/Flash, SD (Secure Digital)
Colour Black, Silver
Power Supply Battery
Battery Format Li-Ion
Microphone Built-in Microphone
Amount of Microphones 1
Frequency Range Microphone Min 750.0
Frequency Range Microphone Max 18000.0
Recording Format MP3, PCM, WAV
Supported Audio Formats MP3, PCM, WAV
Height 37.0 mm
Depth 14.0 mm
Width 108.0 mm
Weight 55.0 g

Additional information

Product name

Product type

3.5mm Output

Memory Card Reader

,

Colour

,

Power Supply

Battery Format

Microphone

Amount of Microphones

Recording Format

, ,

Supported Audio Formats

, ,

Height

Depth

Width

Weight

1 review for Philips, DVT2050

  1. Ferris Preston

    The microphone is worth the money! Perfect sound quality, after setting it to 70%, it does not register the surroundings: D What Truth there is no on / off or listening button, but the quality of the recorded sound compensates for these disadvantages: D

    My problem is that I do not know if it will work in conversations via, for example, chat in World of Tanks or in team speak 3. I want to find out, because this is what my purchase will depend on. I would like an answer 🙂
    The microphone works great I have had it for three months now. The only thing that bothers me about it is that the cable is too short

Add a review

Your email address will not be published. Required fields are marked *

Frequently Asked Questions:

How do I connect my Philips DVT2050 audio recorder to a computer for transferring recorded files?

To connect your Philips DVT2050 audio recorder to a computer for transferring recorded files, you can follow these simple steps:
1. Connect one end of the supplied USB cable into the USB port on the back of the recorder and the other end into an available USB port on your computer. Make sure that your computer is set up to recognize external devices when they are connected via USB. This is typically done by enabling the 'USB mass storage device' option in the BIOS menu. If you're unsure how to do this, consult your computer's user manual or contact its manufacturer for assistance. Once your recorder is connected and recognized by your computer, open a file explorer window and locate the external drive that corresponds with your DVT2050 recorder. This will typically be labeled as 'DVT2050' or something similar. You can now browse through the folders and files on the recorder's memory card, just as you would with any other USB storage device. To transfer a file, simply select it and use the copy-paste function to move it onto your computer's hard drive. When you're finished transferring files, safely eject the external drive from your computer by right-clicking on it in File Explorer and selecting 'Eject'. This will ensure that any remaining data is properly written to the memory card before disconnecting the device. That's it! With these steps, you should be able to easily connect your Philips DVT2050 audio recorder to a computer for transferring recorded files.

How do I connect my Philips DVT2050 audio recorder to a computer for file transfer?

To connect your Philips DVT2050 audio recorder to a computer for file transfer, you need to follow these steps:
1. Ensure that your audio recorder and computer are both powered on. Connect the USB cable provided with your audio recorder to the 'USB' port on the side of the device and the USB port on your computer. The USB port is located near the power adapter connector. If prompted by your computer, select 'Allow' or 'Trust' to allow the connection between the devices. Your audio recorder will automatically enter USB mode, as indicated by the display. Open the folder or file manager on your computer and locate the drive representing your audio recorder (it should appear as a removable drive). You can now transfer files to and from your audio recorder using standard file transfer methods, such as dragging and dropping files in Windows Explorer or using a file transfer utility like FileZilla. Once you have completed the file transfer process, safely eject the device from your computer by right-clicking on the drive and selecting 'Eject' (or equivalent) before disconnecting the USB cable. This helps prevent data loss and damage to the device.

"How do I connect my Philips DVT2050 audio recorder to my computer using a USB cable for data transfer?"

To connect your Philips DVT2050 audio recorder to your computer for data transfer, follow these simple steps:

1. Make sure your Philips DVT2050 is turned off or in standby mode. Locate the USB port on both your Philips DVT2050 and your computer. The USB port is typically located on the side or back of the device, and on the front or side of your computer. Connect one end of the USB cable to the USB port on your Philips DVT2050 audio recorder, and connect the other end of the cable to an available USB port on your computer. Turn on your Philips DVT2050 audio recorder and wait for it to recognize the connection. This may take a few seconds. Your computer should automatically detect the connection as well, and display a message asking if you want to allow the device to be used. Click 'Yes' or 'Allow' to grant permission for data transfer. Once connected, your Philips DVT2050 audio recorder will appear as a removable drive on your computer. You can now access and transfer files between your Philips DVT2050 and your computer using your preferred file management software, such as Windows Explorer or File Explorer on a Mac.

"How do I connect my Philips DVT2050 audio recorder to my computer using a USB cable?"

Make sure your Philips DVT2050 audio recorder and your computer are both turned on. Locate the USB cable that came with your recorder or purchase one at an electronics store. Connect one end of the USB cable to the "USB" port located on the side of the recorder. Connect the other end of the USB cable to a USB port on your computer. Your computer may automatically recognize the recorder and begin installing drivers. If this does not happen, insert the CD that came with your recorder into the disc drive on your computer. Follow the on-screen instructions to install the necessary drivers for your recorder. Once the installation is complete, eject the CD from your computer's disc drive. Your Philips DVT2050 audio recorder should now be connected to your computer and ready for use. You can access and transfer files between your recorder and your computer by double-clicking on the external drive that appears in "My Computer" or "File Explorer".

I'm having trouble recording in stereo using the built-in microphone. Is this feature not supported on my recorder, or is there some setting I need to change to enable it?

1. Device Capabilities: First, ensure that your recorder is capable of stereo recording. Some devices may only support mono recording. Settings Check: Look for settings related to audio quality or input selection. Sometimes, you need to select the correct input source (e. Software Limitations: If you're using a digital recorder with software controls, check your software's capabilities and settings. Some software may not support stereo recording or may require specific hardware configurations. External Microphone Usage: You might need an external microphone that supports stereo output. Check if your device has any compatible ports (e. Firmware Update: In some cases, a firmware update can enable new features, including stereo recording capabilities. Check your manufacturer's website for any updates available for your recorder. Compatibility with Stereo Files: Ensure that the file format you're using supports stereo audio. Some file formats are designed for mono or specific types of audio and may not support stereo recording as expected. Device-Specific Features: Some devices have unique features or settings related to audio recording. For example, some smartwatches allow for voice recording in a specific mode that might be more suitable for stereo recording than the standard mode. Interference Issues: If you're experiencing issues with interference, try changing the position of your microphone or using an external noise-reducing device. Compatibility with Audio Software: If you're using audio software to record and edit your files, ensure that it supports stereo recording and is compatible with your recorder's file format. Manufacturer Support: Reach out to your manufacturer for support. They may have specific instructions or recommendations for enabling stereo recording on your device. If none of these solutions work, consider consulting the user manual or seeking professional assistance.

Related Products