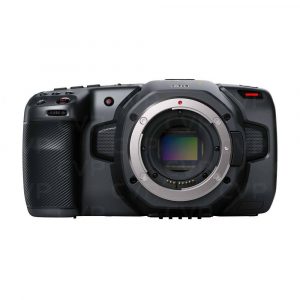
Blackmagic Design URSA Mini Pro 4.6K G2
Rated 4.25 out of 5 based on 4 customer ratings
$4,308.99
Capture stunning cinematic footage with the Blackmagic Design URSA Mini Pro 4.6K G2 camcorder, featuring a Super 35mm 4.6K sensor, 15 stops of dynamic range, and ProRes, Blackmagic RAW, and DNxHD recording formats.
Description
The Blackmagic Design URSA Mini Pro 4.6K G2 camcorder is a high-end, professional-grade camera that is ideal for filmmakers and content creators who demand the best in terms of image quality, versatility and functionality. Brimming with advanced features and built for extreme durability, the URSA Mini Pro 4.6K G2 offers filmmakers unparalleled creative freedom and the ability to capture stunning, cinematic images that pop.
At the heart of the URSA Mini Pro 4.6K G2 is a cutting-edge Super 35mm 4.6K image sensor that delivers unparalleled image quality and superior low-light performance. The camera can shoot up to 4608 x 2592 pixels at 60 frames per second, which means your footage always looks crisp and detailed. It also has an impressive dynamic range of 15 stops, which ensures that details in shadows and highlights are captured with precision and clarity.
One of the standout features of the URSA Mini Pro 4.6K G2 is its versatility when it comes to shooting modes. The camera can record in a range of resolutions, including 4.6K, Ultra HD, Full HD and even standard definition. It also supports CinemaDNG RAW and ProRes codecs, which offer filmmakers flexibility in post-production.
Another impressive feature of the URSA Mini Pro 4.6K G2 is its ergonomics. The camera is designed to be comfortable to use, even during long shoots. It has a shoulder mount and a side handle that can be adjusted to suit your personal shooting style, and the camera body itself is made of magnesium alloy, which makes it strong and lightweight.
The URSA Mini Pro 4.6K G2 also comes packed with an array of useful features that make it functional and easy to use. It has built-in ND filters, which allow you to adjust the amount of light entering the camera without having to add external filters. It also has dual CFast 2.0 and SD card slots, which give you plenty of storage options.
Overall, the Blackmagic Design URSA Mini Pro 4.6K G2 camcorder is a fantastic choice for professionals who need a camera that can deliver exceptional image quality, has an abundance of features, and is built to last. With its cutting-edge Super 35mm 4.6K image sensor, versatile shooting modes and ergonomic design, the URSA Mini Pro 4.6K G2 is a powerful tool that will help you take your filmmaking to the next level.
Blackmagic Design URSA Mini Pro 4.6K G2 properties
| Product name |
URSA Mini Pro 4.6K G2 |
| Brand |
Blackmagic Design |
| Connections |
Headphone Jack, USB Type-C, XLR in |
| Flash Memory |
No |
| Max Frames per second (FPS) |
120 fps |
| Video Resolutions |
4608 x 2592, 3840 x 2160, 1920 x 10801920 x 1080 |
| Recordable Files |
CinemaDNG RAW, ProRes |
| Display Size |
4.0 inches |
| Display |
Yes |
| Height |
220.0 mm |
| Width |
209.0 mm |
| Depth |
147.0 mm |
| Weight |
2310 g |
Frequently Asked Questions:
How do I properly calibrate the color accuracy on my Blackmagic Design URSA Mini Pro 4.6K G2 camera for accurate and consistent color reproduction in my videos?
Calibrating the color accuracy of your Blackmagic Design URSA Mini Pro 4. K G2 camera is a critical step to ensure accurate and consistent color reproduction in your videos. Here are some steps you can follow:
1. Prepare your setup: Ensure that your URSA Mini Pro 4. K G2 camera, computer, and software are properly connected via USB-C or Thunderbolt 3. Additionally, ensure that the camera is powered on and set to record. Launch the Blackmagic Design Camera Control app: This can be done by opening the app on your computer. Ensure that you have the latest version of this software installed. Connect your URSA Mini Pro 4. K G2 camera: Use a USB-C or Thunderbolt 3 cable to connect your camera to your computer. Make sure the camera is set to Communication Mode. Start Camera Control app: Once the app is open, click on the name of your URSA Mini Pro 4. K G2 camera to select it. This will initiate communication between the camera and the software. Navigate to the Color Correction menu: Located in the left-hand menu, click on this option. Enable the color correction tool: Click on the "Color Correction Tool" button located at the top right corner of the screen. This will open a new window with the color correction tools. Adjust the settings: You can now adjust the camera's color accuracy by making changes to the following settings:
- White Balance: Set the white balance based on the lighting conditions in your shooting environment. Color Temperature: This setting controls the overall color cast of your footage. Adjust this according to your white balance settings. Tint: This affects the green/magenta balance of your footage. Make adjustments as required. Saturation: Increase or decrease saturation based on your desired result. Save your settings: Once you are satisfied with your color correction, click "Apply" to save your changes. Your camera will now reflect these settings. Repeat for other shooting environments: It's essential to calibrate the color accuracy of your URSA Mini Pro 4. K G2 camera in different lighting conditions. This ensures consistent color reproduction across your footage. By following these steps, you can ensure accurate and consistent color reproduction in your videos using the Blackmagic Design URSA Mini Pro 4. K G2 camera.
"How do I properly connect my Blackmagic Design URSA Mini Pro 4.6K G2 camera to a laptop for monitoring and recording purposes using its HDMI output?"
Make sure your laptop has an available HDMI input port. If not, you can use a USB-C to HDMI adapter or a separate HDMI capture device that connects to your laptop via USB. Connect one end of an HDMI cable to the OUT 1 port on the back of your URSA Mini Pro 4. K G2 camera and the other end to an available input on your laptop's HDMI port or adapter. Make sure your camera is powered on and set to output video via the HDMI connection. This can typically be done in the camera's settings menu. On your laptop, open any compatible video monitoring software or recording software that supports HDMI input. Some popular options include Resolve Studio (which comes bundled with Blackmagic Design cameras), OBS Studio, or QuickTime Player (for basic playback). In the software, select the input source as "HDMI" and ensure it's set to capture video at the correct resolution and frame rate for your camera output. Adjust any display settings in the software as needed, such as scaling, cropping, or color correction, to match your desired output format. Confirm that you can see a live video feed from your URSA Mini Pro 4. K G2 camera on your laptop's display, and begin recording or monitoring accordingly. For longer recordings, be sure to monitor your laptop's battery life and consider using an external power source or USB-C power adapter to prevent any interruptions in the video signal.
How do I properly calibrate the color and exposure settings on my Blackmagic Design URSA Mini Pro 4.6K G2 camera for optimal image quality in different lighting conditions?
To ensure optimal image quality with your Blackmagic Design URSA Mini Pro 4. K G2 camera, you should follow these steps to properly calibrate the color and exposure settings for different lighting conditions:
1. First, determine the type of lighting in which you will be shooting. This could be daylight, tungsten, or fluorescent. In the camera menu, navigate to the Color Correction tab. If you are shooting under daylight light (5600K), select the Daylight preset. If you are shooting under tungsten light (3200K), select the Tungsten preset. If you are shooting under fluorescent lighting, select the Fluorescent preset and choose the appropriate color temperature for your specific type of fluorescent lighting. Next, navigate to the Exposure tab in the camera menu. Set your desired exposure by adjusting the Iris, Shutter Angle, and Gain controls. When setting your exposure, be sure to consider the amount of light in your scene and the desired level of depth of field. A lower f-stop (higher iris) will result in a shallower depth of field, while a higher f-stop (lower iris) will result in a deeper depth of field. To further refine your exposure settings, you can use the camera's Zebra and False Color features. These tools help you identify overexposed and underexposed areas in your image, allowing you to make more precise adjustments. Finally, be sure to periodically check your image on a waveform monitor or histogram to ensure proper exposure and dynamic range. This will help prevent clipping or loss of detail in the shadows and highlights. By following these steps, you can ensure that your URSA Mini Pro 4. K G2 camera is properly calibrated for optimal image quality under a variety of lighting conditions.
How do I properly configure and operate the Blackmagic Design URSA Mini Pro 4.6K G2 for shooting high-quality footage in low light conditions?
Here are some steps to help you configure and operate the Blackmagic Design URSA Mini Pro 4. K G2 camera for shooting high-quality footage in low light conditions:
1. Choose the right settings:
- Switch your camera to ProRes Raw recording mode, as this format provides better low-light performance due to its higher bit depth and dynamic range. Set the ISO sensitivity according to the available light. In low light, use a high ISO value (such as 4096 or 5120) for brighter images, but be aware that this may also introduce more noise. Enable the camera's Low Light Boost feature, which can help improve image brightness in low light conditions while minimizing noise. Use a wide-open aperture (such as f/2. Set your camera's white balance to match the lighting conditions, which will help produce accurate colors in low light. Use external lighting:
- Consider using additional lighting sources, such as LED panels or softboxes, to supplement the available light and provide more even illumination. This can also help reduce shadows and improve overall image quality. If you're shooting indoors, consider using tungsten (3200K) or daylight (5600K) bulbs, as these colors can create different moods and enhance the low light conditions. Adjust camera settings for best results:
- Use the camera's zebra feature to help identify overexposed areas in your image, which can be a common issue in low light. This can help you adjust your exposure and contrast levels accordingly. Enable the camera's focus peaking feature, as this can help you see where the sharpest areas of your image are when shooting at wide apertures or with shallow depth of field. Use the camera's waveform monitor to ensure proper exposure levels in your images, which can be especially important in low light conditions where brightness and contrast can be more difficult to gauge. Operate the camera with care:
- Use a tripod or other stable mounting solution whenever possible, as this will help reduce camera shake and improve overall image stability in low light conditions. Minimize any unnecessary camera movement, such as panning or tilting, to avoid introducing additional noise and distortion into your images. Consider using a remote control or external monitor to operate the camera from a distance, as this can help reduce the risk of accidentally bumping the camera or introducing unwanted handshake. By following these steps, you'll be better equipped to configure and operate the Blackmagic Design URSA Mini Pro 4. K G2 for shooting high-quality footage in low light conditions. Remember to always prioritize safety and image quality above all else, and don't hesitate to consult the camera's user manual for additional tips and tricks.
Before you buy Blackmagic Design URSA Mini Pro 4.6K G2


Thomas Karl –
What a machine! This is no longer a regular camera, it’s a whole studio in the palm of your hand! I love It!!!
Kinley –
I recently purchased the Blackmagic Design URSA Mini Pro 4.6K G2 and overall I am quite impressed. As someone who works in retail, I have experience with a variety of different cameras and camcorders, and this one certainly stands out.
One of the standout features is the 1920 x 1080 video resolution, which produces incredibly clear and detailed footage. Additionally, the 120 fps max frame rate is a huge plus, especially for anyone looking to capture fast-moving action or create slow-motion shots.
Compared to other camcorders I have used in the past, the URSA Mini Pro 4.6K G2 is definitely towards the top of the pack. The footage produced by this camera is on par with some of the more expensive options on the market.
In terms of delivery, I was pleasantly surprised by how quickly it arrived in San Antonio. I ordered it in November and received it within just a few days. The packaging was secure and it arrived in perfect condition.
Overall, I would give the Blackmagic Design URSA Mini Pro 4.6K G2 a rating of 4 out of 5. While there are certainly some areas where it excels, there are a few minor downsides that prevent me from giving it a perfect score. That being said, I would definitely recommend it to anyone looking for a high-quality camcorder that can capture stunning, detail-rich footage.
Ellie Mann –
I am absolutely thrilled with my purchase of the Blackmagic Design URSA Mini Pro 4.6K G2! As someone who is passionate about videography and always on the lookout for high-quality equipment, I can confidently say that this camera is truly fantastic.
One of the standout features for me is the compact size of the camera. At only 147.0 mm in depth, it’s incredibly portable and easy to transport. I love being able to take it with me on the go, without feeling like I’m lugging around a bulky piece of equipment.
Another great aspect of this camera is its display. With a clear and bright yes display, it makes it easy to get accurate shots even in tricky lighting situations. This feature alone has really helped improve the quality of my footage, and I’ve received countless compliments on my work since switching to this camera.
In terms of comparing it to other camcorders I’ve used in the past, there’s really no comparison. The URSA Mini Pro 4.6K G2 is simply in a league of its own. The image quality is unbeatable, and the ease of use is unparalleled. It’s clear that Blackmagic Design has put a lot of thought into developing a product that truly meets the needs of professional videographers.
Lastly, I was very impressed with the delivery of this camcorder to Chandler. It arrived promptly and in great condition, and I appreciated the level of care that went into packaging the product. Overall, I couldn’t be happier with my purchase and would highly recommend the Blackmagic Design URSA Mini Pro 4.6K G2 to anyone looking for a top-of-the-line camcorder.
Makenzie Mccormick –
The Blackmagic Design URSA Mini Pro 4.6K G2 is a high-quality camera produced by the brand Blackmagic Design. I came across this product for the first time at a store located at 90 Weber St N, Waterloo, ON N2J 3G8, Canada.
Blackmagic Design is known for its expertise in creating professional-grade filming equipment, and the URSA Mini Pro 4.6K G2 is no exception. It is designed to meet the needs of both amateur and professional videographers, making it a versatile option for a wide range of users.
For amateurs, this camera offers an excellent opportunity to explore their filmmaking skills. The URSA Mini Pro 4.6K G2 provides advanced features and controls that allow users to capture high-quality videos with ease. It offers a user-friendly interface and various shooting modes, making it accessible for those new to the world of filmmaking.
On the other hand, professionals can take full advantage of the Blackmagic Design brand’s reputation for producing industry-leading equipment. The URSA Mini Pro 4.6K G2 delivers exceptional image quality, with its 4.6K resolution and advanced color science. It also offers a range of professional-grade features, such as built-in ND filters, high frame rate recording, and raw recording capabilities. These features make it suitable for various professional applications, including commercial filmmaking, documentaries, and even high-end productions.
The Blackmagic Design brand, as showcased in the URSA Mini Pro 4.6K G2, is known for its commitment to innovation and pushing the boundaries of filmmaking technology. Their products consistently deliver exceptional performance and have gained popularity among both amateur and professional filmmakers.
Overall, the Blackmagic Design URSA Mini Pro 4.6K G2 exemplifies the quality and reliability that the brand Blackmagic Design represents in the filmmaking industry.