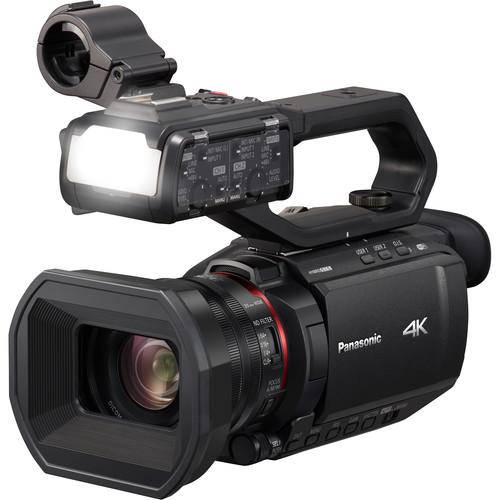
Panasonic HC-X2000
Rated 5.00 out of 5 based on 1 customer rating
$1,607.99
The industry’s smallest and lightest camera with 4K 60p recording combines a host of functions, including 25mm wide-angle, 24x optical zoom and live streaming.
Description
Professional shooting everywhere: HC-X2000 packs advanced functions in a well-balanced body to excel both in functionality and mobility. A new ultrathin fan disperses the heat to allow the construction of the industry’s smallest and lightest 4K/60p-camcorder and a very low power consumption.
This professional camcorder has been developed with the professional photographer and video makers in mind. The camera is equipped with a powerful 9-megapixel sensor and allows for 4K/60p video recording thanks to 1/2.5-type (inch) MOS Sensor. The camera has a new, unique design with a large, easy-to-view LCD and a user-friendly control panel. A new feature on the camera is the ability to change the perspective while filming.
Panasonic HC-X2000 properties
| Product name |
HC-X2000 |
| Max Video Resolution |
2160p (4K) |
| Max Frames per second (FPS) |
120 fps |
| Video Resolutions |
3840×2160 (24, 25, 50, 60fps), 1920×1080 (24, 50, 60fps) |
| Recordable Files |
MOV, MP4, AVCHD |
| Type |
Action camera |
| HDMI |
Yes |
| NFC |
Yes |
| Wi-Fi |
Yes |
| USB 2.0 |
Yes |
| Headphone Jack |
Yes |
| XLR in |
Yes |
| SD Type |
SDHC, SDXC |
| SDHC |
Yes |
| SDXC |
Yes |
| Viewfinder |
Yes |
| Display |
Yes |
| Display Size |
3.5 “ |
| Touch screen |
Yes |
| Battery Type |
R6 (AA) |
| Sound |
Stereo |
| Digital Zoom |
10 x |
| Optical Zoom |
24 x |
| Filter Size |
62.0 mm |
| Focal Length (Wide-Tele) |
4.12-98.9 mm |
| Focal Length (35mm equiv) |
25-600 mm |
| Aperture (Wide-tele) |
1.8-4 |
| Manual Focus |
Yes |
| Image Stabilization |
Yes |
| Image Stabilization Type |
Optical |
| Sensor |
1MOS |
| Sensor Megapixels |
8.29 MP |
| Sensor Size |
1/2.5 “ |
| Height |
159.0 mm |
| Width |
129.0 mm |
| Depth |
257.0 mm |
| Weight |
1500 g |
Frequently Asked Questions:
What are the steps to connect my Panasonic HC-X2000 to WiFi and use its remote streaming features?
To connect your Panasonic HC-X2000 to WiFi and use its remote streaming features, follow these steps:
1. Turn on your camera and make sure it is connected to a power source.
2. Press the "MENU" button on the camera to access the main menu.
3. Use the arrow buttons or touch screen to navigate to the "Network" option and press the "OK" button.
4. Select "WiFi Setup" from the available options.
5. Choose your WiFi network from the list of available networks and enter the password if required.
6. Once connected, the camera will show a message confirming the connection.
7. To enable remote streaming features, go to the "Network" option again and select "Remote Access."
8. Enable the "Remote Access" setting by selecting "On."
9. You can now access your camera's live stream through any web browser using the provided URL and login credentials.
10. Make sure your camera is set to "Record & Stream" mode for live streaming and adjust other settings as needed.
Remember that remote streaming features may not be available in all regions, and you should check with Panasonic support to ensure compatibility before proceeding.
"How do I connect my Panasonic HC-X2000 camcorder to a TV using an HDMI cable?"
First, ensure that both your Panasonic HC-X2000 camcorder and the TV you want to connect it to have HDMI input/output ports. Locate the HDMI output port on your Panasonic HC-X2000 camcorder. It's typically located on the side or back of the device, near other connectivity ports like USB or composite video outputs. Find an available HDMI input port on your TV and insert one end of the HDMI cable into it. Make sure that you push the connector firmly to ensure a secure connection. Insert the other end of the HDMI cable into the HDMI output port on your camcorder. Again, make sure that you push the connector firmly to ensure a secure connection. Turn on both your Panasonic HC-X2000 camcorder and TV, and wait for them to establish a connection via HDMI. This typically takes only a few seconds. After the connection has been established, select the appropriate HDMI input source on your TV. This is usually done by pressing the Input or Source button on your TV's remote control, then navigating through the available sources until you find the one that corresponds to the HDMI port where you connected your camcorder. Once you have selected the correct input source, your Panasonic HC-X2000 camcoder's video output should be displayed on your TV. You can now use your TV as a large-screen monitor to review footage or play back recorded videos. To disconnect your camcorder from the TV, simply unplug the HDMI cable from both devices in reverse order, starting with the TV and then with the camcorder. Remember to always disconnect cables properly to avoid damaging them or the equipment they connect. By following these simple steps, you can easily connect your Panasonic HC-X2000 camcorder to a TV using an HDMI cable, allowing you to enjoy your videos on a larger screen. If you have any further questions regarding this process, don't hesitate to consult the user manual that came with your device for more detailed information and troubleshooting tips.
"How do I properly focus the lens on my Panasonic HC-X2000 camcorder for clear and sharp video?"
To focus your Panasonic HC-X2000 camcorder for clear and sharp video, follow these steps:
1. Make sure the subject you want to focus on is in the center of the frame. Press the "AF/AE Lock" button (located just above the lens) to activate autofocus mode. The AF indicator light will turn on. Use the joystick or touchscreen to move the focus point to the subject you want to focus on. You can also use the "Touch Focus" feature by touching the screen where you want the focus to be. Press the shutter button halfway to initiate autofocus. The lens will automatically adjust until the subject is in focus. If you prefer manual focus, press and hold the "AF/AE Lock" button while turning the focus ring on the lens until the subject is in focus. Release the button to lock the focus. To fine-tune the focus, use the joystick or touchscreen to adjust the focus point slightly left or right of the subject until it's perfectly focused. This feature is especially useful for portrait and still life photography. If you want to lock the focus and exposure settings, press the "AF/AE Lock" button and hold it down while pressing the shutter button halfway. The lens will remain focused on that subject until you release both buttons. To adjust the focus speed, go to the camera's menu (press the "Menu" button) and select "Focus Settings. Here, you can choose from three modes: "Fast," "Normal," or "Slow. Make sure your lens is clean and free of dust or debris. Use a microfiber cloth to gently wipe the lens before filming. Finally, make sure there's enough light in the scene for the camera to focus properly. If it's too dark, the autofocus may struggle to find the subject. In low light conditions, consider using an external light source or increasing the ISO setting on your camcorder.
How do I connect my Panasonic HC-X2000 to Wi-Fi and stream live videos on social media platforms?
To connect your Panasonic HC-X2000 camcorder to Wi-Fi and stream live videos on social media platforms, please follow these steps:
1. Make sure that the camera's firmware is up-to-date. Connect the camera to your computer using a USB cable and download the latest firmware from the Panasonic website. Follow the on-screen instructions to install the firmware. Turn on the Wi-Fi feature on your smartphone, tablet or laptop. Ensure that the device is connected to a stable Wi-Fi network. Press the [HOME] button on the camera and navigate to the [SETUP] menu using the joystick or touchscreen. Select [NETWORK SETTING]. Choose [WIRELESS LAN SETUP] and select [CONNECT TO A NETWORK]. The camera will search for available Wi-Fi networks. When the camera detects your network, select it from the list of available networks. Enter the password (if required) using the on-screen keyboard or external keyboard. Once connected, go to your social media platform and select the option for live streaming. Follow the instructions provided by the platform to connect your account to the camera. Launch the Panasonic Image App on your smartphone, tablet or laptop. Connect to the camera using Wi-Fi Direct (if available) or connect via the network that you just set up. Use the app to control the camera settings and preview the live video feed. Adjust the exposure, white balance and focus as needed. When you're ready to begin streaming, press the [RECORD] button on the camera. The live video will be transmitted to your social media platform through the app. Monitor the quality of the stream using the app's monitoring tools. Adjust camera settings as needed to improve the quality of the video. When you're finished streaming, press the [STOP] button on the camera to end the recording. Disconnect from the Wi-Fi network and turn off the camera when you're done.
I'm getting a "Error Code C-07" on my Panasonic HC-X2000, what does it mean and how can I fix it?
1. Firmware issue: The error code could be caused by a corrupted or outdated firmware. Try updating the firmware to the latest version using the Panasonic software update tool. Internal memory corruption: The C-07 error code might indicate that there is a problem with the camera's internal memory, such as a corrupted file system or a faulty memory chip. In this case, you may need to perform a factory reset on the camera. This will erase all your settings and recorded videos, so make sure to back up any important data before proceeding. Hardware issue: The error code could also be caused by a hardware problem, such as a faulty sensor or a damaged circuit board. In this case, you may need to send the camera in for repair or replace it if it's still under warranty. To troubleshoot the issue, try the following steps:
1. Turn off the camera and remove the battery pack. Press and hold the "Record" button while inserting the battery pack back into the camera. This will perform a power-on reset, which may clear any firmware issues. Try updating the firmware to the latest version using the Panasonic software update tool. If you're still experiencing the error code after trying the above steps, try performing a factory reset on the camera by following these steps:
* Turn off the camera and remove the battery pack. Press and hold the "Record" button while inserting the battery pack back into the camera. While holding down the "Record" button, press the power button to turn on the camera. Release the "Record" button after 10 seconds to complete the factory reset. Note: A factory reset will erase all your settings and recorded videos, so make sure to back up any important data before proceeding.
The lens on my Panasonic HC-X2000 is becoming increasingly scratched, are you able to repair or replace the lens for free under warranty?
That's a bummer about the scratches on your lens! Unfortunately, Panasonic's warranty typically covers defects in materials and workmanship, but not damage caused by normal wear and tear. Scratches are usually considered cosmetic damage rather than a defect. However, it's worth checking the specifics of your warranty to be sure. You can try contacting Panasonic's customer service directly to inquire about their repair or replacement policies for scratched lenses. They may offer options for repair or replacement at a cost, even if it's not covered under warranty. If you're still within the warranty period (which is usually 1-2 years), it's definitely worth reaching out to them to see what they can do for you. Keep in mind that they may require proof of purchase and the lens itself as evidence of the damage. If your warranty has expired, you might consider looking into third-party repair services or even replacing the camera altogether if the scratches are severe enough to affect image quality.
Before you buy Panasonic HC-X2000



Virtuos –
I almost never write an opinion out of laziness, but here I have to. this camera is just amazing, I switched from a Canon and there’s nothing it can’t do. records amazing videos in 4k and slog 3 with great autofocus, has a brilliant wifi connection that you can use to take pictures with a self-timer or turn on movie recording, has devilishly fast taking pictures of a series with a devilishly good autofocus – all photos are taken on f1.4 / 1.8 and each hit !! this camera will be remembered for a long time.