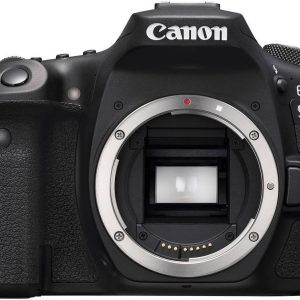
Canon EOS 5D Mark IV
Rated 4.50 out of 5 based on 4 customer ratings
$1,772.00
Capture stunning photos and videos with the Canon EOS 5D Mark IV, the ultimate DSLR camera for professional photographers and videographers.
Description
The Canon EOS 5D Mark IV is a professional-grade digital camera that has been designed to meet the needs of photographers and videographers who demand top-of-the-line performance and functionality. This camera features a 30.4-megapixel full-frame sensor, which is capable of capturing stunning images with exceptional detail and color accuracy. Whether you’re shooting portraits, landscapes, or action sequences, the Canon EOS 5D Mark IV has the power and versatility needed to meet your creative demands.
One of the most notable features of the Canon EOS 5D Mark IV is its advanced autofocus system. This camera features a 61-point autofocus system that is capable of tracking subjects at up to 7 frames per second. This makes it an ideal choice for capturing fast-moving subjects like athletes, wildlife, and vehicles. Additionally, the camera’s Dual Pixel CMOS Autofocus system provides smooth and precise focus tracking during video capture, which is ideal for professional videographers.
Another key feature of the Canon EOS 5D Mark IV is its high-resolution LCD touchscreen. This intuitive display allows users to quickly and easily access menus and settings, review images and video footage, and control the camera’s focus and exposure settings. The camera also includes built-in wireless connectivity, which enables users to quickly and easily transfer images and video to a computer, tablet or smartphone using the Canon Camera Connect app.
The Canon EOS 5D Mark IV also includes a number of advanced shooting modes and features designed to ensure optimal image quality and creative control. These include High Dynamic Range (HDR) shooting, which allows users to combine images with different exposures to create stunning, high-contrast images, and Time-Lapse Movie mode, which enables users to create time-lapse videos with ease.
In terms of video capabilities, the Canon EOS 5D Mark IV is one of the most advanced DSLR cameras on the market. The camera features 4K video recording capabilities at 30 frames per second, as well as Full HD video recording at up to 60 frames per second. This makes it an ideal choice for professional videographers who demand high-quality video footage in a portable and versatile package.
Overall, the Canon EOS 5D Mark IV is an exceptional camera that offers unmatched performance, versatility, and image quality. Whether you’re a professional photographer or videographer, or simply an enthusiast who demands the best tools for capturing stunning images and video, the Canon EOS 5D Mark IV has everything you need to take your creative skills to the next level.
Digital SLR, CMOS, 30.4 MP, GPS, NFC, Wi-Fi, 800g
Canon EOS 5D Mark IV properties
| Product name |
EOS 5D Mark IV |
| Type |
Digital SLR |
| Lens |
Body only |
| Compatible lenses |
Canon EF |
| Focal Length |
1.0x |
| Memory Cards |
SD, SDHC, SDXC |
| Features |
GPS, NFC, Wi-Fi |
| Viewfinder |
Electronic (EVF), LCD/OLED |
| Image Stabilization |
No |
| Manual Focus |
Yes |
| Image File Format |
DPOF, EXIF, JPEG, RAW |
| Flash |
External |
| Flash Sync Speed |
1/800 sec |
| Max Video Resolution |
4096×2160 |
| Video File Format |
AVCHD / MP4, MPEG4, Motion JPEG |
| Sensor Type |
CMOS |
| Effective Pixels |
30.4 MP |
| Total Pixels |
31.7 MP |
| Weight |
800.0 g |
| Dimensions (HxWxD) |
116.4,150.7,75.9 mm |
Frequently Asked Questions:
What is the recommended way to update the firmware on my Canon EOS 5D Mark IV camera?
The recommended way to update the firmware on your Canon EOS 5D Mark IV camera is by downloading it from Canon's official website and following the instructions provided in the update guide. Here is a step-by-step guide:
1. Go to Canon's official website at https://www.usa.canon.com/internet/portal.jsp and click on "Support" in the top menu bar.
2. In the Support page, type "EOS 5D Mark IV" in the search box and hit Enter. This will take you to a new page with all available resources for your camera.
3. Click on "Firmware & Software" from the left-hand side menu to view the latest firmware versions available for your camera model.
4. Download the firmware update file by clicking on the "Download" button next to the version you want to install. Make sure to download it onto your computer, not directly onto the SD card inserted in your camera.
5. Insert a fully formatted SD card into your computer and save the downloaded firmware update file onto it. Do not move or rename the file.
6. Turn off your camera.
7. Connect the camera to your computer using the supplied USB cable, ensuring that the camera is set to "PC" mode in the camera's menu settings.
8. Open the Canon EOS Utility software on your computer (if not already installed, download and install it from Canon's website).
9. In the utility software, click on the "Camera Settings" tab at the top of the screen.
10. Click on "Firmware Version" to view the current firmware version installed in your camera. If an update is available, a prompt will appear, asking you to select the folder containing the downloaded firmware update file. Choose the appropriate folder and click "OK".
11. Follow the on-screen instructions to complete the firmware update process. This may include formatting the SD card in your camera, which will erase all data stored on it. Make sure to back up any important files before proceeding with the update.
12. Once the update is completed, your camera will restart automatically, and you can start using it with the updated firmware version.
What is the best way to set up and use auto focus on my Canon EOS 5D Mark IV for the first time?
Setting up and using autofocus on your Canon EOS 5D Mark IV camera for the first time can be easy if you follow these steps:
1. Familiarize yourself with the AF (autofocus) system: The Canon EOS 5D Mark IV features a 61-point, high-precision AF system that uses an RGB+IR metering sensor for improved precision in low light conditions. The system includes 41 cross-type sensors and 5 dual cross-type sensors with f/8 support.
2. Choose the right focus mode: There are three autofocus modes available on your Canon EOS 5D Mark IV – AI Servo (continuous autofocus), One Shot (single autofocus), and AI Focus AF (automatically switches between AI Servo and One Shot based on subject movement). Choose the mode that best suits your shooting situation.
3. Set up focus points: The Canon EOS 5D Mark IV offers multiple autofocus point arrangements, including a flexible single-point AF, zone AF (which uses a cluster of focus points), and automatic selection. You can also manually select the focus point by pressing the AF point selection button and using the multi-controller to move the focus point around the screen.
4. Adjust focus settings: In the camera's menu, you can adjust various autofocus settings such as AF method (One Shot or AI Servo), AF configuration tool (customize the behavior of individual focus points), and focus point selection (choose how many focus points are displayed).
5. Practice using back-button focusing: This technique involves assigning autofocus to a button on the rear of the camera, freeing up the shutter button for taking photos. To set this up, go to Custom Controls in the camera's menu and assign the AF-ON function to a compatible button (AF4 or AF5).
6. Experiment with different focus modes: The Canon EOS 5D Mark IV has several focus modes that you can experiment with depending on your shooting situation. For example, Face+Track prioritizes faces in the scene for better focus accuracy, while Expand Flexible Zone uses surrounding points to increase focusing speed and accuracy.
7. Check your images: After taking photos using autofocus, review your images to ensure that they are sharp and properly focused. If necessary, adjust your settings accordingly.
By following these steps, you can effectively set up and use auto focus on your Canon EOS 5D Mark IV camera for the first time.
How do I switch my Canon EOS 5D Mark IV from manual focus to autofocus mode?
To switch your Canon EOS 5D Mark IV camera from manual focus to autofocus mode, follow these steps:
1. Make sure your camera is set to the shooting mode you want to use (such as aperture priority, shutter priority or program mode). You can do this by rotating the Mode dial on top of the camera. Press and hold the AF-ON button located just behind the shutter release button until the autofocus system becomes active and the focus points light up in the viewfinder. The AF-ON button is labeled with a half-moon shape that looks like an eye. Release the AF-ON button to confirm that autofocus mode is activated. You can now use the camera's autofocus system to automatically focus on your subject. If you prefer, you can also press and hold the shutter release button halfway down to activate autofocus mode. This will engage both the autofocus and the metering systems at the same time. To switch back to manual focus mode, press and hold the AF-ON button again until the autofocus system shuts off and the focus points disappear from the viewfinder. You're now in manual focus mode. That's it! These steps should help you quickly and easily switch between manual focus and autofocus modes on your Canon EOS 5D Mark IV camera.
How do I properly set up and use the autofocus system on my Canon EOS 5D Mark IV camera for capturing fast-moving subjects in low light conditions?
Here are some steps to help you set up and utilize the autofocus system on your Canon EOS 5D Mark IV camera when shooting fast-moving subjects in low light environments:
1. Select the right AF mode:
The first step is to select the appropriate autofocus (AF) mode for the type of movement you're trying to capture. The EOS 5D Mark IV offers three main AF modes: One-Shot AF, AI Servo AF, and AI Focus AF. In low light conditions and when shooting fast-moving subjects, it's best to use AI Servo AF as this mode continuously tracks moving subjects as long as the shutter button is half-pressed. Adjust the AF point selection:
The EOS 5D Mark IV provides multiple options for selecting the autofocus points. You can choose from a single point, zone AF, or automatic selection (which selects the appropriate points based on subject movement). For fast-moving subjects in low light conditions, it's best to use the Zone AF mode as this allows you to cover a larger area with multiple focus points and increases your chances of getting a sharp image. Adjust the autofocus settings:
The EOS 5D Mark IV provides several options to fine-tune the autofocus system for low light conditions, such as AF sensitivity, AI Servo priority, and AF point auto switching. To improve focus accuracy in low light, you can increase the AF sensitivity level, which makes the camera more sensitive to light and allows it to focus in dimmer conditions. Additionally, you can prioritize AI Servo over One-Shot or manual focus modes, which ensures that the camera will continue focusing on a moving subject even if you accidentally release the shutter button halfway. Use back-button focusing:
Back-button focusing is a technique used to separate the function of focusing from the function of taking a picture. Instead of relying on the shutter button to focus, you can assign the focus function to a different button (such as the AF-ON button) and use the shutter button solely for taking pictures. This helps prevent accidentally focusing when you're trying to take a shot, especially in low light conditions where accidental half-presses are more common. Use continuous shooting mode:
In low light environments, it can be challenging to capture fast-moving subjects due to slower shutter speeds and dimmer lighting. To improve your chances of getting a sharp image, you can use the camera's continuous shooting mode (which allows you to take multiple shots in quick succession). This increases your likelihood of capturing at least one sharp image even if some of the frames are slightly blurry due to subject movement or low light conditions. Use external lighting:
If possible, consider using external lighting sources such as speedlights, strobes, or continuous lights to illuminate your subjects and improve focus accuracy in low light conditions. This will provide you with more light to work with and allow you to use faster shutter speeds for better focus tracking and less blur from subject movement. By following these steps, you'll be able to properly set up and utilize the autofocus system on your Canon EOS 5D Mark IV camera when shooting fast-moving subjects in low light conditions.
I've been trying to use Wi-Fi on my Canon EOS 5D Mark IV but I'm getting an error message saying "Camera Access Point is not available". Why is this happening and how can I fix it?
1. Firmware issues**: Outdated or corrupted firmware can cause problems with CAP functionality. Ensure your camera's firmware is up-to-date by checking Canon's website. Camera settings**: Make sure that the Wi-Fi setting on your camera is enabled and set to "CAP" (Camera Access Point) mode. You can check this in the camera's menu under "Wi-Fi Settings" or "Network Settings. Wireless interference**: Other devices in your vicinity might be interfering with the CAP signal. Try moving your camera away from other electronic devices, such as cordless phones, microwaves, and neighboring Wi-Fi routers. Distance limitations**: The CAP feature has a limited range (around 10-15 feet). If you're trying to connect from too far away, it might not work. Camera battery level**: A low battery can cause the camera's wireless functions to malfunction. Try charging your camera or replacing the batteries. To fix the issue:
1. Restart your camera**: Sometimes, a simple reboot can resolve connectivity issues. Reset CAP settings**: If you've changed any CAP-related settings recently, try resetting them to their default values. Update your camera's firmware**: As mentioned earlier, outdated or corrupted firmware might be causing the issue. Check Canon's website for updates and follow their instructions to update your firmware. Contact Canon support**: If none of the above steps work, it's possible that there's a hardware issue with your camera. Reach out to Canon's customer support for assistance. If you've tried all these troubleshooting steps and still can't get CAP working, it might be worth considering visiting a Canon service center or authorized repair shop for further diagnosis and potential repairs.
Before you buy Canon EOS 5D Mark IV


Beer –
I switched from mark II to mark IV and I am delighted! Half the resolution of photos makes it easier to work on them. Less noise at high sensitivities – pictures from “four” at ISO 6400 look better than from the old “two” at ISO 400. The greater tonal range allows for better results in Camera RAW and retrieval of more from shadows. WiFi makes tethering easy – you don’t have to bother with a cable, and with the Canon Camera Connect app you can take pictures by controlling the camera from your phone. However, the most important feature of the new “four” for me is the autofocus – EXCELLENT. It hits the point every time. Even in LifeView! Even in low light – always accurate and fast.
Od –
I switched from mark II to mark IV and I am delighted! Half the resolution of photos makes it easier to work on them. Less noise at high sensitivities – pictures from “four” at ISO 6400 look better than from the old “two” at ISO 400. The greater tonal range allows for better results in Camera RAW and retrieval of more from shadows. WiFi makes tethering easy – you don’t have to bother with a cable, and with the Canon Camera Connect app you can take pictures by controlling the camera from your phone. However, the most important feature of the new “four” for me is the autofocus – EXCELLENT. It hits the point every time. Even in LifeView! Even in low light – always accurate and fast.
Caden –
The Canon EOS 5D Mark IV is an advanced digital camera known for its high-quality performance, versatile features and exceptional image quality. One of the notable aspects of this camera is its full-frame Focal Length (FL) sensor with a 1.0x magnification factor. This means that the lens will produce images that closely match what you see through your viewfinder. The Canon EOS 5D Mark IV is packed with other impressive technical features as well, including an excellent 30.4MP CMOS sensor, a fast and accurate 61-point AF system, and 4K video recording capabilities.
To ensure that our customers receive their orders in a timely and secure manner, we take great care to handle shipments with care. Our Digital cameras are packaged and delivered to you promptly, with your order being sent to 65-14, rue Bruno-Dan Denault, Sherbrooke, Quebec J1G 2J2, Canada.
With its advanced imaging technology and exceptional performance capabilities, the Canon EOS 5D Mark IV is an ideal choice for photographers and filmmakers who demand outstanding image quality, versatility, and dependability. Its 1.0x magnification factor ensures that your images will be true-to-life, allowing you to capture every moment in stunning detail.
Daisy –
Product Name in Digital Cameras refers to the unique title given to a specific model or variant of a digital camera manufactured by a brand. In the case of our review, we are discussing the Canon EOS 5D Mark IV, a top-of-the-line DSLR camera from the renowned brand, Canon.
I purchased this Digital Camera in August, and it has been an absolute game-changer for me as a photography enthusiast. The EOS 5D Mark IV boasts of advanced features that make it stand out from its predecessors and competitors alike. From its impressive image quality to its intuitive interface and powerful performance, this camera is truly a masterpiece.
One of the aspects that I particularly love about this Digital Camera is its power efficiency. The Canon EOS 5D Mark IV boasts of an outstanding battery life, which means that you can shoot for hours without having to worry about running out of juice. This not only saves you money on expensive camera batteries but also reduces your carbon footprint, making it a more eco-friendly choice for environmentally conscious photographers like myself.
Another feature that sets the EOS 5D Mark IV apart is its advanced autofocus system. With 61 points and Dual Pixel CMOS AF technology, this camera allows you to capture sharp and precise images, even in low light conditions. This makes it ideal for capturing fast-moving subjects, such as wildlife or sports events, where split-second timing is crucial.
The EOS 5D Mark IV also boasts of a full-frame CMOS sensor that delivers stunning image quality with rich colors and fine details. Whether you’re shooting landscapes, portraits, or action shots, this camera can capture it all with exceptional clarity and depth.
One tip for those considering purchasing the Canon EOS 5D Mark IV is to invest in a high-quality lens. While the camera itself is impressive, the lens you use will greatly impact the overall quality of your images. I would recommend the Canon EF 24mm f/1.4L II USM or the Canon EF 70-200mm f/2.8L IS III USM, both of which offer exceptional image quality and are compatible with the EOS 5D Mark IV.
In terms of accessories, I would recommend investing in a sturdy tripod to ensure stable shots, especially when shooting at slower shutter speeds or in low light conditions. A remote shutter release is also a handy accessory that allows you to take photos without having to touch the camera, which can help prevent blurry images due to camera shake.
In conclusion, the Canon EOS 5D Mark IV is a top-of-the-line Digital Camera that delivers exceptional image quality, advanced features, and impressive performance. Its power efficiency and eco-friendliness make it an ideal choice for environmentally conscious photographers, while its advanced autofocus system and full-frame sensor ensure stunning results every time. Whether you’re a professional photographer or a hobbyist, the EOS 5D Mark IV is a must-have addition to your camera collection.
Colin –
I’d like to express my gratitude towards Caden’s review of the Canon EOS 5D Mark IV, which has been a valuable resource for many photographers and filmmakers. However, I must respectfully disagree with his opinion, particularly regarding its full-frame Focal Length (FL) sensor.
While it’s true that the camera boasts an excellent 30.4MP CMOS sensor and a fast 61-point AF system, I believe that the FL sensor is not as impressive as Caden claims. In fact, I think it’s one of the major drawbacks of this camera. The 1.0x magnification factor, which Caden praises for producing images that closely match what you see through your viewfinder, can actually lead to a loss of detail and depth in certain situations.
For instance, when shooting wide-angle scenes or capturing distant subjects, the FL sensor’s limited magnification factor can result in a loss of image sharpness and resolution. This is especially problematic for photographers who rely on their camera’s ability to capture high-quality images at various focal lengths.
Additionally, I’d like to point out that Caden’s review fails to mention the camera’s vulnerability to dust and moisture, which can be a major concern for photographers working in harsh environments. While Canon has taken steps to improve the EOS 5D Mark IV’s weather-sealing capabilities, it still lags behind other cameras on the market.
Moving on to today’s news, I couldn’t help but feel a sense of empathy for the homeowners who lost their multimillion-dollar home in a landslide. The fact that they’re still being pursued by the bank for their mortgage debt is nothing short of heartbreaking. It just goes to show how easily life can take a turn for the worse, and how important it is to be prepared for any eventuality.
In conclusion, while I appreciate Caden’s enthusiasm for the Canon EOS 5D Mark IV, I must respectfully disagree with his opinion on its FL sensor. With its limitations in terms of image sharpness and resolution, as well as its vulnerability to dust and moisture, I believe this camera falls short of being a top-notch choice for photographers and filmmakers.