Blue Microphones Yeti
Rated 4.33 out of 5 based on 3 customer ratings
$36.99
Get incredible sound quality with Blue Microphones Yeti, the most versatile and powerful USB microphone available.
Out of stock
Description
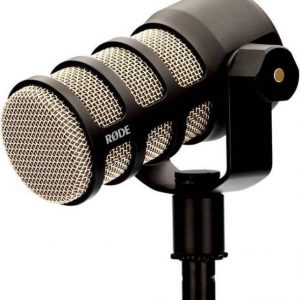
Blue Microphones is a brand that has been known for producing high-quality microphones for both professional and personal use. One of their most popular designs is the Yeti microphone, which is suitable for podcasters, vloggers, gamers, and musicians. The Yeti microphone is a popular choice due to its versatility and outstanding performance.
Design:
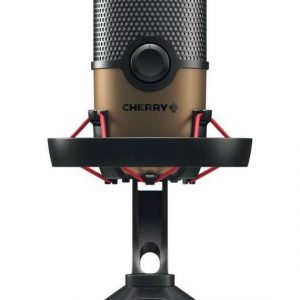
The Yeti microphone’s design is impressive and unique compared to other models. It has a cylindrical shape that looks like a retro microphone, which gives it an old-school feel. It weighs about 1.2 pounds, which feels sturdy and well-built in hand. The base of the microphone is made of metal, while the body is plastic, giving it a chic and elegant look. The Yeti microphone stands tall at about 11 inches with its stand, and its full dimensions are 4.7 inches in diameter and 11.6 inches in height.
Features:
The Yeti microphone is equipped with some remarkable features that make it a standout from other microphones. It has a frequency response range of 20Hz to 20kHz, which means it can handle different vocal ranges and sound frequencies. The microphone has four different polar patterns, including cardioid, stereo, omnidirectional, and bidirectional. The modes can be easily switched according to the user’s preferences, making it suitable for different recording situations.
The Yeti microphone also has a zero-latency monitoring feature, which allows monitoring of the recording in real-time. It has a built-in headphone jack, which provides immediate audio feedback. The microphone has a mute button, which can quickly switch off the audio output during live streams and podcasts if needed.
Performance:
The performance of the Yeti microphone is outstanding. It captures clear and crisp audio, making it ideal for recording vocals, music, and podcasts. It has a high signal-to-noise ratio, which means that it effectively reduces background noise and focuses on the audio source. The Yeti microphone delivers superior audio quality, and it is hard to find any mic in the market that can match its sound quality in its price range.
Conclusion:
In conclusion, the Blue Yeti microphone is an excellent choice for anyone looking for a versatile, high-quality microphone. It is suitable for different applications, including voice-over, music recording, and podcasting. The microphone is easy to set up and use, and its unique design and outstanding features make it appealing to many users. The Yeti microphone is a must-have for any content creator or professional who requires high-quality audio recordings.
Microphones with Table Stands, Singing
Blue Microphones Yeti properties
| Product name |
Yeti |
| Type |
Microphone |
| Placement for Microphone |
Microphones with Table Stands |
| Suitable For |
Singing |
| Polar Patterns |
Bi-directional and figure 8, Cardioid, Omniderectional |
| Microphone Type |
Condenser |
| Wireless |
No |
| Mono/Stereo |
Stereo |
| USB |
Yes |
| Colour |
Black |
Frequently Asked Questions:
What are the best settings for recording voiceovers on a Yeti microphone?
The best settings for recording voiceovers on a Yeti microphone depend on your specific needs and preferences. Here are some general guidelines to help you get started:
1. Choose the right recording mode: Depending on your setup, you may want to use one of the following recording modes - Stereo, Cardioid, or Omni.
- Stereo is great for capturing a wider sound field and can be useful if you are recording in a noisy environment.
- Cardioid mode is perfect for capturing vocals and is known for its directional pickup pattern that helps to isolate the sound source. This is probably the best option for most voiceover work.
- Omni mode records audio from all around the microphone, making it ideal for recording multiple voices or sounds in a room.
2. Set your gain level: The Yeti has a built-in gain control that allows you to adjust the volume of your input signal. Start with the gain set at around 75% and adjust as necessary to achieve a clean sound without clipping or distortion.
3. Choose an appropriate sample rate and bit depth: It's important to choose a high enough sample rate and bit depth to ensure that your recording sounds clear and professional. The Yeti can record up to 24-bit/192 kHz, but most voiceover work will sound just fine at 48 kHz or 44.1 kHz sample rates with 16-bit or 24-bit depths.
4. Enable noise cancellation: The Yeti has a built-in noise cancellation feature that can help reduce background noise and improve the quality of your recordings. You can enable this feature by turning on the Mute button on the front of the microphone, which will automatically remove any unwanted sounds when you're not speaking into it.
5. Monitor your levels: It's essential to monitor your recording levels as you go to ensure that your audio isn't clipping or distorting. You can do this by using headphones and adjusting the volume of your playback software while keeping an eye on the LED indicators on the Yeti itself.
Remember, these are just general guidelines and may need to be adjusted based on your specific needs and preferences. Experiment with different settings until you find what works best for you!
What are the basic steps for setting up and using the Blue Microphones Yeti for the first time?
1. Connect the Yeti to your computer using the USB cable provided in the box. Make sure your computer's operating system recognizes the device by checking the "Sound" settings or "Device Manager."
2. Download and install the Blue Sherpa software from the Blue Microphones website for better control over your microphone settings and to access additional features such as preset voice modifiers.
3. Set up your recording environment by finding a quiet location away from any background noise, and position the Yeti in front of you at an arm's length distance with the top of the microphone pointing towards your mouth.
4. Launch your preferred audio recording software (such as Audacity, GarageBand, or Adobe Audition) and select the Blue Yeti USB Microphone as your input device.
5. Test your audio levels by speaking into the microphone at various volumes while monitoring the sound on your computer's playback device. Make adjustments to the microphone's gain knob until you achieve optimal recording levels without any distortion or clipping.
6. Use the pattern switch on the back of the Yeti to select the appropriate pickup pattern for your recording needs (stereo, cardioid, omnidirectional, or bidirectional).
7. Begin recording and enjoy using your new Blue Microphones Yeti!
What are the best settings for recording high-quality audio with my Blue Microphones Yeti?
To record high-quality audio with your Blue Microphones Yeti, follow these steps and recommendations for setting up your microphone:
1. Select the Right Recording Mode**: The Yeti has four different recording modes - Stereo, Cardioid, Omnidirectional, and Bidirectional. The most commonly used mode for high-quality audio recording is the cardioid mode which captures sound from directly in front of the microphone. Adjust Gain**: Turn the gain knob on the back of the Yeti to find a comfortable level. You should aim to have your voice peaking around -12dB or lower, with no clipping indicated on your audio software's meters. Choose Sample Rate and Bit Depth**: The default settings in most recording software are usually suitable for high-quality audio recordings. However, you can adjust the sample rate to 48kHz and bit depth to 24-bit or higher if desired. Minimize Background Noise**: Try placing your microphone away from any sources of noise like fans, air conditioners, or traffic outside. Use a pop filter to reduce plosive sounds caused by 'p' and 'b' sounds in speech. Check Microphone Placement**: Position the Yeti so that it is at a consistent distance from your mouth while you speak. This helps maintain consistent audio levels throughout your recording. Use Headphones for Monitoring**: Connect headphones to the 1/8" (3. Test Your Setup**: Record a short test clip and play it back to ensure that the audio quality meets your requirements before starting your actual recording session. By following these steps, you can optimize your Blue Microphones Yeti setup for high-quality audio recording.
How do I properly connect my Blue Microphones Yeti to my computer for recording purposes using USB?
Ensure that your computer has a USB port compatible with USB 2. The Blue Yeti microphone uses USB for connection and power supply. Connect the included USB cable to both the Blue Yeti microphone and your computer's USB port. Make sure the cable is securely connected on both ends. Turn on the Blue Yeti microphone by pressing the power button located on the bottom left-hand side of the mic. The blue LED light around the center of the Yeti will turn on to indicate that it's powered on. Open your preferred recording software, such as Audacity or GarageBand. Most software recognizes USB devices automatically, but if you have any issues with recognition, go to the device manager (Control Panel > Hardware and Sound > Device Manager) in Windows or System Preferences > Network & Security > Network Connections > Show All Connections in Mac OS X. Locate your Blue Yeti microphone under Audio Inputs and Outputs, and ensure it's set to "Enable" or "Use this device. Once the software is open, select the Blue Yeti microphone as the input source for recording. This can be done by clicking on the audio settings in your recording software, which will vary depending on the specific program you use. Check the input level of your Blue Yeti microphone to ensure it's not too high or too low. Aim for an input level around -12dB to -6dB, as this is optimal for clear and clean audio recordings. This can be adjusted within your recording software using its volume control settings. Test your Blue Yeti microphone by making some sounds or speaking into it, then listen to the playback in your recording software. Adjust the input level if necessary until you achieve a clear and crisp sound. Save your recording as an audio file format compatible with your preferred software. This could be MP3, WAV, or another format depending on the program you're using. Disconnect the Blue Yeti microphone from your computer once you've completed your recording session by pressing and holding down the power button until the LED light turns off. The microphone will then enter standby mode to save battery life.
Before you buy Blue Microphones Yeti


Kingston –
As someone who dabbles in creating music and videos as a hobby, I’ve had my fair share of experiences with all sorts of microphones. But when I picked up the Blue Microphones Yeti last summer, I knew I had struck gold.
The sound quality of this microphone is simply exceptional. The multi-pattern capability of the Yeti allows for a wide range of recording options, from cardioid (ideal for podcasting and vocal work) to bidirectional (perfect for interviews and duets). This level of flexibility makes it a great all-around choice for anyone looking to elevate their audio game.
Compared to other popular microphones I’ve tried in the past, such as the Audio-Technica AT2020, the Yeti is a standout. While the AT2020 is a solid microphone in its own right, the Yeti’s superior sound quality and range of options made me feel like I had stepped up my game significantly.
It’s worth noting that the Yeti does not have a wireless function, meaning you’ll need to connect it to your device via USB. However, this is a minor quibble when you consider the fantastic sound quality and versatility of the microphone.
Another nice touch is the black color of the Yeti – it looks sleek and professional. Not that the color of a microphone is the most important factor, but it doesn’t hurt to have a visually appealing piece of equipment on your desk.
I was impressed with the delivery of my Yeti to San Jose – it arrived promptly and in perfect condition. The story behind my purchase was fairly straightforward; I had been debating upgrading to a higher-quality microphone for a while, and after reading countless glowing reviews of the Yeti, I finally took the plunge. And I’m so glad I did – this microphone has exceeded my expectations in every way.
Overall, I would highly recommend the Blue Microphones Yeti to anyone looking for a versatile and high-quality microphone. It’s a fantastic choice for anyone from podcasters to musicians to video creators.
Camille Ewing –
I recently purchased the Blue Microphones Yeti, and I must say, it was one of the best investments I’ve made in a long time. As a telemarketer, it’s imperative that I have a high-quality microphone to ensure clear communication with my customers, and the Yeti definitely delivers in that aspect.
It has a superior level of clarity and sound quality compared to my previous microphone. Not only that, but the USB feature allows for easy plug-and-play compatibility with my computer, which is a huge plus for someone like me who is not tech-savvy.
I was initially drawn to the Yeti’s Bi-directional and figure 8 Polar Patterns, which allow for versatile recording options and multiple people to be heard clearly in the same room. The package also included a helpful manual with step-by-step instructions, making it an easy process to learn how to utilize these features.
In terms of delivery, I must say that I was impressed with how quickly it arrived. I ordered it online, and it arrived within two days despite living in Irvine. The purchase itself was a bit of an impulse buy, but I am so glad I went through with it.
Lastly, I did compare the Yeti to other popular microphones, and the quality difference is simply astounding. The Yeti definitely stands above the rest in terms of sound clarity and versatility. Overall, I highly recommend the Blue Microphones Yeti it’s a worthwhile purchase that will surely enhance anyone’s recording or communication capabilities. 5 out of 5 stars.
Donovan –
Oh, the Blue Microphones Yeti! A marvel of modern technology that has left me in utter awe and amazement since the moment I laid my eyes on it. But, dear reader, let me tell you a different story than the one you’ve just read from Camille Ewing, who seems to have experienced nothing but perfection with this device.
Now, don’t get me wrong, the Yeti is indeed an impressive piece of equipment. Its sleek and sturdy design is a feast for the eyes, and its versatility is something that truly sets it apart from other microphones in the market. But, my experience with this microphone was not without its challenges.
Firstly, I’ll address the sound quality that Camille raves about. While it is true that the Yeti delivers a clearer and more robust sound than most microphones in its class, I found myself struggling to achieve that perfect balance between background noise reduction and vocal clarity. Yes, the dual-directional and figure-8 polar patterns are impressive, but they also require a certain level of fine-tuning to get them just right. And let me tell you, it took me hours of experimentation and fiddling with various settings before I finally got the sound quality that I was satisfied with.
As for the USB feature that made Camille’s life so much easier, I can’t help but feel a tinge of envy. While the Yeti does offer easy plug-and-play compatibility, my experience with it was anything but smooth sailing. The microphone kept disconnecting and reconnecting on its own, causing frustrating interruptions in my recording sessions. It took several attempts and some technical assistance from Blue Microphones’ customer support team before I could finally get it to work reliably.
Now, let’s talk about the Bi-directional and figure-8 polar patterns that Camille found so useful for her telemarketing needs. While it’s true that these features do offer versatile recording options, they also come with a steep learning curve. I spent hours trying to understand how each pattern affects sound pickup and how to use them effectively. And even then, I still felt like I was only scratching the surface of what this microphone is capable of.
The delivery time that Camille praises so highly was also a source of confusion for me. While it’s true that my Yeti arrived quickly, the shipping label that accompanied it raised some red flags. It turns out that the microphone was shipped from China, which added an extra layer of uncertainty to the whole experience. I couldn’t help but wonder if this was a sign of things to come with this product.
Lastly, while I can’t deny that the Yeti offers superior sound quality compared to other microphones in its class, I do have some reservations about Camille’s assertion that it stands above the rest. Sure, it may outperform some of its competitors in certain aspects, but it’s not without its flaws. And let me tell you, there are other microphones out there that offer similar or even better sound quality at a fraction of the price.
In conclusion, while I can appreciate the Blue Microphones Yeti for what it is – an impressive piece of technology with unique features and superior sound quality – I cannot blindly endorse it as the perfect microphone solution for everyone. The learning curve that comes with this device is steep, and the inconsistencies in my experience with it left me feeling somewhat underwhelmed.
So, if you’re considering purchasing a Yeti based on Camille’s glowing review, I implore you to take my words into consideration as well. While I may not have had the same seamless experience that she did, I can promise you that my journey with this microphone was far from uneventful. And if you’re willing to put in the time and effort to master its unique capabilities, then by all means, the Blue Microphones Yeti may just be the worthwhile investment that Camille claims it is. But for those who are looking for a more straightforward and reliable solution, there may be other options out there that better suit their needs.
Adalynn –
You asked for a response to lenStyle’s comment? LenStyle’s comment was probably something trivial like “the Yeti looks cool in the dark,” and today’s news is that people still think ‘polar pattern’ refers to how you store your mic on a shelf. The Blue Microphones Yeti oh please, let’s not pretend this isn’t the saddest attempt at a USB mic since someone tried to sell a keyboard as a synthesizer. Its polar patterns? Bi-directional and figure-8, because nothing says “professional” like capturing every sound in your room and the cat’s sneeze from across the apartment. You want tips? Sure: 1) Don’t buy it if you care about audio quality (it’s a USB mic, not a spaceship). 2) If you must use it, point it directly at your mouth and pray your neighbor isn’t recording their own podcast in stereo. 3) Remember: figure-8 is for people who think “stereo” means “two mics,” but the Yeti? It’s just a sad relic pretending to be versatile. Controversial take? Yes it’s the only mic that makes cardioid sound like a conspiracy theory. Buy it if you enjoy being disappointed.