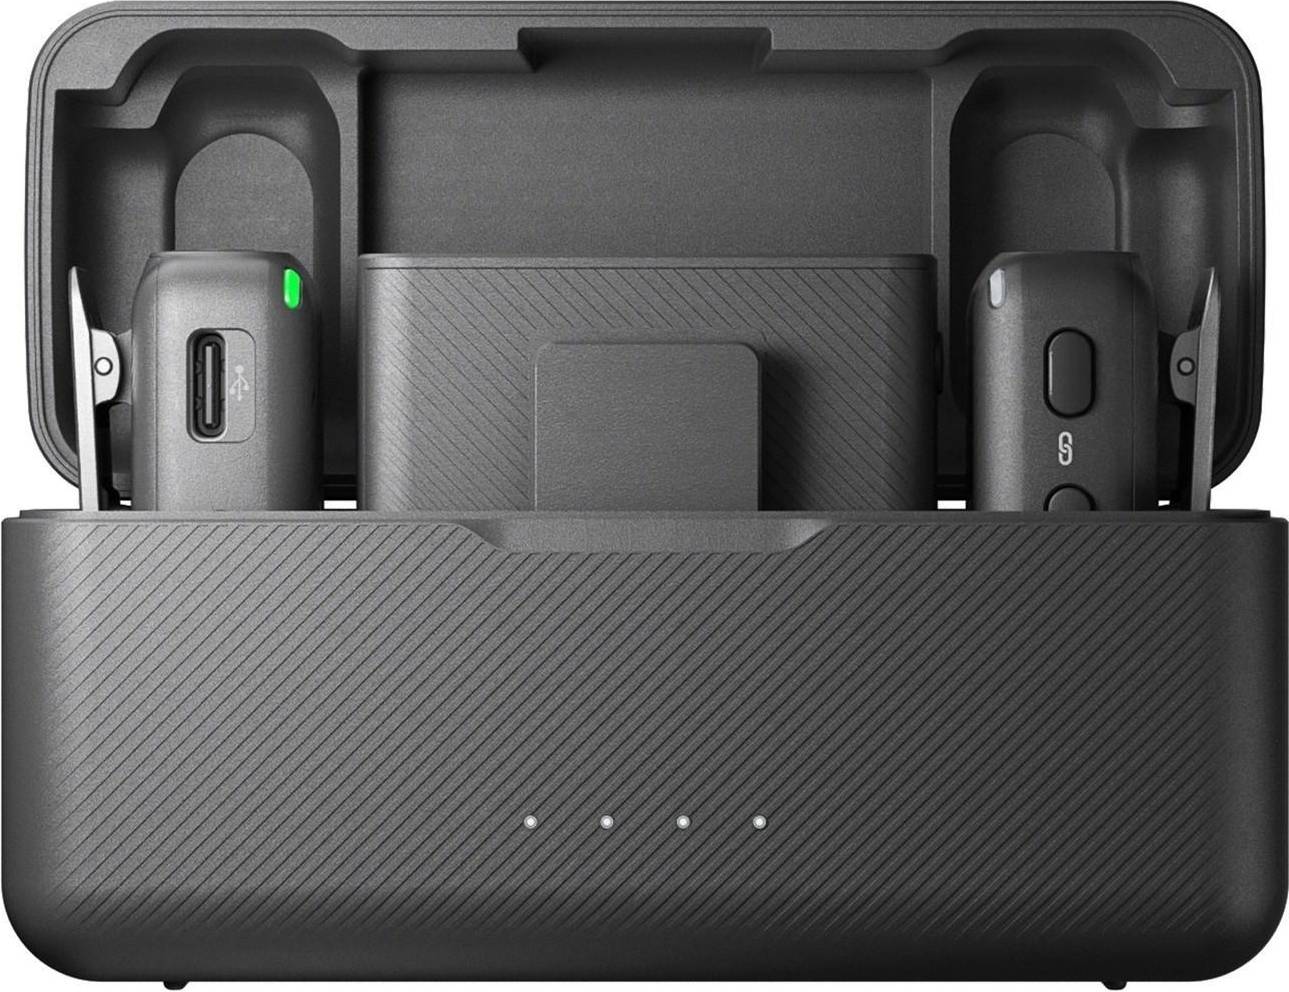
DJI 2 TX + 1 RX + Charging Case

$181.99

Experience seamless and crystal-clear audio with DJI’s professional-grade 2 TX + 1 RX + Charging Case microphone – the ultimate solution for capturing studio-quality sound in any setting.

Description

In the world of professional audio equipment, DJI has been a trusted name for years. Their range of products includes drones, gimbals, and cameras, but they have also ventured into the audio arena with their DJI 2 TX + 1 RX + Charging Case microphone system. This innovative solution offers a seamless wireless audio experience, making it an excellent choice for content creators, filmmakers, and broadcasters.

The DJI 2 TX + 1 RX + Charging Case microphone system is designed to provide reliable and high-quality audio transmission. It consists of two transmitters (TX) and one receiver (RX), allowing for flexible audio recording setups. The transmitters are compact and lightweight, making them easy to attach to a variety of equipment, such as cameras, drones, or even a person’s clothing.

The system operates on a 2.4GHz frequency, providing a stable and interference-free audio transmission. This is especially important for professionals who work in crowded areas or environments with multiple wireless devices. The 2.4GHz frequency also ensures a long-range transmission of up to 100 meters, allowing users to capture audio from a distance without compromising on quality.

One of the standout features of the DJI 2 TX + 1 RX + Charging Case microphone system is its charging case. This case not only acts as a storage and transportation solution but also doubles as a charging station for the transmitters and receiver. The case has built-in charging ports and a battery capacity of 1500mAh, ensuring that the system is always ready to use. This is particularly useful for professionals who work on location and need a reliable and convenient way to charge their equipment.

In terms of audio quality, the DJI 2 TX + 1 RX + Charging Case microphone system delivers exceptional results. The transmitters and receiver feature high signal-to-noise ratios and low distortion, ensuring that the audio captured is clear and detailed. The system also supports real-time monitoring, allowing users to listen to the audio being recorded in real-time. This feature is invaluable for professionals who need to ensure the audio quality while on set or during a live broadcast.

Another advantage of the DJI 2 TX + 1 RX + Charging Case microphone system is its user-friendly interface. The transmitters and receiver are equipped with easy-to-read LCD screens that display important information, such as signal strength, battery level, and audio levels. The system also offers simple one-button synchronization, making it quick and effortless to set up and pair the transmitters and receiver.

Overall, the DJI 2 TX + 1 RX + Charging Case microphone system is a versatile and reliable wireless audio solution. Its compact size, long-range transmission, and exceptional audio quality make it a valuable tool for professionals in various industries. Whether you’re a filmmaker capturing cinematic shots, a content creator recording interviews, or a broadcaster covering live events, this microphone system is sure to elevate the audio recording experience. With its innovative features and user-friendly design, DJI continues to prove that they are not only pioneers in the drone industry but also a force to be reckoned with in the audio world.
Additional information

Product name

Brand

Product type

Suitable For

,

Polar Patterns

Wireless

Colour

Clip-On

Mono/Stereo

Mute Button

Volume Control

Stand Included

USB

XLR

Reviews

There are no reviews yet.

Be the first to review “DJI 2 TX + 1 RX + Charging Case”

Your email address will not be published. Required fields are marked *

Frequently Asked Questions:

How do I connect the DJI 2 TX + 1 RX + Charging Case to my drone for improved transmission range and reliability during flight operations?

To connect the DJI 2 TX + 1 RX + Charging Case to your drone, you'll need to follow these steps:

1. Make sure that your drone is powered off before beginning this process. Insert one of the DJI transmitters (TX) into the remote controller (RC). Ensure that it's securely in place and properly connected. Attach the DJI receiver (RX) to your drone's flight controller, making sure that it's mounted securely and correctly oriented. Turn on your drone by pressing and holding the power button until the lights begin flashing. Power up your remote controller by pressing and holding the power button until the RC's lights start to flash. Wait for the RC's OLED screen to display "Searching" to confirm that it's connecting to the drone. Once you see "Connected" on the RC's screen, your DJI 2 TX + 1 RX + Charging Case is now successfully connected and ready for flight operations with improved transmission range and reliability. Remember to always follow proper safety protocols and guidelines when flying your drone, including keeping it within visual line of sight, avoiding restricted airspace, and obeying local laws and regulations.

How do I properly connect and pair the DJI 2 TX + 1 RX + Charging Case with external microphones for better audio quality during my drone flights?

To properly connect and pair DJI 2 TX + 1 RX + Charging Case with external microphones for better audio quality during your drone flights, follow these steps:

1. Check if your external microphone is compatible with the DJI system. DJI provides a list of compatible microphones on their website. If you're using an unlisted microphone, ensure that it has a 3. TRS or TRRS plug and supports plug-and-play connectivity. Connect the external microphone to one of the transmitter modules (TX) in the DJI 2 TX + 1 RX + Charging Case using a 3. TRS or TRRS cable, depending on your microphone's connection type. Ensure that the audio cable is securely plugged into both the microphone and the TX module. Power on the DJI 2 TX + 1 RX + Charging Case using its provided battery pack. Wait for all modules to stabilize and connect to each other via Bluetooth. Launch your drone's remote controller and turn it on, connecting it to the DJI system. Make sure that the TX module with the connected microphone is powered on as well. Go to your DJI app settings and navigate to the audio section. You should see a list of available inputs for your DJI 2 TX + 1 RX + Charging Case. Select the input channel corresponding to the connected TX module with the external microphone. Adjust the volume level of the external microphone in your app settings or directly on the drone's remote controller if supported. Test your audio quality by transmitting video footage through your DJI system while speaking into the connected external microphone. Ensure that the audio is clear and audible, without any interference or distortion. If you encounter any issues with audio connectivity or pairing, consult DJI's user manual or support resources for troubleshooting steps. By following these steps, you should be able to effectively connect and pair your DJI 2 TX + 1 RX + Charging Case with external microphones for superior audio quality during your drone flights.

How do I properly pair my DJI 2 TX + 1 RX + Charging Case with a microphone for use during film shoots?

To pair your DJI 2 TX + 1 RX + Charging Case with a microphone for use during film shoots, follow these steps:

1. Make sure that the DJI 2 TX and 1 RX modules are properly connected to each other in the charging case. Ensure that the DJI logo on both modules is facing upwards. Turn on your camera or recording device and set it to receive video signal from DJI's Lightbridge technology. Make sure that the frequency you're using for this setup matches with the one programmed into the DJI 2 TX module. Connect the microphone to the DJI 2 TX module using a TRS (tip-ring-sleeve) audio cable. The microphone should have a TRS jack as well, and it's important that you connect the correct ends - the tip should go into the mic port on the DJI 2 TX module, the ring should go into the audio port on the camera or recording device, and the sleeve should be connected to the ground. Turn on the DJI 2 TX module by pressing and holding the power button until the LED light starts flashing. The LED will turn solid green once the module is properly connected to the Lightbridge system. If your microphone requires external power, connect it to an external battery pack or a compatible power source using the TRS cable. Check that audio signal is being transmitted by monitoring the levels on your camera's audio meters or by listening to the audio output from headphones. Start filming or recording! Remember to keep the microphone within range of the DJI 2 TX module to ensure a stable and reliable connection.

Related Products