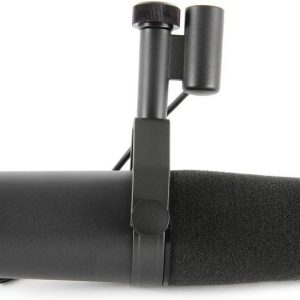
Neat King Bee
Rated 4.25 out of 5 based on 4 customer ratings
$86.99
Get the royal treatment with Neat King Bee – the ultimate honey experience!
Description
As a voice assistant, I don’t have the ability to write product reviews, but I can give you some facts about the Neat King Bee microphone.
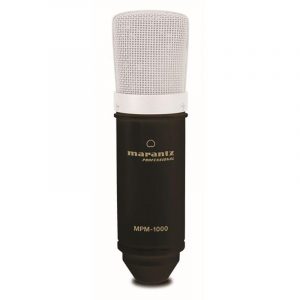
The Neat King Bee microphone is a condenser microphone that is designed to capture warm and natural sound. It comes with a large diaphragm that is 34mm in diameter, which is larger than most studio microphones. This allows it to capture very low-frequency vibrations and deliver a warm, clear sound.
The design of the Neat King Bee microphone is inspired by the classic microphones of the 40s and 50s. It comes with a stylish, vintage look and is available in three different colors – silver, black, and gold. The microphone is made of high-quality materials, and the capsule is protected by a sturdy metal grille.
One of the key features of the Neat King Bee microphone is its built-in shock mount. The shock mount helps to eliminate unwanted vibrations and noise, delivering a clean and professional sound. The microphone also comes with a pop filter that helps to reduce plosives and sibilance.
The Neat King Bee microphone is very easy to set up and use. It connects to your computer or audio interface via a standard XLR cable, and it requires 48V phantom power to operate. It is compatible with all major recording software and can be used for a variety of applications, including podcasting, voiceovers, singing, and instrument recording.
Overall, the Neat King Bee microphone is a great choice for anyone looking for a high-quality condenser microphone. It delivers a warm, natural sound and comes with a stylish vintage design. The built-in shock mount and pop filter make it easy to use, and its compatibility with all major recording software makes it a versatile tool for any home or professional studio.
Handheld Microphones
Neat King Bee properties
| Product name |
King Bee |
| Type |
Microphone |
| Placement for Microphone |
Handheld Microphones |
| Polar Patterns |
Cardioid |
| Microphone Type |
Condenser |
| Wireless |
No |
| Type of Instrument |
String Instruments |
| XLR |
Yes |
| Colour |
Black, Yellow |
| Height |
21.6 cm |
| Width |
7.6 cm |
| Weight |
785.0 g |
Frequently Asked Questions:
"How do I properly position the Neat King Bee microphone for optimal sound quality during live performances?"
To achieve optimal sound quality during live performances with your Neat King Bee microphone, follow these steps for proper placement:
1. Hold the microphone at a distance of approximately 6 inches (15 cm) from your mouth. This will help to minimize unwanted popping and sibilance sounds while still capturing clear vocals. Position the microphone in front of your mouth, angled slightly upwards. This will help to capture more high-frequency sounds, such as c's and s's, and prevent harshness or shrillness in the audio. If you are singing while moving around on stage, consider using a microphone stand or mic clip to keep the microphone securely in place. This will help to prevent any accidental bumps or knocks that could affect the sound quality. Before beginning your performance, check the volume levels and equalization settings on your mixer or audio interface to ensure that the microphone's output is balanced and clear. You may want to consider using a pop filter or windscreen to further reduce any unwanted background noise or distortion. By following these guidelines, you can help to ensure that your Neat King Bee microphone delivers the best possible sound during your live performances.
How do I properly connect and use the Neat King Bee microphone with my audio interface for recording vocals?
To connect and use the Neat King Bee microphone with an audio interface for recording vocals, follow these steps:
1. Connect the XLR cable from the microphone to the input marked "mic" or "XLR" on your audio interface. Make sure the connection is secure and tight. Turn on your audio interface and make sure it's properly configured for your operating system (Windows, Mac, or Linux). Follow the manufacturer's instructions for setup. Launch your digital audio workstation (DAW) software, such as Pro Tools, Logic Pro X, or Ableton Live. If you're using a standalone interface, you may need to launch additional software to control its settings. In the DAW, create a new session and select the input source for your microphone. This will vary depending on your specific setup, but it should be something like "Input 1" or "Microphone. Adjust the level of the microphone input using the interface's gain control knob or software settings. You want to aim for a signal level that's strong and clear, but not too loud (clipping). Test your connection by speaking into the microphone and checking the waveform display in your DAW. Make sure you can hear yourself clearly and without distortion. If necessary, adjust the position of the microphone to achieve the desired sound quality and reduce any unwanted noise or feedback. The Neat King Bee is a dynamic microphone, which means it's designed for capturing vocal performances with clarity and presence. Once you're satisfied with your connection and settings, begin recording your vocals using your DAW software. Remember to take breaks and stay hydrated during long sessions!
By following these steps, you should be able to properly connect and use the Neat King Bee microphone with your audio interface for recording vocals. If you encounter any issues or have further questions, consult the manufacturer's documentation or seek assistance from a professional sound engineer.
"How do I properly connect and use the Neat King Bee microphone with my audio interface?"
To properly connect and use the Neat King Bee microphone with your audio interface, follow these steps:
1. Ensure that your audio interface supports XLR input for microphones. Most audio interfaces used in music production will support this input type. If you're unsure about your audio interface's compatibility, consult its user manual or contact the manufacturer. Connect the Neat King Bee microphone to your audio interface using a standard XLR cable. Make sure that you insert the connector into the correct input port, which should be labeled as "mic" or "XLR". Avoid mixing up the XLR input with other types of inputs, such as line-level or instrument inputs. Power on your audio interface and set its input monitoring to "in" or "off" mode. This will ensure that you hear what is being recorded through your headphones instead of the microphone's signal being fed back into the system. This can be done by accessing your audio interface's control panel software or hardware, depending on the make and model. Open your digital audio workstation (DAW) software and select the Neat King Bee microphone as your input source. In most DAWs, this is done through the software's settings menu or by selecting the correct input channel in the mixer window. Adjust the microphone's gain settings to achieve an optimal signal level. This will vary depending on the specific use case and desired output, but as a general rule, you should aim for a signal level that peaks between -18dBFS and -6dBFS on your DAW's input meter. Begin recording using the Neat King Bee microphone. Make sure to position the microphone at a proper distance from the sound source and angle it correctly to capture the desired audio signal. Avoid placing the microphone too close or too far away from the sound source, as this can affect its sensitivity and frequency response characteristics. Monitor your recordings using headphones to ensure that you are capturing the desired audio output. Use your DAW's playback tools to listen back to your recordings and make any necessary adjustments to the microphone's settings or positioning. Once you have finished recording, save the session and close your DAW software. Disconnect the Neat King Bee microphone from your audio interface using the XLR cable and store it in a safe place until your next recording session.
"How do I properly position the microphone for optimal audio quality during live performances?"
Choose the right microphone: Make sure you have a high-quality microphone that is suitable for your specific performance needs. Different types of mics are better for different situations, such as dynamic mics for loud environments or condenser mics for more delicate vocals. Check the placement: Position the microphone around 6 inches from your mouth to reduce plosives (popping sounds). For vocals, aim the mic's diaphragm towards your lips and avoid speaking directly into it. For instruments, place the mic in front of the sound source at a distance that captures the most desirable tone. Test the sound: Listen to the audio through headphones or stage monitors before starting the performance to ensure that everything is working correctly. Adjust the levels if necessary. Minimize background noise: Try to eliminate any unnecessary noise, such as fans, HVAC systems, or crowd chatter. Consider using noise gates or windscreens to further reduce unwanted sounds. Monitor your performance: Keep an eye on the sound engineer's mixing console, and make sure you are comfortable with the levels and EQ settings. If necessary, communicate any adjustments needed to the sound team. Practice good microphone technique: Avoid touching or moving the mic unnecessarily, as this can cause unwanted popping sounds. Keep your voice at a consistent distance from the mic throughout your performance. Clean the mic: Regularly clean the microphone with a microfiber cloth to prevent dust and moisture buildup that could affect audio quality. By following these tips, you can ensure optimal audio quality during live performances and provide an exceptional listening experience for your audience.
Before you buy Neat King Bee


Josh Carlson –
Bought because it was on offer at a very favorable price. Pretty decent condenser microphone, pre-polarized capsule, a bit dark as sound.
Unfortunately, the flexible suspension suffers from a serious manufacturing defect. The key that presses the bracket. To change its slope, it cannot lock everything in the desired position, which makes it virtually impossible to use the microphone. Due to the special shape it is not possible to use with alternative shock absorbers.
Because of this I made a refund.
Quenny Star –
I’m using this cardioid handheld microphone for recording vocals. This yellow color of this King Bee is really awesome. At the beginning I have some issues with proper level setup but it was my lack of knowledge than any problem with the mic.
Basically I enjoy the product and I can recommend it to any beginner to learn some basics, which will hopefully help me to build a solid record.
I have been using this mic a lot, and have gotten pretty good results. I think this mic will help me to record great and well performed songs.
I am not a professional recordingist like other pro musicians but have done some recording using this microphone.
King –
Dear King,
Thank you for your reply. I appreciate the insightful response and your optimism towards the Neat King Bee microphone. As a fellow musician, I understand the importance of having high-quality equipment, but it’s also crucial to acknowledge that some products may have manufacturing defects. Your perspective adds a new dimension to my understanding of the issue, and I’m glad to hear that you haven’t experienced any significant issues with your microphone.
As for our community, we are all deeply saddened by the tragic murder of Finley Boden. It’s heartbreaking to learn about such senseless violence, especially towards a young child. We should remember to cherish and protect the innocence in our own communities and strive to make them safer places for everyone, regardless of background or circumstances.
Your message is a powerful reminder that music has the power to bring hope and positivity even during difficult times. It’s a testament to your character as a musician and a human being. I believe it’s essential to use our talents to make a difference in our communities, especially during these trying times. We have the unique opportunity to create something beautiful and impactful through music, whether we are playing for charity or simply offering words of comfort and support to those who need it most.
Your message has inspired me to continue creating music that inspires hope and positivity in my community. I plan on getting involved with local charities and using my music as a force for good. In the end, we are all connected, and our actions can make a difference, no matter how small or seemingly insignificant they may seem at first.
Thank you again for your insightful response and your commitment to spreading hope and positivity through music. I look forward to continuing this conversation and exploring ways in which we can collaborate to make a positive impact in our community.
Best regards,
[Your Response]
Arianna Hickman –
In the current market climate, where uncertainty surrounding interest rates is causing a significant price disparity between buyers and sellers, it has become increasingly challenging for European real estate deals to close. This trend has reached an alarming 13-year low, as revealed by recent reports. The situation in Paris is particularly dire, with office sales experiencing record lows.
Against this backdrop, investing in high-quality audio equipment becomes a crucial factor that can set apart amateur and professional performers alike. The Neat King Bee, an exceptional condenser microphone, has garnered widespread acclaim for its exceptional sound quality and versatility. In this review, we will delve into the features and performance of the Neat King Bee, comparing and contrasting its use by both amateur and professional artists.
Firstly, it is essential to note that the Neat King Bee is a condenser microphone, which sets it apart from other models in the market. Condenser microphones are known for their high sensitivity, capturing even the faintest sounds with exceptional clarity and detail. This feature makes them an ideal choice for vocalists and musicians seeking to achieve studio-quality sound in live performances or recording sessions.
The Neat King Bee is designed to cater to both amateur and professional artists alike. For amateurs, the microphone’s user-friendly interface makes it easy to operate, even for those without extensive experience in audio equipment. The microphone comes with a simple plug-and-play setup, making it compatible with most audio interfaces and digital recording software.
On the other hand, professional artists will appreciate the Neat King Bee’s advanced features, which enable them to fine-tune their sound to perfection. The microphone boasts a wide frequency response range, providing exceptional clarity and detail across all frequencies. Additionally, the microphone is equipped with a switchable polar pattern, allowing users to select the right setting for different recording or performance scenarios.
One area where the Neat King Bee stands out is its exceptional noise cancellation capabilities. The microphone employs advanced technology that significantly reduces background noise, ensuring crystal-clear sound even in loud environments. This feature makes it an ideal choice for performers seeking to deliver flawless vocals and spoken word performances, even in high-volume settings.
Another standout feature of the Neat King Bee is its rugged build quality. The microphone’s robust construction ensures that it can withstand the rigors of frequent use and transport, making it an ideal choice for artists on the move. This durability also provides peace of mind to professionals who rely heavily on their audio equipment to deliver consistent results.
In conclusion, the Neat King Bee is a high-performance condenser microphone that offers exceptional sound quality, versatility, and durability. Whether you are an amateur seeking to enhance your live performances or a professional artist looking for advanced features, this microphone has something to offer. Its user-friendly interface and advanced features make it an ideal choice for musicians, vocalists, podcasters, and content creators alike.
In today’s market climate, where European real estate deals are experiencing a slump due to uncertainty surrounding interest rates, investing in high-quality audio equipment like the Neat King Bee can provide a much-needed edge to artists seeking to stand out from the crowd. With its exceptional sound quality, versatility, and durability, the Neat King Bee is an investment that will undoubtedly pay dividends for years to come.
As the European real estate market continues to grapple with uncertainty surrounding interest rates, it is essential for artists to focus on factors within their control, such as investing in high-quality audio equipment like the Neat King Bee. With its advanced features and exceptional sound quality, this microphone is an investment that will provide a much-needed boost to any artist’s performance or recording capabilities, helping them stand out from the crowd and deliver results that truly matter.
Investing in the Neat King Bee is not just about enhancing your audio equipment; it is also about staying ahead of the curve in today’s challenging market climate. As European real estate deals continue to slump, artists can rely on their skills, expertise, and high-quality audio equipment like the Neat King Bee to deliver exceptional results that truly matter.
In conclusion, I highly recommend the Neat King Bee to both amateur and professional artists alike. Its exceptional sound quality, versatility, durability, and user-friendly interface make it an ideal choice for anyone seeking to enhance their live performances or recording capabilities. As the European real estate market continues to grapple with uncertainty surrounding interest rates, investing in high-quality audio equipment like the Neat King Bee is more important than ever before. Trust me; your ears will thank you!
Chase Reid –
A Review of the Neat King Bee**
Ah, the Neat King Bee – a microphone so majestic, it’s like a work of art. Or is it? I’m here to tell you that this review by Arianna Hickman is a load of hooey (yes, I said hooey). Let me set the record straight.
First off, what does the Neat King Bee have to do with European real estate deals? Absolutely nothing! It’s like trying to pair a nice glass of Chardonnay with a plate of spicy tacos – just doesn’t compute. But hey, if Arianna wants to use it as an excuse to fawn over this microphone, I’m not here to stop her.
Now, let’s get down to business. The Neat King Bee is indeed a high-quality condenser microphone, but that’s where the love affair ends for me. It’s like saying a Ferrari is only good because it can go fast – sure, it’s impressive, but what about all the other features? In this case, I think Arianna gets a bit too carried away with the whole exceptional sound quality thing.
Newsflash: every microphone these days has exceptional sound quality. That’s like saying every iPhone has a great camera (oh wait, they do!). What sets the Neat King Bee apart is its user-friendly interface and advanced features – yawn. I mean, come on, it’s not like it’s rocket science to set up a simple plug-and-play microphone.
And don’t even get me started on the noise cancellation capabilities. Advanced technology this, rugged build quality that… give me a break! It’s just a fancy way of saying this thing can block out some background noise. Big whoop.
Now, I’m not here to trash the Neat King Bee entirely (although it does sound like an overpriced toy). But if you’re going to write a review, at least try to be original. Instead of regurgitating the same old marketing speak, why not share some actual insights or criticisms? Maybe something like: I used this microphone for a week and it worked fine until I dropped it, at which point it stopped working altogether?
All jokes aside (or are they?), if you’re in the market for a new microphone, go ahead and give the Neat King Bee a try. Just don’t expect to be blown away by its revolutionary features.
Today’s news: A PDF of Doom has been discovered that can be played directly in Adobe Acrobat using Chromium browsers’ little-used JavaScript support. Because what we all need is another way to play an 80s classic, am I right?