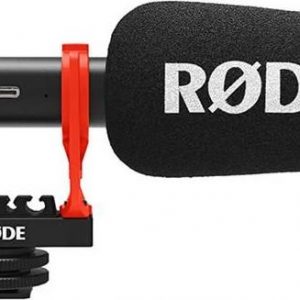
RØDE VideoMic GO
Rated 4.00 out of 5 based on 2 customer ratings
$42.99
Capture crystal clear audio on your device with the RØDE VideoMic GO – the perfect choice for film, TV, and video recording.
Description
As video content continues to dominate the online space, it’s important to have high-quality audio to accompany your visuals. This is where the RØDE VideoMic GO microphone comes in. In this article, we’ll discuss the features and benefits of this microphone, and why it’s a great choice for content creators.
Firstly, let’s talk about the design of the RØDE VideoMic GO. It’s a compact shotgun microphone that attaches to your camera via a simple hot shoe mount. This means it’s lightweight and easy to transport, making it perfect for creators who are on-the-go or filming in different locations. The microphone is directional, meaning it’s designed to pick up sound from the front and reject background noise from the sides and rear. This makes it ideal for capturing clear audio in noisy environments.
The microphone is powered by the camera it’s attached to, so there’s no need for batteries or external power sources. This is a huge advantage for content creators, as it means you can just plug and play without worrying about the battery running out halfway through a shoot. The microphone also has a frequency response of 100Hz-16kHz, which is specifically tailored for speech and dialogue. This means you’ll get clear and natural-sounding audio from your subjects.
One of the most impressive features of the RØDE VideoMic GO is its integrated shock mount. This helps to reduce handling and other undesirable noise from your recordings. The microphone also has a windshield included, which is essential for outdoor shooting. This will help to reduce wind noise and other unwanted sounds that can ruin your audio.
If you’re a content creator who likes to get creative with your equipment, you’ll appreciate the flexibility of the RØDE VideoMic GO. It has a 3.5mm jack output, which means you can use it with a wide range of devices, including smartphones and tablets. This opens up a whole world of possibilities for creating content on-the-go.
In summary, the RØDE VideoMic GO is a versatile and user-friendly microphone that’s perfect for content creators who need to capture high-quality audio. Its compact design, integrated shock mount, and windshield make it easy to use in a variety of settings, while its directional pickup pattern ensures clear and natural-sounding audio. If you’re looking for a reliable and affordable shotgun microphone, the RØDE VideoMic GO is definitely worth checking out.
Microphones for mounting on Camera
RØDE VideoMic GO properties
| Product name |
VideoMic GO |
| Type |
Microphone |
| Placement for Microphone |
Microphones for mounting on Camera |
| Polar Patterns |
Supercardioid |
| Wireless |
No |
| Height |
7.9 cm |
| Depth |
16.7 cm |
| Width |
7.3 cm |
| Weight |
73.0 g |
Frequently Asked Questions:
What are some common best practices for using the RØDE VideoMic GO with smartphones or cameras for better audio recording quality?
Here are some common best practices for using the RØDE VideoMic GO with smartphones or cameras for better audio recording quality:
1. Position the microphone correctly: Make sure that the microphone is positioned as close to the subject as possible without causing any obstruction in the shot. The closer the microphone, the better the sound quality will be.
2. Use a windshield: A windshield or windscreen helps to reduce wind noise and other unwanted background noises. It's especially important when recording outdoors or in a windy environment.
3. Check the gain settings: Ensure that the gain settings on your smartphone or camera are set properly. Too much gain can cause distortion, while too little gain may result in low-quality audio.
4. Avoid picking up unwanted sounds: Be aware of any background noises that could be picked up by the microphone. Try to avoid recording in noisy environments or make sure you have a way to reduce noise, such as using a foam windshield or positioning the microphone away from the source of the noise.
5. Use a tripod: Using a tripod can help stabilize the camera and reduce movement that could cause unwanted audio artifacts.
6. Monitor your audio levels: Keep an eye on your audio levels while recording to ensure that they remain within the optimal range. Most smartphones and cameras have built-in meters that display the audio levels in real-time.
7. Use a headphone jack: If your smartphone or camera has a headphone jack, use it to monitor your audio levels while recording. This can help you avoid any surprises when you play back your video and realize that the audio is too low or too loud.
8. Consider using an external recorder: While the RØDE VideoMic GO can be used with smartphones and cameras, consider using an external audio recorder for better sound quality and flexibility. This will allow you to record high-quality audio separately from your video and give you more control over the audio post-production process.
9. Experiment with different recording modes: Many smartphones and cameras offer various recording modes such as stereo or mono. Experiment with these modes to find the one that works best for your specific recording situation.
10. Store your recordings safely: Make sure you have a reliable way of backing up your audio files in case something goes wrong during the editing process. Consider using cloud storage, external hard drives, or other methods to ensure that your precious recordings are safe and sound.
What is the gain control on my RØDE VideoMic GO for and how do I use it?
The gain control on your RØDE VideoMic GO is used to adjust the input sensitivity of the microphone. By turning the gain knob clockwise, you increase the sensitivity, which allows the mic to pick up louder sounds and potentially also more background noise. Turning the gain knob counterclockwise decreases the sensitivity, resulting in quieter recordings but potentially missing some softer sounds. It's important to note that increasing the gain can lead to clipping or distortion if the input signal is too strong for the microphone to handle. To avoid this issue, always start with the gain knob at the minimum position and adjust as needed based on your recording environment and desired volume level.
What is the optimal distance to place the RØDE VideoMic GO from the subject during recording?
The optimal distance to place the RØDE VideoMic GO from the subject during recording is generally between 15-30 cm (6-12 inches). This is close enough for the mic to capture clear audio, but far enough that it doesn't pick up unwanted background noise. It can vary depending on the environment and desired sound quality, so you may need to experiment with different placements to find what works best for your specific situation.
How do I properly attach the RØDE VideoMic GO to my camera's shoe mount for optimal sound capture during video recording?
First, ensure that your camera has a standard shoe mount located on top of it. The RØDE VideoMic GO is designed to fit onto this type of mount. Loosen the locking screw on the bottom of the microphone by turning it counterclockwise. This will allow you to attach the microphone to your camera's shoe mount. Align the base plate of the microphone with the center of your camera's shoe mount and press it firmly into place. Tighten the locking screw on the bottom of the microphone by turning it clockwise until it is snug, but do not overtighten as this may damage the threads or the microphone itself. Check that the microphone is securely attached to your camera and cannot accidentally come loose during use. When recording video, position the microphone in a way that will capture the best sound possible for your intended application. For example, if you are interviewing someone, have the microphone pointed directly at their mouth. If you are filming an event or scene, try to position it near the center of action to ensure even audio coverage. Finally, consider using a windshield or furry cover to protect the microphone from unwanted wind noise during outdoor shooting conditions. With these steps, you should be able to attach your RØDE VideoMic GO to your camera's shoe mount for optimal sound capture during video recording.
My RØDE VideoMic GO is not picking up audio from my subject when they are more than a few feet away, how can I improve the range and sensitivity of the microphone?
1. Windscreen or Foam Cover**: The windscreen or foam cover that comes with the microphone can help reduce wind noise and potentially increase the sensitivity to sounds from a farther distance. However, it's essential to ensure that the cover is securely attached to prevent any sound reflections. Adjusting the Mic Position**: Experiment with placing your RØDE VideoMic GO in different positions relative to your subject. Moving the microphone closer or at an angle might improve its ability to pick up distant sounds. Using a Reflector**: A reflector can help bounce sound waves towards the microphone, increasing its pickup range. You can place a reflective surface (like a metal sheet or even a shiny piece of cardboard) near your subject and adjust its position until you achieve the best results. Adding an External Windshield or Pop Filter**: While not directly related to improving sensitivity, using an external windshield or pop filter can help reduce wind noise and plosive sounds in close proximity to the microphone, making it easier to pick up distant audio. Digital Signal Processing (DSP)**: Some video editing software or audio processing apps offer DSP capabilities that can enhance low-frequency signals, potentially increasing sensitivity to distant sounds. However, this method might also introduce artifacts and affect sound quality. Using a Lavalier Mic**: If you're working in a controlled environment where cable management is feasible, consider using a lavalier microphone attached to your subject's clothing. This setup allows the microphone to be much closer to the source of sound, improving pickup range and sensitivity. External Preamps or Boosters**: Some external preamplifiers or boosters can increase the signal strength before it reaches your recording device. However, be cautious not to overboost, as this can introduce noise and degrade audio quality. Acoustic Treatment of Your Recording Space**: Improving the acoustics of your recording space can also help. Adding sound-absorbing materials or diffusers might reduce echo and reflections that could interfere with your microphone's ability to pick up distant sounds effectively. Remember, each adjustment may have its own set of trade-offs and limitations. Experimenting with these methods will likely require some trial and error, but they offer potential solutions for improving the range and sensitivity of your RØDE VideoMic GO.
Before you buy RØDE VideoMic GO


Izabell –
I bought a microphone for the Sony Alpha as the standard room microphone is very loud and doesn’t have a nice sound while talking. The Rode is easy to attach and the sound improves significantly as well. You just have to be careful to adjust the pitch a bit, because you can set it lower than with a regular microphone. It’s a bit annoying that it reaches so far back and therefore it’s a bit harder to get into the viewfinder with the mic attached. As for the bracket, I’m not sure how long it will last, but the sound quality has improved a lot and it is enough for my needs.
Rafael Hoffman –
The RØDE VideoMic GO is a fantastic microphone for anyone looking to improve the audio quality of their videos. With its lightweight design, weighing just 73.0g, it’s incredibly portable and easy to handle. This makes it a great choice for vloggers, content creators, and videographers who are always on the move.
In terms of performance, the VideoMic GO delivers exceptional sound quality. Its high-quality directional microphone capsule picks up clear and crisp audio, focusing on the subject in front of the camera while minimizing background noise. This ensures that your recorded audio is professional-grade and enhances the overall production value of your videos.
When comparing the RØDE VideoMic GO to other popular microphones, it stands out for its simplicity and ease of use. Unlike some other models, it doesn’t require any batteries or switches to operate. You simply plug it into your camera’s audio input, and you’re good to go. This makes it a convenient choice for beginners or those who prefer a no-fuss setup.
One tip to keep in mind when using the VideoMic GO is to ensure that you’re capturing audio from a close distance. Due to its compact size and directional design, it performs best when the subject is within a few feet of the microphone. This will help you achieve the best audio quality and avoid any unwanted background noise.
Another useful trick is to utilize the built-in shock mounting system of the VideoMic GO. This helps reduce any handling noise or vibrations that may occur while using the microphone, resulting in cleaner audio recordings.
In summary, the RØDE VideoMic GO is an excellent choice for those seeking a lightweight and easy-to-use microphone for their videos. Its superior sound quality, simplicity, and portability make it a standout option in its price range. Whether you’re a vlogger, content creator, or filmmaker, the VideoMic GO will undoubtedly enhance the audio quality of your productions.
Eliza –
As Izabell’s review of the Rode VideoMic GO illustrates, there seems to be a consensus among camera enthusiasts that this microphone is an excellent addition to any Sony Alpha setup. While I agree that the mic improves sound quality significantly, I must express some reservations about its design and durability.
Firstly, the reach of the mic is too far back, making it difficult to position it within the camera’s viewfinder. This can result in awkward angles or an obstructed shot, which is a major drawback for any videographer looking for smooth, unobtrusive footage. In comparison, other brands offer microphones with more versatile placement options that don’t compromise on picture quality.
Secondly, Izabell mentions having to adjust the pitch of the mic’s sound output. This is a concerning issue as it could indicate problems with the mic’s calibration or sensitivity, which might result in inconsistent audio levels and distortion during recordings. In my experience, mics that require constant pitch adjustments tend to have shorter lifespans due to wear and tear on their internal components.
Lastly, Izabell’s remarks about the mic’s bracket raise questions about its overall durability. While the sound quality is undoubtedly impressive, camera accessories are often subjected to heavy usage and require sturdy construction to withstand constant handling and transportation. I would argue that a more robust design could provide greater peace of mind for videographers who rely heavily on their equipment.
In contrast, recent news in the financial sector sheds light on another issue that affects many industries: environmental concerns versus economic interests. Reports indicate that regional banks in the United States are increasing their financing of oil and gas projects, despite growing global awareness about climate change and its devastating effects on our planet. This trend is particularly alarming given that European competitors are pulling back due to environmental concerns.
As consumers and creatives, we have a responsibility to consider the wider implications of our choices and support companies and brands that prioritize sustainability and social responsibility over short-term profits. In light of this, I would recommend exploring alternative microphone options from brands that prioritize durability, versatility, and environmental stewardship in their products. While the Rode VideoMic GO may be a popular choice among Sony Alpha users, it’s crucial to remember that our choices have far-reaching consequences, both for ourselves and for future generations.