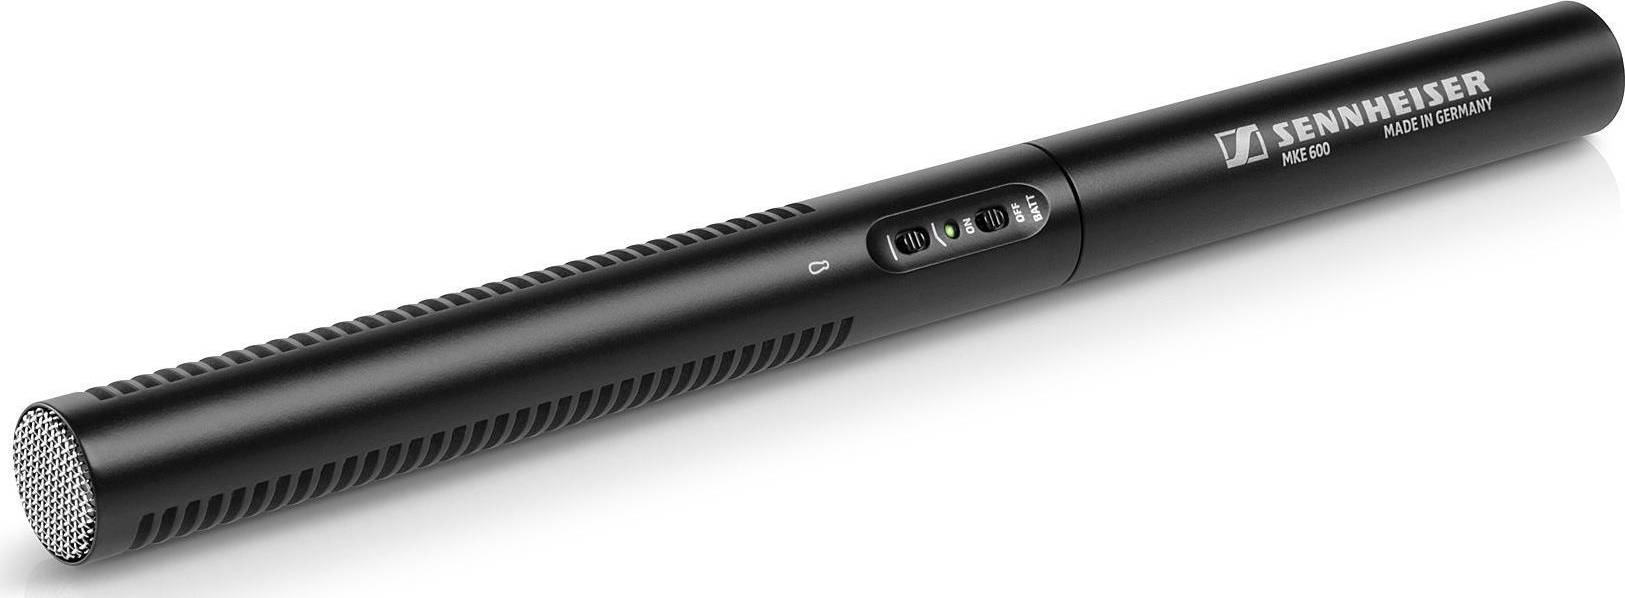
Sennheiser MKE 600

$201.99

Capture crisp and professional audio with the Sennheiser MKE 600 microphone, perfect for filmmakers, broadcasters, and content creators seeking top-notch sound quality.

Description

Sennheiser is a renowned brand in the audio industry, and their MKE 600 microphone is no exception to their commitment to quality and performance. This shotgun microphone is a versatile tool for professional audio recording, suitable for various applications such as filmmaking, broadcasting, and podcasting.

One of the standout features of the Sennheiser MKE 600 is its exceptional sound quality. The microphone utilizes a highly directional shotgun pickup pattern, which allows for focused audio capture while minimizing background noise. This makes it ideal for capturing clear and crisp audio in environments with significant ambient noise, such as on-location film shoots or busy event spaces.

Additionally, the MKE 600 microphone features a low-cut filter that helps attenuate low-frequency rumble and wind noise, further enhancing audio clarity. This filter can be easily switched on or off, allowing for flexibility in different recording situations.

Another advantage of the MKE 600 is its high sensitivity, ensuring that even the faintest sounds are captured accurately. This sensitivity, combined with its low inherent self-noise, makes it an excellent choice for recording dialogue, interviews, or any audio where capturing subtle nuances is crucial.

The microphone also offers excellent off-axis rejection, meaning it rejects sound from the sides and rear. This feature is especially beneficial in environments with multiple speakers or sources of audio, as it helps isolate the desired sound source and reduces unwanted noise interference.

The Sennheiser MKE 600 is designed with durability in mind, making it a reliable tool for professionals who frequently work in challenging conditions. The microphone’s rugged metal housing provides protection against the rigors of field recording, ensuring it can withstand the demands of outdoor use.

Furthermore, the MKE 600 is powered by a single AA battery, providing up to 150 hours of operation. This feature is particularly useful for remote recording situations where access to power sources may be limited. The microphone also includes an integrated foam windscreen to further reduce wind noise, although it is recommended to use an additional windshield in extremely windy conditions.

In terms of connectivity, the MKE 600 offers a standard 3-pin XLR output, allowing it to be easily connected to a wide range of audio recording devices, such as cameras, field recorders, or mixers. Its compact and lightweight design makes it highly portable and compatible with various setups.

Overall, the Sennheiser MKE 600 microphone is a top-notch choice for professionals seeking a reliable and high-quality shotgun microphone. Its exceptional sound quality, off-axis rejection, durability, and versatility make it a valuable tool for a wide range of audio recording applications. Whether you are a filmmaker, broadcaster, or podcaster, the MKE 600 is capable of delivering outstanding audio performance in any situation.
Additional information

Product name

Brand

Product type

Polar Patterns

Wireless

Colour

Mute Button

Volume Control

Stand Included

USB

XLR

Reviews

There are no reviews yet.

Be the first to review “Sennheiser MKE 600”

Your email address will not be published. Required fields are marked *

Frequently Asked Questions:

How do I properly attach and detach the Rycote Lyre shock mount from the Sennheiser MKE 600 microphone for optimal performance during audio recordings?

To attach the Rycote Lyre shock mount to the Sennheiser MKE 600 microphone, follow these steps:
1. Hold the microphone in your hand with the XLR connector facing downwards. Locate the Rycote Lyre shock mount and ensure that it is in the correct orientation (the logo on the shock mount should be facing upwards). Slide the shock mount onto the threaded base of the microphone, making sure that the threads align properly. Firmly twist the shock mount clockwise until it is securely attached to the microphone. To detach the Rycote Lyre shock mount from the Sennheiser MKE 600 microphone, follow these steps:
1. Hold the microphone in your hand with the XLR connector facing downwards. Locate the Rycote Lyre shock mount and ensure that it is in the correct orientation (the logo on the shock mount should be facing upwards). Firmly twist the shock mount counterclockwise to unscrew it from the threaded base of the microphone. Carefully remove the shock mount from the microphone and store it separately for safekeeping or transport purposes.

How do I properly connect and operate the Sennheiser MKE 600 microphone for the first time?

Unpack the Sennheiser MKE 600 microphone from its packaging, making sure all accessories such as the windscreen, battery, and carrying pouch are included. Insert a fresh AA battery into the bottom of the microphone. Make sure the battery is installed with the positive (+) side facing upwards. Attach the provided windscreen to the top of the microphone to prevent wind noise during outdoor recordings. Connect the microphone to your camera, smartphone, or audio recorder using a compatible XLR-to-mini jack adapter or cable. If you're not sure which connector is needed, consult the user manual or manufacturer's website for specific recommendations. Power on the microphone by holding down the power button located on the side of the unit until the LED light turns green. The microphone should beep once to confirm it's powered on. Adjust the gain level using the volume control wheel located at the top of the microphone. Make sure the audio levels don't exceed 0 dB to avoid distortion. Check the audio levels and monitor the sound through your camera or recording device. Use headphones to ensure accurate monitoring, especially in loud environments where it may be difficult to hear audio signals clearly. Once satisfied with the audio quality, begin recording using your preferred software or hardware. Remember to turn off the microphone when finished to conserve battery life. To clean the microphone, use a soft, dry cloth to wipe down the surface of the unit. Avoid getting water or moisture inside the microphone body as this can damage its internal components. Store the Sennheiser MKE 600 microphone in the included carrying pouch to protect it from dust and scratches during transport.

How do I connect my Sennheiser MKE 600 microphone to my iPhone for recording audio?

To connect your Sennheiser MKE 600 microphone to your iPhone, follow these steps:
1. Make sure your Sennheiser MKE 600 is powered off. Plug the Lightning cable into the bottom of your Sennheiser MKE 600. The end that plugs into the device has a small circle cutout on it. Connect the other end of the Lightning cable to the Lightning port on your iPhone. Turn on your Sennheiser MKE 600 by pressing and holding the power button until you hear a beep and see the LED light up. Open the Voice Memos app on your iPhone. Tap the "+" icon in the upper left corner to start a new recording. Adjust the levels by tapping and dragging the sliders at the top of the screen until you hear the audio level indicator in the bottom right corner reach about -12 dB. This will ensure that your recording is not too loud or quiet. Tap the red record button to start recording. To pause or stop the recording, tap the record button again. When you're finished recording, tap the "Done" button in the upper right corner and then tap "Save" to save your recording.

"How should I properly connect and use the Sennheiser MKE 600 microphone with my camera for the first time?"

Check your camera's manual to ensure it is compatible with the XLR input needed by the Sennheiser MKE 600 microphone. If you are unsure, you can contact the manufacturer or a professional audio expert for guidance. Purchase an XLR-to-XLR cable (such as a 3-pin to 3-pin cable) that is compatible with both your camera and the Sennheiser MKE 600 microphone. This will connect the microphone's output to your camera's input. Before connecting the microphone, ensure that it is turned off to prevent any damage to either device. Connect one end of the XLR-to-XLR cable to the microphone's output (located at the bottom of the microphone). The cable should fit securely into the connector. Locate your camera's input port for the XLR cable, which is typically located on the side or back of the camera body. Insert the other end of the cable into this port. Again, make sure the connection is secure. Turn on both the camera and microphone. You may see a message on your camera's display asking if you want to switch to an external input source (i. Select "yes" or follow the instructions provided by your camera's manual. Adjust the audio levels for the microphone using your camera's settings menu. This can typically be found in the audio or sound section of the settings menu. You may need to experiment with different settings until you achieve optimal audio quality. If desired, attach a windscreen (a protective cover that reduces wind noise) to the bottom of the microphone to further improve audio quality in outdoor environments. Practice using the microphone and camera to become familiar with the setup process and make any necessary adjustments. Remember to always store and transport the microphone and cable carefully to prevent damage. For future use, follow steps 4-8 as needed. If you encounter any issues or questions regarding your Sennheiser MKE 600 microphone or camera setup, consult the manufacturer's manuals or seek assistance from a professional audio expert.

Related Products