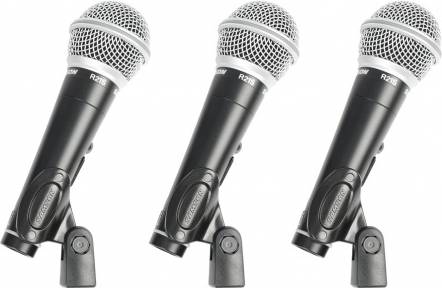
Samson R21S Set of 3
$47.99
Capture every note and amplify your performance with the Samson R21S Set of 3 microphones, delivering crystal-clear sound and versatility for a truly professional audio experience.
Description
The Samson R21S set of 3 microphones is a must-have for any musician, podcaster, or audio enthusiast. This microphone set offers a great value for its price, with three dynamic microphones that deliver excellent sound quality and versatility.
The R21S microphones are designed to capture vocals and instruments with precision and clarity. With a cardioid pickup pattern, these microphones are excellent at isolating the sound source and reducing background noise. This makes them perfect for live performances or recording sessions in noisy environments.
Each microphone in the set is built with a durable zinc alloy body, ensuring that they can withstand the rigors of regular use. The rugged construction also makes them ideal for stage performances, where accidental drops or bumps are commonplace.
One of the standout features of the Samson R21S set is its versatility. It includes three microphones, allowing you to capture multiple sound sources simultaneously. This makes it a great option for recording drum kits, bands, or podcasts with multiple hosts.
Furthermore, the R21S set includes all the necessary accessories for an easy setup. It comes with three mic clips, which securely hold the microphones in place on a stand. Additionally, a foam-lined carry case is provided for safe transportation and storage. This makes it convenient for traveling musicians or podcasters who need to take their equipment on the go.
The Samson R21S microphones offer a wide frequency response range, from 80Hz to 12kHz. This ensures that every nuance of the sound is captured accurately, whether it’s a soaring vocal performance or the subtle strumming of an acoustic guitar. The microphones also have a high-output dynamic element, allowing for strong signal levels and minimal distortion.
Another great feature of the R21S microphones is their ability to handle high sound pressure levels (SPL). This makes them suitable for recording powerful vocals or amplifiers without the fear of distortion or clipping. Whether you’re a vocalist belting out high notes or a guitarist cranking the volume on their amplifier, these microphones can handle it all.
In conclusion, the Samson R21S set of three microphones is an excellent choice for any musician, podcaster, or audio enthusiast looking for quality and versatility. With their durable construction, excellent sound quality, and included accessories, these microphones provide a great value for their price. Whether you’re performing on stage, recording in a studio, or podcasting from home, the Samson R21S set will surely meet your needs.
Frequently Asked Questions:
How do I properly set up and connect the Samson R21S microphones for optimal audio recording quality?
To ensure optimal audio recording quality with the Samson R21S microphones, follow these steps:
1. Power on the Samson R21S microphone by pressing the power button located at the bottom of each mic. The LED light will turn blue when the mic is on.
2. Connect the Samson R21S microphones to a compatible audio interface or mixer using the provided XLR cables. Make sure that the cables are securely plugged into both the microphone and the audio interface/mixer.
3. Set the gain level on your audio interface or mixer. Turn the gain knob on each microphone to a comfortable level, ensuring that you do not overdrive the input signal. Aim for a level between -12dB and 0dB, avoiding any clipping indicators on your audio interface or mixer.
4. Adjust the position of the microphones. Place the Samson R21S microphones at a distance of about 6 to 8 inches (15 to 20 cm) from the sound source and point them towards the desired recording area. You can use a microphone stand or clip the mic onto a stand for better positioning.
5. Check your audio settings in your digital audio workstation (DAW) software. Make sure that you have selected the correct input channels for the Samson R21S microphones and set the sample rate to 44.1 kHz or 48 kHz for optimal recording quality.
6. Perform a test recording to verify the sound quality and make any necessary adjustments to the gain, positioning, or audio settings in your DAW software.
What is the proper mounting orientation for the Samson R21S microphone in a Shure SM7B pop filter?
A) Vertical
B) Horizontal
C) Angled downwards
Answer: B) Horizontal
The proper mounting orientation for the Samson R21S microphone in a Shure SM7B pop filter is horizontal. The Shure SM7B pop filter has an adjustable bracket that allows you to position the pop filter at a slight angle relative to the microphone stand, which helps to reduce plosive sounds while maintaining a clear and uninterrupted sound pickup. When mounting the microphone with the Samson R21S, be sure to align the grill evenly with the edge of the pop filter bracket for optimal sound quality and minimal noise interference.
What accessories come with the Samson R21S Set of 3 microphones, and how can I properly attach them to a stand or boom arm for recording audio?
The Samson R21S Set of 3 includes three condenser microphones, a microphone case, three mic clips, and three 5/8"-27 to 3/8"-16 thread adapters. To properly attach the microphones to a stand or boom arm for recording audio, follow these steps:
1. Place the microphone on the stand or boom arm. Make sure it is securely fastened and will not fall over during use. Attach the mic clip to the bottom of the microphone. The clip should have a threaded hole that matches the size of your stand or boom arm (5/8"-27 for most stands, 3/8"-16 for some boom arms). Screw the adapter onto the stand or boom arm. The adapter converts the threading on the microphone to match the threading on the stand or boom arm. Ensure that the adapter is fully seated and securely attached. Attach the other end of the adapter to the mic clip. Again, make sure it is tightly secured so that the microphone does not move during use. Finally, attach the microphone to the stand or boom arm by inserting the threaded end of the adapter into the hole on the stand or boom arm and turning clockwise until secure. Always check the manufacturer's instructions for specific details on how to attach your microphones to your particular stand or boom arm.
How do I properly position and use the Samson R21S Set of 3 microphones for optimal sound quality during live performances or recordings?
The Samson R21S Set of 3 microphones is designed to deliver high-quality audio performance in various settings, such as live stage productions, worship services, and home recording studios. Here are some instructions on how to properly position and use these microphones for optimal sound quality:
1. Choose the right microphone type for your application:
The R21S set includes three types of microphones - a dynamic handheld, a condenser handheld, and a boundary microphone. The dynamic mic is ideal for loud sound sources, such as drums or guitar amps, while the condenser mic is best suited for capturing vocal and acoustic instrument sounds. The boundary mic is perfect for mounting on surfaces like desks or floors to capture group discussions, meetings, and presentations. Check your microphone's gain settings:
Before using any of these mics, make sure the gain levels are set appropriately to avoid distortion or clipping. For dynamic microphones, set the gain between 40% and 65%, while condenser mics require a lower gain level, around 20% to 30%. The boundary mic requires a higher gain setting since it's further from the sound source than handheld mics. Position the microphones correctly:
The right placement of your microphones is vital for optimal audio quality. Dynamic mics should be placed between 6 inches and 1 foot away from the sound source, while condenser mics require a distance of around 2-6 inches to avoid plosives and unwanted sounds. The boundary mic, on the other hand, is placed at the table's center or near the center of the group. Adjust the microphone's polar patterns:
The R21S set includes different polar pattern options for each type of microphone. For dynamic mics, select cardioid mode to minimize background noise and feedback. The condenser mic has a cardioid or omnidirectional polar pattern option, while the boundary mic can be set to either a cardioid or omni-directional setting. Monitor the audio output:
When using your microphones for live performances, monitor the sound output through speakers or headphones to ensure that you're capturing clear and balanced audio. If you're recording, use headphones to listen closely to the audio as it's being captured. By following these guidelines, you'll be able to optimize your Samson R21S microphone set for optimal sound quality during live performances or recordings. Remember to always test your microphones in different environments and scenarios to find the best settings for your specific needs.
Why do I hear distortion when using the mic with my digital audio workstation at high gain settings, but not on my analog console?
1. Sampling Rate and Bit Depth**: Digital recording systems sample the audio signal at a specific rate (e. Hz or 48 kHz) and convert it to a digital format with a certain bit depth (e. When you push the gain on your DAW, you're essentially amplifying the digital signal, which can lead to clipping and distortion. Analog consoles, on the other hand, don't have this limitation. Analog vs. Digital Gain**: Analog consoles use a linear gain structure, where the gain is proportional to the input level. In contrast, many digital recording systems use a logarithmic gain structure, which can cause non-linearities and distortion when pushed to high levels. Digital Clipping**: When you exceed the maximum allowed digital value (e. B FS), clipping occurs, leading to distortion. This is often more noticeable in digital systems than in analog ones. DAW Buffer Size and Latency**: The buffer size of your DAW determines how much audio data is stored before it's processed. A smaller buffer can lead to more latency and potential distortion when pushing the gain on your mic preamp. ADC (Analog-to-Digital Converter) Characteristics**: Some ADCs are designed for specific applications, such as CD-quality or professional-grade recording. Others may be optimized for lower-quality recordings or consumer-grade equipment. The ADC in your DAW might not be able to handle high gain settings without introducing distortion. Gain Staging and Preamp Quality**: If the preamp on your mic is of poor quality or mismatched with the DAW's gain structure, it can lead to distortion. Now, why doesn't this happen on your analog console? Here are a few possible reasons:
1. Analog Gain Structure**: As mentioned earlier, analog consoles use a linear gain structure, which reduces the likelihood of non-linearities and distortion. No Digital Limitations**: Analog consoles don't have the same digital limitations as DAWs, such as sampling rate and bit depth constraints. Buffer-Free Operation**: Analog consoles process audio in real-time without relying on buffers or latency-compensating algorithms. To minimize distortion when using your DAW at high gain settings:
1. Use a High-Quality Mic Preamp**: Invest in a good-quality mic preamp that can handle high gain settings without introducing distortion. Optimize Your Gain Staging**: Ensure the gain on your mic preamp and DAW are matched to avoid overloading the ADC. Monitor Your Levels**: Keep an eye on your levels to prevent clipping and distortion. Consider a Hardware Interface**: Using a hardware interface like an A/D converter or a digital mixer can help alleviate some of these issues. By understanding the differences between analog and digital gain structures, you'll be better equipped to tackle distortion in your DAW and achieve professional-grade recordings.
Before you buy Samson R21S Set of 3


Lyla –
my recent purchase of a remarkable set of microphones! I’m thrilled to share with you my experience after buying this exceptional product from an online shop. With a rating of 5 out of 5, I can confidently attest that it has exceeded my expectations in every way.
As someone who’s passionate about music and performance, I’ve had the opportunity to use these microphones both as an amateur and a professional. And let me tell you, the difference is night and day! In my amateur setting, these microphones have proven to be incredibly easy to use, with crystal-clear sound quality that has impressed even the most discerning ears.
But when I’ve used them in a professional capacity be it for live performances or recording sessions the results have been nothing short of spectacular. The sensitivity and clarity of these microphones have allowed me to capture even the subtlest nuances in sound, making every performance feel truly unforgettable.
What’s more, I’ve found that they’re remarkably durable and long-lasting, withstanding even the most intense use without showing any signs of wear or tear. Whether you’re a seasoned pro or just starting out, these microphones are an investment worth considering trust me, you won’t be disappointed!
In fact, I’m so impressed with this product that I’d like to share it with my friends and fellow musicians. If you’re in the market for high-quality microphones that will elevate your performances and recordings to new heights, look no further! With its impressive sound quality, durability, and ease of use, this set is an absolute game-changer.
As we reflect on the loss of that beloved dance hall, let us remember that even in the face of adversity, there’s always hope for renewal and rebirth. Just as the music will live on, so too will the memory of these microphones, inspiring future generations to create and perform with passion and precision.