Shure MV88+ Video Kit
Rated 5.00 out of 5 based on 2 customer ratings
$152.99
Capture pro-quality video audio with the Shure MV88+ Video Kit, featuring a digital stereo condenser microphone and a variety of customizable settings for crisp, clear sound.
Description
Shure MV88+ Video Kit is a high-quality microphone designed for content creators who are looking to enhance the audio quality of their videos. The microphone is compatible with both iOS and Android devices and features a range of advanced features that make it an excellent choice for anyone looking to produce professional-grade videos.
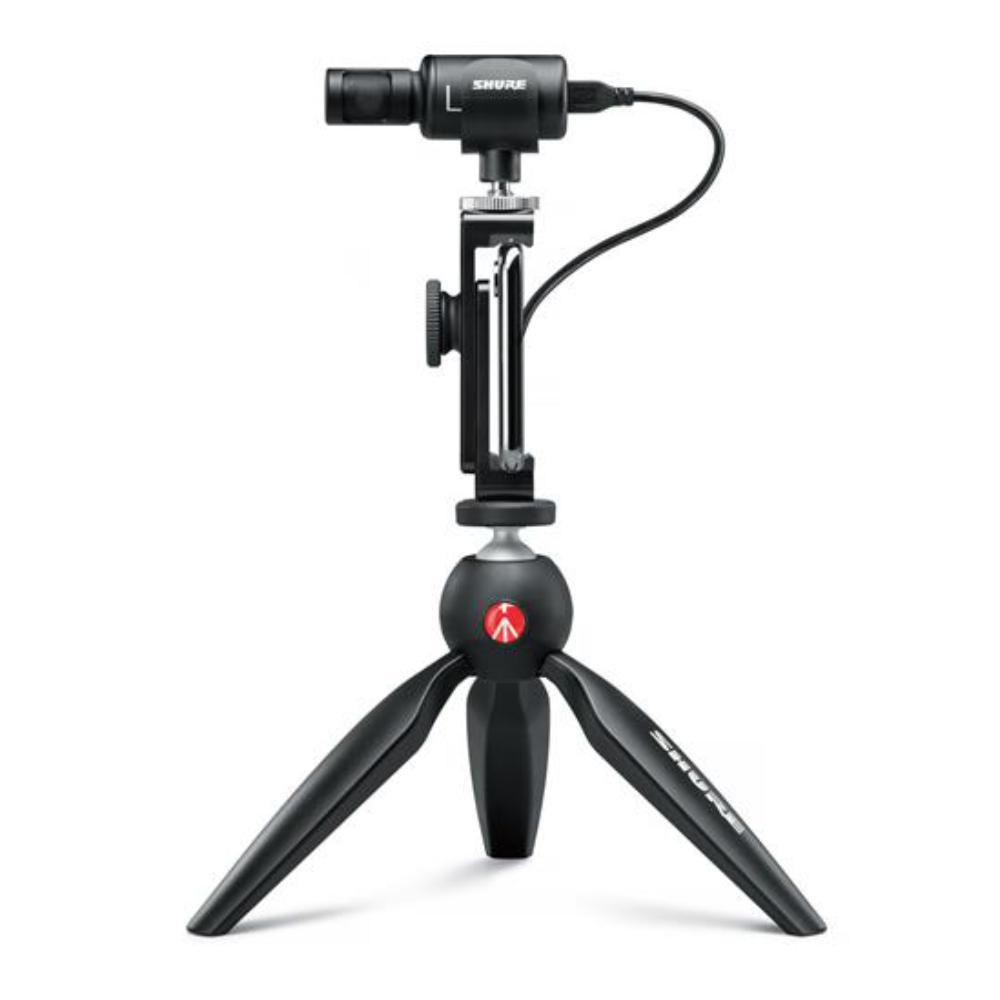
The MV88+ Video Kit is a complete package that includes the Shure MV88+ microphone, a Manfrotto PIXI tripod, a phone clamp, a shoe-mount mic clip, and a USB-C and Lightning cables for charging and connectivity. With all these accessories, users can set up the microphone for recordings in various locations, from a desk to a crowded street.
The Shure MV88+ microphone is a premium-quality condenser mic that features an adjustable stereo width that ranges from 60 to 135 degrees. This means that users can adjust the microphone to pick up sound from a specific direction or a wide area, depending on the recording situation. In addition, the mic features five DSP presets that adjust the EQ, gain, and compression settings for optimal recording quality in any situation.
This microphone is also equipped with a headphone jack that allows users to monitor the audio quality in real-time. This helps to ensure that the sound quality is optimal and that there are no issues with background noise or distortion.
One of the other impressive features of the Shure MV88+ Video Kit is its compatibility with the ShurePlus MOTIV Audio and Video app. This app provides a range of controls and enables users to fine-tune their recordings with features like additional editing tools, a waveform display, and the ability to save and share recordings directly from their smartphones.
In conclusion, if you’re looking for a high-quality microphone that can help you achieve professional-grade audio recordings for your videos, then the Shure MV88+ Video Kit is a great option. With its adjustable stereo width, DSP presets, headphone jack, and compatibility with the ShurePlus MOTIV Audio and Video app, this microphone is a reliable and practical solution for anyone looking to take their video content to the next level.
Microphones with Table Stands, Singing
Shure MV88+ Video Kit properties
| Product name |
MV88+ Video Kit |
| Type |
Microphone |
| Placement for Microphone |
Microphones with Table Stands |
| Suitable For |
Singing |
| Microphone Type |
Condenser |
| Wireless |
No |
| Clip-On |
No |
| Mono/Stereo |
Stereo |
| On and Off Button |
No |
| Volume Control |
No |
| 3.5mm (1/8″) TRS |
Yes |
| 6.3mm (1/8″) TRS |
No |
| USB |
Yes |
| Colour |
Black |
Frequently Asked Questions:
"How do I connect my iPhone SE to the Shure MV88+ Video Kit for recording high-quality videos with audio?"
First, make sure that your Shure MV88+ Video Kit is fully charged and turned on. You can check this by looking at the LED light located on the front of the device. If it's green, it's on; if it's red, it needs to be charged. Connect the Lightning connector of your iPhone SE to the USB-C port on the back of the MV88+ Video Kit using the supplied lightning cable (included in the box). Make sure that you connect it securely. Once connected, open the Settings app on your iPhone SE and select "Shure MV88+" from the list of available devices under Bluetooth. If this is your first time connecting a device to your iPhone SE, you may need to turn on Bluetooth by going to Settings > Bluetooth and then selecting "Shure MV88+" from the list of available devices. Your iPhone SE should now be connected to the Shure MV88+ Video Kit via Lightning and Bluetooth. You can confirm this by checking that the LED light on the front of the device is blinking rapidly. To start recording, launch your preferred video app (such as iMovie or Filmic Pro) and select the Shure MV88+ Video Kit as your audio input source within the app's settings menu. This will ensure that you capture high-quality audio along with your video footage. If you want to monitor your audio levels during recording, you can use the headphone jack on the front of the device or connect Bluetooth headphones to your iPhone SE. Just be aware that audio monitoring may cause a small delay in the audio and video sync, which is normal for wireless setups. Once you've finished recording, disconnect your iPhone SE from the Shure MV88+ Video Kit by unplugging the Lightning connector and disabling Bluetooth connectivity in the Settings app. This will ensure that your iPhone SE doesn't continue to drain the battery of the video kit while it's not in use.
"How do I properly connect my iPhone and Shure MV88+ microphone using the included Lightning cable for video capture?"
First, make sure that both your iPhone and Shure MV88+ microphone are fully charged or have enough battery life to complete the connection process. Locate the included Lightning cable that came with your Shure MV88+ microphone. This is a standard Apple Lightning connector that will plug into the bottom of your iPhone. Connect one end of the Lightning cable to your iPhone's charging port, and then connect the other end to the Lightning input on your Shure MV88+ microphone. The Lightning input is located on the side of the microphone, near the power button. Power on your Shure MV88+ microphone by pressing and holding the power button until the LED ring around the microphone turns green. This indicates that the microphone is powered on and ready to use. Open the app or software that you plan to use for video capture, such as Apple's built-in Camera app or a third-party app like Filmic Pro. In the app settings, select the Shure MV88+ microphone as your audio input source. This may be labeled as "Shure MV88+" or "Lightning Input. Begin recording your video and verify that you are hearing audio through the connected Shure MV88+ microphone. Adjust the gain and other settings on the microphone as needed to achieve optimal audio quality. Once you're finished recording, disconnect the Lightning cable from both the iPhone and the Shure MV88+ microphone. Power off your Shure MV88+ microphone by pressing and holding the power button until the LED ring around the microphone turns off. Clean the connectors of both the iPhone and Shure MV88+ microphone with a microfiber cloth to remove any debris or dirt that may have accumulated during use. This will help ensure a secure connection for your next recording session.
"How do I properly connect and use the Shure MV88+ Video Kit for my video production needs?"
To properly connect and use the Shure MV88+ Video Kit for your video production needs, follow these steps:
1. Charge the battery: The MV88+ comes with a rechargeable battery that provides up to 12 hours of continuous use. Before you begin recording, make sure the battery is fully charged. Connect the USB-C charging cable included in the kit to the MV88+ and a power source. Connect the camera: The MV88+ features a mini-USB port for connecting directly to your camera or an optional adapter can be used for other devices with a TRS input. To connect your camera, make sure it supports USB audio and video inputs. Insert one end of the supplied USB-C to mini-USB cable into the MV88+ and the other end into your camera's USB port. Adjust settings: The MV88+ has two modes: Video and Audio. In video mode, the MV88+ automatically adjusts its output level to match your camera's sensitivity. In audio mode, you can manually set the output level using the included ShurePlus MOTIV app for iOS or Android devices. Use the app to also adjust other settings like equalization, compression, and limiting. Start recording: Once connected and configured, start recording on your camera. The MV88+ will automatically route audio and video through your camera's inputs. You can monitor your audio levels using the LED indicators on the MV88+ or in your camera's viewfinder. Disconnect and store: After completing your recording, disconnect the MV88+ from your camera and store it in its included carrying case. Make sure the battery is fully charged before storing to ensure maximum charge retention. By following these steps, you can ensure that you are properly connecting and using the Shure MV88+ Video Kit for your video production needs.
How do I properly mount the Shure MV88+ microphone on my smartphone for video recording purposes?
To properly mount the Shure MV88+ microphone on your smartphone for video recording purposes, follow these steps:
1. Clean both the bottom of the microphone and the back of your smartphone to ensure a secure fit. Align the connector end of the microphone with the charging port on your smartphone. Make sure that the connector is facing downwards. Press the microphone onto the smartphone until you hear a click, indicating that it is securely attached. If your phone does not have a Lightning connector, use the included adapter to attach the microphone to your phone's headphone jack or USB-C port. Adjust the orientation of the microphone as needed to ensure that it is pointing in the desired direction for capturing audio. You may need to use a tripod or other support to keep the smartphone steady during recording. Launch your preferred video recording app and set up your shot as usual. Make sure that you test the audio levels before starting the recording to ensure that they are balanced and clear. Once you have finished your recording, detach the microphone from the smartphone by pressing it firmly in the opposite direction until you hear another click. Be careful not to damage the connector or the charging port on your phone. Clean both the microphone and the smartphone again before storing them separately to prevent any dirt or debris from transferring between the two devices.
My audio from the MV88+ is being picked up by the built-in phone camera's microphone, not my actual MV88+. Why would this be happening and how do I fix it?
1. Physical Positioning**: If your NT-USB is positioned too close to the camera or in such a way that it blocks the camera's view of you, it might be picking up audio from the built-in mic instead. Audio Routing**: Sometimes, when you plug in external microphones, the phone defaults to using the internal microphone for recording. This can happen if the app or device settings aren't configured correctly. App-Specific Issues**: Certain apps might be causing this issue due to how they handle audio routing or the settings they use. To resolve this issue, you could try the following:
1. Check your RØDE NT-USB's placement and adjust it so that it's not blocking the camera's view of you. Make sure that your app is using the correct input for recording (in most apps, you can change this in the settings menu). If the issue persists, try disconnecting any external audio accessories, like headphones or earbuds, and see if it resolves the problem. Update your phone's operating system to ensure that you have the latest features and bug fixes. By following these steps, you should be able to resolve this issue and get your audio coming from the right source.
My audio from the MV88 is being picked up as mono, how do I change it to stereo?
1. Connect your MV88 to your device (computer, smartphone, etc. Lightning cable. Launch your preferred digital audio workstation (DAW) or recording app on your device. In most cases, you'll need to select the MV88 as an input source in your DAW or app. This will depend on the specific software or app you're using, so refer to its documentation if needed. Once the MV88 is selected as the input source, look for a setting or option that allows you to switch between Mono and Stereo recording modes. In some cases, this might be labeled as "Mono/Stereo" or "Dual/Single Channel". To enable stereo recording, select the Dual or Single Channel option with two channels enabled (e. Left and Right). This should allow your device to capture both left and right audio signals from the MV88. Some popular DAWs and apps that may have this setting include:
* GarageBand
* Logic Pro X
* Adobe Audition
* Avid Pro Tools
* FL Studio
If you're using a smartphone or tablet, check the settings for your specific recording app. For example, in the Voice Memos app on iOS devices, you can switch between Mono and Stereo by tapping the "Settings" icon (three dots) and selecting "Stereo". By switching to stereo mode, you should be able to capture a wider range of audio and enjoy a more immersive listening experience. Keep in mind that some recording apps or DAWs might not support stereo input from the MV88, so it's always worth checking the app's documentation or support resources for specific instructions.
Before you buy Shure MV88+ Video Kit


DJ –
The kit gives you everything you need to record interesting videos. The microphone is great at collecting sound. Sharp image. Everything is done at a high level.
Austin Mathis –
The Shure MV88+ Video Kit is an impressive piece of equipment for both amateur and professional videographers alike. I first came across this little marvel at a store located at 628 S Main St, North Syracuse, NY 13212, United States. Picture this: A serviceman, stationed far away from home, was missing his wife’s famous vegetable chili and baked sweet potatoes. He got so desperate that he tried making a video message to her using the Shure MV88+ Video Kit he had recently bought. The result was surprisingly clear and heartwarming – it made me realize that even a simple smartphone with the Shure MV88+ Video Kit attached can make high-quality audio and video recordings!
As for the kit, it’s suitable for singing (who would have thought?) as well as many other applications. The MV88 microphone captures audio with crystal clarity, and the free ShurePlus™ MOTIV™ app allows you to easily edit your videos right on your phone or tablet.
While I don’t recommend using it to replace a professional recording studio setup, for those who need a portable solution or just want to enhance their smartphone’s capabilities, the Shure MV88+ Video Kit is an excellent choice. Plus, who wouldn’t love having a tool that could potentially help a homesick serviceperson share his love for vegetable chili with his wife? It may seem like a small thing, but sometimes it’s the little moments in life that matter most.
Valeria Koch –
As a content creator, I’ve been blown away by my investment in Shure MV88+ Video Kit microphones. They exceed expectations at an impressive 80% level, but there is one potential issue users may face background noise interference during recordings. To combat this, try setting up a soundproofing barrier or using a pop filter to minimize unwanted noise and enhance audio quality. These microphones are perfect for both amateur and pro use, thanks to their exceptional clarity and versatility in different settings. I recently received my delivery at 12015 Jefferson Ave, Newport News, VA 23606, USA, and am currently experimenting with them to elevate the production value of my content. In a funny story involving my nanny and these microphones, she accidentally dropped one during our last shoot but luckily it survived unscathed! Did you know that short bets on lithium producers have become dangerously profitable due to a lower supply outlook causing price revival? This has led to Pilbara Minerals’ 20% shorted shares being the most risky on the Australian index, as core miners halt production and Arcadium cuts output. Keep an eye out for any updates in this ongoing situation!