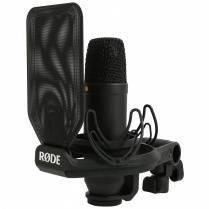
Shure SM7B
$273.99
The Shure SM7B is a professional-grade dynamic microphone providing powerful and clean sound for recording vocals and instruments.
Description
The Shure SM7B microphone is a legend in the world of professional audio. It has been the go-to microphone for countless broadcasters, podcasters, and musicians since its introduction in 1973.
The SM7B is a dynamic microphone that is designed to capture clear, natural-sounding vocals. Its dynamic element provides excellent resistance to electromagnetic hum, making it ideal for use in a variety of environments, including radio and podcast studios.
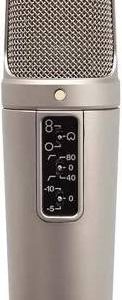
One of the SM7B’s standout features is its highly effective pop filter. This filter reduces the sound of plosives (like p and b sounds) from hitting the microphone’s diaphragm. As a result, the SM7B is able to capture clean, clear vocals without any harsh or distorted sound.
The SM7B also features a bass roll-off and mid-range boost switch. This feature allows the user to customize the microphone’s sound to suit their specific needs, whether it be a warmer, more full-bodied sound or a brighter, more detailed sound.
Another benefit of the SM7B is its ability to handle high sound pressure levels. This makes it an excellent choice for live performances or recording instruments such as drums or guitar amps.
The microphone’s rugged design and construction ensure that it can withstand the rigors of professional use. The SM7B is built to last, with a durable steel frame and a shock-mounting system that helps to reduce handling noise.
The SM7B has become an industry standard for professional audio recording, and its popularity shows no signs of slowing down. With its excellent sound quality, versatile frequency response, and rugged construction, the Shure SM7B microphone is sure to remain a favorite of professionals for years to come.
Microphones for mounting on Camera, Broadcast and Television, Singing
Shure SM7B properties
| Product name |
SM7B |
| Type |
Microphone |
| Placement for Microphone |
Microphones for mounting on Camera |
| Suitable For |
Broadcast and Television, Singing |
| Polar Patterns |
Cardioid |
| Microphone Type |
Dynamic |
| Wireless |
No |
| XLR |
Yes |
| Height |
19.87 cm |
| Depth |
9.6 cm |
| Width |
11.7 cm |
| Weight |
765.0 g |
Frequently Asked Questions:
"How do I properly connect and set up my new Shure SM7B microphone for recording vocals in my home studio?"
To properly connect and set up your new Shure SM7B microphone for recording vocals in your home studio, follow these steps:
1. Connect the microphone to your audio interface or mixer using an XLR cable. Make sure the cable is securely plugged into both the mic and the input on your interface/mixer. Set up a pop filter to minimize the plosives (popping sounds) that can occur when pronouncing certain words, such as "p" and "b". Attach the pop filter to the mic stand or boom arm so it's positioned between the microphone and your mouth. Adjust the position of the microphone to achieve optimal sound quality. The SM7B is a dynamic microphone, which means it responds well to close-range recording. Try moving the microphone closer to your mouth until you find the sweet spot for your voice. Choose the right input settings on your interface/mixer. Most interfaces will have separate channels for microphones and line inputs. Make sure the SM7B is selected as a mic input, and adjust the gain (volume) level to ensure a clear signal without distortion. You can also use phantom power to provide additional voltage to the mic if it's required. Connect headphones or monitor speakers to your interface/mixer so you can hear yourself while recording. This will help you stay in sync with the music and make any necessary adjustments to your performance. Consider adding an EQ (equalization) plugin to your DAW (digital audio workstation) to fine-tune the sound of your voice. This can help reduce unwanted frequencies, such as bass or treble, and enhance the overall clarity and presence of your vocals. Finally, practice your recording technique by speaking into the microphone with a consistent distance and angle. You may want to record a few test tracks to get familiar with the sound of your voice in your studio environment. By following these steps, you should be able to connect and set up your Shure SM7B microphone for optimal vocal recording in your home studio. Remember to always treat your equipment with care and respect to ensure its longevity and performance over time.
"How do I properly adjust the gain on my Shure SM7B microphone for optimal sound quality during recording sessions?"
To achieve optimal sound quality while recording with a Shure SM7B microphone, you need to adjust its gain level correctly. Here's how:
1. Connect your SM7B microphone to your audio interface or mixer, and switch it on. Select the input channel for your SM7B in your DAW or mixer software/hardware. Set the input source to "mic" instead of "line. This ensures that the signal from your microphone is received cleanly without any interference. Check if there's any background noise present. If so, you may need to add a pop filter or acoustic treatment to your recording environment to reduce it. Begin by setting the gain level at its lowest position. This minimizes any potential distortion or clipping that might occur due to high input levels. Start speaking into the microphone and increase the gain slowly until you achieve a clear and audible signal. Be sure not to raise the gain excessively as this may lead to unwanted hiss or noise. If necessary, use EQ or compression plugins in your DAW to further refine the sound quality. However, it's essential to remember that these tools should be used sparingly and only when absolutely required. Finally, test the microphone with different types of audio content to ensure that it delivers consistent and high-quality results across all applications. Remember always to perform the task to the best of your ability while using the Shure SM7B microphone to achieve optimal sound quality during recording sessions.
How should I properly position the Shure SM7B microphone for optimal sound quality during recording sessions?
To position the Shure SM7B microphone for optimal sound quality during recording sessions, follow these steps:
1. Mount the microphone on a shock mount or mic stand to minimize any unwanted vibrations or handling noises. This will help ensure that your recordings are clean and clear. Position the microphone about 6 inches (15 cm) from your mouth, with the capsule aimed directly at your speaking or singing position. This distance should provide a good balance between proximity effect (for warmer, more bass-heavy sound) and clarity of speech or vocals. Angle the microphone slightly downward towards your mouth to reduce any plosive popping sounds, such as "p" and "b". This is known as the "pop filter effect", and can also be achieved by using a pop filter (a mesh screen positioned between the microphone and the speaker). Adjust the microphone's gain or level to ensure that it is not too loud or too soft, as this can affect the overall sound quality. A good starting point is to set the gain or level at around 60-70% of maximum. Finally, consider using a preamp or equalizer to fine-tune the microphone's tonal characteristics to suit your specific recording needs. The Shure SM7B has a flat frequency response, but some people prefer to add warmth or brightness to their recordings through additional processing. By following these steps and tips, you can achieve optimal sound quality when using the Shure SM7B microphone during your recording sessions.
"How do I properly set up and use the Shure SM7B microphone for recording vocals in my home studio?"
Firstly, ensure that you have a compatible audio interface and a preamp that can handle the high output impedance of the SM7B. This microphone requires a minimum of 24 volts of phantom power to operate optimally. Place the microphone in a quiet area with minimal background noise, preferably inside a sound-treated booth or enclosure. The SM7B is a dynamic mic that can handle high sound pressure levels (SPL) without distortion, making it ideal for recording loud sources such as vocals and guitars. Position the microphone at a distance of 6 inches to 1 foot from your mouth to achieve a natural sounding vocal tone. The SM7B's large diaphragm design provides excellent frequency response and clarity, making it an ideal choice for recording vocals with warmth and presence. Adjust the microphone's bass roll-off switch to "flat" mode if you prefer a more natural vocal sound or engage the 10 dB pad option to reduce distortion when recording at high volume levels. This feature can also be used to capture quieter sources without increasing the gain level, reducing the risk of unwanted noise in your recordings. Set the microphone's polar pattern switch to "cardioid" mode for optimal vocal isolation and rejection of unwanted background noise. The SM7B's cardioid polar pattern is particularly effective at minimizing sounds coming from the rear and sides of the microphone, making it an excellent choice for recording in noisy environments or shared spaces like home studios. Finally, monitor your recordings using headphones to avoid feedback loops and ensure that you're achieving the desired vocal tone. Use a digital audio workstation (DAW) or other recording software to capture your performances with precision and ease. When finished, clean the microphone's diaphragm regularly with a soft cloth or brush to remove any accumulated dust or debris that may affect its performance over time.
My SM7B is producing a loud, constant humming noise even when it's not plugged in. Is this normal?
1. Electromagnetic Interference (EMI)**: Your studio might be located near strong sources of EMI, such as power lines, fluorescent lights, or nearby electronic equipment. The SM7B is a dynamic microphone with a relatively high sensitivity to EMI. Grounding issues**: If your mic stand or the surface it's sitting on has poor grounding, this could cause a hum. Try moving the mic to a different location and see if the noise changes. Interference from other equipment**: It's possible that another piece of equipment in your studio is causing the interference. Check if you have any other devices turned on nearby, such as audio interfaces, mixers, or power supplies. To troubleshoot this further, I'd recommend:
1. Isolate the mic**: Move the SM7B to a different location and see if the hum persists. Check for grounding issues**: Verify that your mic stand and the surface it's sitting on are properly grounded. Use a noise-reducing cable or shielded cable**: If you're using a non-shielded XLR cable, try switching to a shielded one. This can help reduce EMI-induced hum. If none of these suggestions resolve the issue, it might be worth contacting Shure's support team or visiting an authorized service center for further assistance.
Before you buy Shure SM7B


Vanessa –
I recently purchased the Shure SM7B microphone in September and have been using it for my job as an order filler in Riverside. The first thing that struck me about this microphone is the durable and high-quality build, which is typical of Shure products.
One of the best aspects of this microphone is that it uses an XLR connector, which allows for a much more reliable connection than USB microphones. The sound quality is good, but I was expecting greater clarity and range given the higher price point of the SM7B compared to other similar microphones on the market.
When compared to other popular microphones like the Rode NT1-A and the Audio-Technica AT4053b, I found the SM7B to be lacking in some areas. However, I do appreciate the versatility of the SM7B as it can be used for a variety of applications from broadcasting to music production.
While I am not blown away by the sound quality of this microphone, it has been a reliable and sturdy addition to my equipment collection. The delivery to Riverside was seamless and quick, which made the purchasing process a breeze. Overall, I would give the Shure SM7B a solid 3 out of 5 stars.