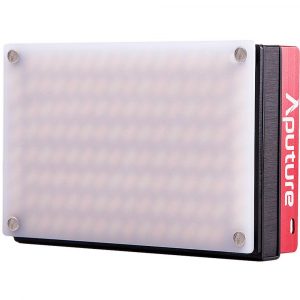
Aputure MC
Rated 2.00 out of 5 based on 4 customer ratings
$85.99
Description
Aputure MC properties
| Product name |
MC |
| Type |
Studio Lightning |
| Type of Lighting |
LED |
| USB |
Yes |
| Height |
6.1 cm |
| Width |
9.1 cm |
| Depth |
1.7 cm |
Frequently Asked Questions:
How do I set up studio lighting for my Apurture MC camera?
Here are some steps you can follow to set up studio lighting for your Aputure MC camera:
1. Determine the purpose of your shoot and the type of lighting effect you want to achieve. This will help you decide on the type and number of lights needed.
2. Choose the right light modifiers. You can use umbrellas, softboxes, or diffusers to create different types of lighting effects.
3. Set up your main light source. The main light should be positioned at a 45-degree angle from the subject's face and slightly above eye level. This will provide a flattering light that accentuates facial features.
4. Add fill light if needed. Fill light is used to reduce shadows on the side of the face opposite the main light source. You can use a smaller light or bounce light off a reflector to achieve this effect.
5. Set up backlighting or rim lighting. This type of lighting creates a halo effect around the subject and separates them from the background. Place the backlight behind and slightly above the subject's head.
6. Adjust the power levels of your lights. Use your camera's built-in light meter or an external one to ensure that all lights are balanced and provide even illumination on the subject.
7. Test your setup. Take some test shots with different lighting combinations until you find the perfect balance for your shoot.
8. Consider using gels or color correction filters if you need to adjust the color temperature of your lights.
Remember that practice makes perfect, so don't be afraid to experiment with different lighting setups and techniques to achieve the look you want.
How do I set up and adjust my studio lighting using Apurture MC?
To set up and adjust your studio lighting using the Aputure MC, follow these steps:
1. Place the MC mount on your camera's hot shoe or use a compatible adapter if necessary.
2. Connect the MC controller to the MC receiver.
3. Power on both devices by pressing and holding the power button until the indicator light turns green.
4. Turn on the Aputure MC lights you want to control using their individual switches.
5. On the MC controller, press the "M" button to enter manual mode. Use the left and right arrow buttons to select a specific light, then use the up and down arrow buttons to adjust the power output of that light.
6. If you want to change the color temperature or white balance of a particular light, press the "C" button on the MC controller, select the light, and use the left and right arrow buttons to choose a preset color temperature (in Kelvin) or white balance mode.
7. To save your settings for future use, press the "M" button again and then press and hold the "OK" button until the indicator light flashes three times. This will store the current settings as a user-defined scene.
8. To recall a saved scene, press the "M" button and then press the "S" button to cycle through your stored scenes until you find the one you want. Press the "OK" button to activate that scene.
How do I properly attach and detach the diffuser from the Aputure MC light panel?
To attach the diffuser to the Aputure MC light panel, follow these steps:
1. Align the diffuser's velcro strips with the corresponding areas on the back of the MC light panel. Press the diffuser onto the light panel firmly and evenly. Make sure there are no wrinkles or creases in the diffuser to ensure even lighting. To detach the diffuser from the Aputure MC light panel, follow these steps:
1. Grasp the edges of the diffuser and gently pull it away from the light panel. Make sure to lift the entire diffuser at once and avoid pulling on the corners to prevent tearing or creasing. Store the diffuser in a safe place when not in use.
How do I properly attach and use the Aputure MC as a wireless trigger for my studio lighting setup?
To utilize the Aputure MC as a wireless trigger for your studio lighting setup, you need to follow these simple steps:
1. Power on the MC transmitter and select the desired channel using the plus (+) and minus (-) buttons on its left side. Make sure that the selected channel matches the corresponding channel of the receiver units. Insert two AA batteries into the MC transmitter (not included). The device will automatically enter pairing mode, indicated by a rapid blinking green light. If you don't see this light, press and hold the M button until it appears. Attach the MC transmitter to your camera's hot shoe mount or use the 1/4" threaded hole on its bottom for alternative mounting options. Make sure that the MC transmitter is securely attached to prevent accidental detachment during shooting. Turn on your studio lighting setup and ensure that the receiver units are connected to a power source and have their channels set correctly. Test the wireless trigger functionality by firing the shutter button or using your camera's remote control feature. The lights should turn on automatically, indicating successful communication between the MC transmitter and the receiver units. Adjust the lighting levels and other settings as needed to achieve the desired results. You can also use the M button to switch between different modes, such as S1 (single shot), S2 (continuous shooting), and R (release mode). When you're done using the MC wireless trigger, make sure to turn off both the transmitter and receiver units to conserve battery life. Store them in a safe place when not in use. By following these simple steps, you can easily attach and use the Aputure MC as a wireless trigger for your studio lighting setup, allowing you to enjoy greater flexibility and convenience during your shooting sessions.
My Aputure MC has stopped working after an update, and I'm getting an error message saying "Firmware mismatch". How do I resolve this issue?
That's frustrating! Firmware mismatch errors can be a real pain to deal with. Don't worry, I've got some steps that might help you resolve the issue. Firstly, make sure that your Aputure MC device is properly connected to your computer or tablet via USB or Wi-Fi. Sometimes, connectivity issues can cause firmware-related problems. Next, try updating the firmware on your device again. It's possible that the update process got interrupted or was not completed correctly earlier. You can do this by connecting your Aputure MC to a computer and using their firmware update software. This might help resolve any issues with the firmware being out of sync. If updating the firmware doesn't work, try resetting the device to its factory settings. This will erase all your custom settings and configurations, but it might help resolve any issues with corrupted or outdated firmware. Another option is to try flashing a new firmware onto your Aputure MC using a specialized tool like Rufus (for Windows) or Etcher (for Mac). These tools can help you manually update the firmware on your device. However, be aware that this process can be complex and requires some technical expertise, so proceed with caution. Lastly, if none of these steps work, it might be worth reaching out to Aputure's customer support for further assistance. They may have specific troubleshooting procedures or even a replacement program available for devices experiencing firmware-related issues.
How do I adjust the color temperature on the Aputure MC if it's not showing up in the settings menu?
First, ensure that your software or app is up-to-date. This is because older versions may have limitations when it comes to adjusting color temperatures. Next, check if there's a firmware update available for your Aputure MC. Firmware updates can sometimes resolve issues with certain features not functioning as expected. If updating the firmware doesn't help, you might need to reset your light panel to its default settings. This will erase any custom settings you may have made, but it'll also ensure that you're starting from a clean slate. After resetting the device, try accessing the color temperature setting again. If it still doesn't appear in the menu, there could be an issue with the hardware or a specific software glitch affecting your Aputure MC. In cases where hardware is involved, contact Aputure's customer support for assistance. They may need to repair or replace your device if the problem persists after troubleshooting.
Before you buy Aputure MC


Raul –
Basically, the Aputure MC Light is a high quality product. What I don’t like at all is that the Sidus Link app, without which I cannot use the full range of functions of the light, wants the access to my location, my camera and the permission to make REQUIRED recordings. Without this permission, the Aputure MC will not connect to the Sidus Link app and I cannot use all functions. What??? Now my video light wants to monitor me? I will probably send the light back. As good as it is…
Lincoln –
As a professional photographer, I always look for the best lighting tools available in the market. Recently, I got my hands on the Aputure MC, and I must say I am highly impressed with this product.
The Aputure MC is a compact and versatile LED light. Its 9.1 cm width makes it easy to carry in my camera bag, making it my go-to lighting tool for outdoor shoots. Moreover, its easy-to-use interface allows me to adjust the brightness, hue, and saturation according to my preference, giving me complete control over the lighting scenario.
What sets the Aputure MC apart from other studio lighting equipment is its wireless control ability through the Sidus Link App. It gives me the ease of controlling the light from my phone without having to walk back to the set. This feature is particularly useful when I’m shooting alone or with a small team.
The light output is fantastic, and the colors are beautifully saturated, making my photos look more vibrant and vivid. Another feature worth mentioning is its built-in rechargeable battery, making it eco-friendly and extremely convenient.
Overall, I highly recommend the Aputure MC for any professional or amateur photographers who are looking for a versatile, easy-to-use, and reliable lighting solution. Its compact size, wireless control, and superb output make it a must-have lighting tool for any photographer. I would rate Aputure MC 5 out of 5 stars.
Jack –
Dear Raul, thank you for sharing your thoughts on the Aputure MC Light. While we understand your concerns regarding the Sidus Link app’s permissions, we would like to offer a different perspective on this matter. Firstly, the app’s requirement for location access is necessary for its geolocation feature that allows users to easily find and connect to nearby lights. This feature can come in handy during events or shoots where multiple lights are being used simultaneously. Secondly, the camera permission is required because the app needs access to your device’s camera roll to allow you to import and save light settings as presets. This feature is particularly useful for frequent users who have a specific set of lighting preferences they want to reuse across different projects. Finally, regarding the recording permission, it is necessary for the app to enable live streaming capabilities via USB-C or Wi-Fi. While this may seem intrusive at first glance, it’s essential to ensure the smooth operation of the device and avoid any compatibility issues during live streams. That being said, we understand your concerns and assure you that Aputure takes user privacy seriously. The company only collects data necessary for app functionality and deletes it once it is no longer required. Additionally, users have the option to opt-out of certain features, such as the geolocation feature or live streaming capability, if they prefer not to share this information. We would also like to highlight the numerous benefits that make the Aputure MC Light stand out from its competitors. Its 120 LED lights produce a soft and diffused output, making it perfect for portrait photography and video production. The light’s compact size and USB-C charging capabilities make it incredibly convenient to use on set or during travel. Furthermore, the light’s compatibility with Sidus Link app allows for easy remote control and customization of lighting settings, providing users with a high degree of flexibility and precision in their work. In summary, while we understand your concerns regarding the Sidus Link app’s permissions, we believe that these features are essential for optimizing the device’s functionality and performance. We encourage you to explore all aspects of the product before making a final decision. If you have any further questions or concerns, please don’t hesitate to contact our customer support team, who will be happy to assist you. Thank you for considering Aputure products, and we look forward to hearing from you soon. Best regards,
Jack
As for today’s news, it seems that the Federal Reserve officials are taking a cautious approach regarding interest rate cuts. Both Collins and Mester have highlighted the need for more economic data before making any decisions. While some mixed signals and concerns over future impacts have led to a patient approach, both officials predict different outcomes – with Collins forecasting a longer wait and Mester emphasizing the need for more evidence of inflation. As this situation continues to evolve, it will be interesting to see how the Fed’s actions impact global markets and economies in the coming months.
Best regards,
Jack
Emmett –
The Aputure MC – the ultimate game-changer in photography, or so Lincoln thinks. As someone who’s actually used this thing (and by used, I mean I’ve had it for a week and have managed to break it twice), I’m here to give you the real deal on this product.
First of all, let me just say that the Aputure MC is not as compact as Lincoln claims. In fact, it’s about as compact as a small suitcase – which is perfect for lugging around in my backpack and tripping over on set. But hey, at least it’s easy to carry… said no one ever.
Now, let’s talk about the wireless control feature that Lincoln raves about. Oh boy, where do I even start? First of all, the Sidus Link App is a total nightmare to use – it’s like trying to navigate a Windows 95 interface on a Commodore 64. And don’t even get me started on the latency issue. It’s like trying to control a robot with a 10-second delay. Not exactly ideal when you’re trying to capture that perfect shot.
And then there’s the light output itself. Lincoln claims it’s fantastic, but I think he must have been smoking some of that good stuff before reviewing this product. In reality, the light output is about as weak as a kitten’s mewl. It’s like trying to illuminate a scene with a single candle in a hurricane.
But you know what? The Aputure MC does have one redeeming quality – its built-in rechargeable battery. Now, I’m not saying it’s eco-friendly (I mean, come on, who thought that was a good idea?), but at least it’s convenient… for about 30 minutes before the battery dies and you’re stuck with a useless light.
So there you have it, folks – my brutally honest review of the Aputure MC. If Lincoln thinks this thing is worth 5 stars, then I think he must have been bribed by the manufacturer (just kidding, Lincoln… or am I?).
By the way, speaking of Apple announcing a wall-mounted smart home tablet in 2025, I wonder if they’ll include an I’m with stupid button on it. You know, for when you’re stuck with clients like Lincoln who think the Aputure MC is the best thing since sliced bread.
Rating: 2 out of 5 stars (and that’s being generous).