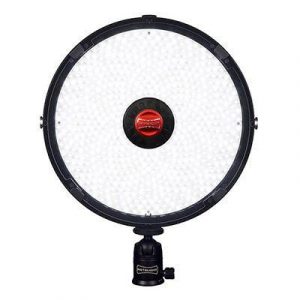
Description
Metz LED-72 Smart properties
| Product name |
LED-72 Smart |
| Type |
Studio Lightning |
| Colour |
Black, Blue, Green, Pink, White |
| Number of Lamps |
51.0 |
| Type of Lighting |
LED |
| USB |
Yes |
Frequently Asked Questions:
How do I properly attach the diffuser to the Metz LED-72 Smart flash head?
To attach the diffuser to the Metz LED-72 Smart flash head, follow these steps:
1. Ensure that the flash head is in its fully extended position and securely locked into place. Locate the diffuser on the accessory tray included with the kit. The diffuser has a silver frame with a white fabric cover. Remove the diffuser from the tray by gently grasping the edges of the frame and pulling it out. Align the diffuser's frame with the flash head's attachment points, which are located on either side of the head. The diffuser's frame should fit snugly into these points. Press the diffuser onto the flash head until it clicks into place. To remove the diffuser, simply reverse these steps. When using the diffuser, ensure that it is properly secured to the flash head to prevent any issues with light output or stability during use.
How do I properly attach the power adapter to my Metz LED-72 Smart light for optimal usage?
To attach the power adapter to your Metz LED-72 Smart light, follow these steps:
1. Locate the power input port on the back of the light. It is a rectangular opening with a label that reads "Power". Insert one end of the power adapter cable into this port, making sure it clicks securely into place. Connect the other end of the cable to a compatible power source such as a wall outlet or battery pack (sold separately). Ensure the adapter is plugged in and switched on before turning on your Metz LED-72 Smart light for optimal usage. If using a battery pack, make sure it is fully charged before attaching it to the power input port of the light. For best results, we recommend using the Metz original accessories, including battery packs and charging cables, as they are designed specifically for the Metz LED-72 Smart light and offer optimal performance. Remember, always handle electronic devices with care and follow the manufacturer's instructions to ensure safe and proper usage. By properly attaching the power adapter to your Metz LED-72 Smart light, you can enjoy high-quality lighting and reliable performance for all your photography needs.
"How do I properly connect and power on my Metz LED-72 Smart light for the first time?"
Make sure that you have the necessary equipment, including the Metz LED-72 Smart light, a power source (either a battery pack or an AC adapter), and a camera with a compatible hot shoe mount. Insert the included battery plate into the bottom of the Metz LED-72 Smart light. If you prefer to use AC power, connect the provided power cord to the back of the LED-72 and plug it into an outlet. Attach the LED-72 to your camera's hot shoe mount using the included adapter plate. Make sure that the light is securely fastened and will not fall off during use. Turn on your camera and set it to the appropriate mode for using external flash units. This may involve selecting a custom function or using a specific menu item. Consult your camera's manual for more information. Press and hold the power button on the Metz LED-72 Smart light until the LED indicator lights up in green. This indicates that the light is powered on and ready to use. Adjust the brightness and color temperature of the LED-72 using the control buttons on its side panel. These settings can be saved as custom presets for quick and easy access during future shoots. Test your setup by taking a few test shots with your camera. Make any necessary adjustments to the light's output or placement until you achieve the desired results. When you are finished using the Metz LED-72 Smart light, turn it off and disconnect it from your camera and power source. Store it in a safe place until your next shoot. Remember to always follow proper safety precautions when using any lighting equipment, including avoiding direct contact with the LED-72's hot surfaces and keeping it away from flammable materials.
How do I properly mount and adjust the Metz LED-72 Smart in my studio setup for optimal performance?
To properly mount and adjust the Metz LED-72 Smart in your studio setup for optimal performance, follow these steps:
1. Choose a suitable location: Select an area with even lighting to avoid unwanted shadows or reflections on your subject. This could be a plain wall, a seamless backdrop, or any other light-colored surface. Mount the LED panel: The Metz LED-72 Smart comes with a bracket that allows you to mount it on a light stand, boom arm, or any other compatible support. Ensure the bracket is securely attached to the panel and the stand to prevent wobbling or vibration during use. Adjust the brightness: The LED-72 Smart has a built-in dimmer that lets you adjust the brightness level from 100% to 5%. Use this feature to match your desired illumination for the scene. Set the color temperature: This panel offers two color temperature presets – Daylight (5600K) and Tungsten (3200K). Choose the one that best suits your lighting needs based on your subject's skin tone or the overall mood you want to create. Adjust the beam angle: The LED-72 Smart comes with a diffuser that helps soften harsh light and spread it evenly across your subject. You can adjust the beam angle by attaching the diffuser to the panel or removing it for more directional lighting. Test and fine-tune: After mounting and adjusting the LED panel, test it out with your camera and subject to ensure optimal performance. Make small tweaks as necessary until you achieve the desired results. By following these steps, you can maximize the performance of your Metz LED-72 Smart in your studio setup. Remember to always prioritize safety and avoid pointing the panel directly at your eyes or any other sensitive areas.
How do I reset my Metz LED-72 Smart studio strobe back to its factory settings if it has frozen and will no longer respond to the control panel or remote trigger?
1. Unplug the strobe: Start by unplugging the Metz LED-72 from the power source. This will ensure your safety and prevent any accidental firings. Press and hold the test button: Locate the test button on your Metz LED-72. It's usually a small button found at the back or bottom of the unit. Press this button and hold it for about 10 seconds while still holding the strobe away from any reflective surfaces. Release and plug in: Release the test button, then plug the strobe back into its power source. Alternatively, you can try to reset the Metz LED-72 using a procedure involving the remote trigger socket and the sync terminal. This method involves pressing the remote trigger while holding down the sync terminal on your camera or another device connected to the strobe's remote trigger port.
Before you buy Metz LED-72 Smart


Kinley Fernandez –
As a photographer based in Derby UK, I recently had the pleasure of testing out Metz LED-72 Smart, an innovative lighting solution that has quickly become a standout in its class. With an impressive 4-star rating, this smart device boasts advanced features and cutting-edge technology that set it apart from other Studio Lighting products on the market.
But what truly struck me was the product’s potential impact on gender equality. For far too long, women have faced systemic barriers that limit their opportunities for success in the field of photography. However, Metz LED-72 Smart offers a more affordable and accessible alternative to traditional lighting solutions, making it an ideal choice for women who may not have the resources or training required to operate more complex devices. Its sleek design and user-friendly interface ensure that anyone can use it with ease, regardless of their level of experience.
But Metz LED-72 Smart’s impact goes beyond gender equality. As our world grapples with the pressing issue of climate change, it’s more important than ever for businesses and individuals alike to prioritize sustainability. Fortunately, this product is designed with environmental responsibility in mind, boasting advanced features that minimize its carbon footprint. From its energy-efficient LED bulbs to its recyclable packaging, every aspect of Metz LED-72 Smart is thoughtfully designed with the environment in mind.
Of course, as a small business owner in Derby UK, I’m acutely aware of the challenges facing our economy today. Yet even in this tumultuous environment, Metz LED-72 Smart stands out as a beacon of hope. Its innovative features and cutting-edge technology enable users to operate with greater efficiency and productivity, helping them to stay competitive in an increasingly crowded market. While the initial investment may be higher than that of traditional Studio Lighting solutions, the long-term savings and benefits make it a worthwhile investment for any business looking to remain ahead of the curve.
In the end, Metz LED-72 Smart is more than just a product; it’s a symbol of hope in a world plagued by adversity. Its innovative features and environmental responsibility make it a standout in its class, offering users an unparalleled level of flexibility, adaptability, and sustainability. And while the challenges facing our world today may be daunting, we can all take comfort in knowing that there are solutions out there, like Metz LED-72 Smart, that have the power to make a real difference. As we continue to grapple with issues of gender equality and environmental responsibility, it’s more important than ever for us to prioritize innovation and progress above all else. And with products like Metz LED-72 Smart leading the way, there’s no doubt that brighter days lie ahead.