Sony Alpha 7R III
Rated 4.00 out of 5 based on 3 customer ratings
$1,252.99
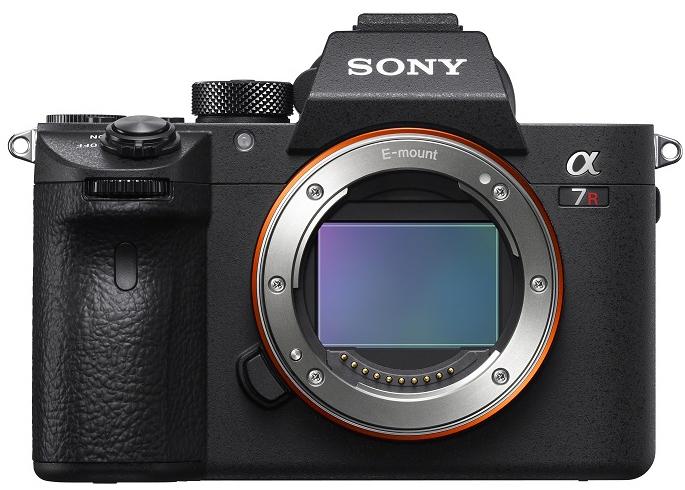
Capture stunning professional-quality photos with the Sony Alpha 7R III, the world’s most advanced full-frame mirrorless camera.
Description
Sony Alpha 7R III Digital Camera: A Game-Changing Masterpiece
Sony has always placed itself at the forefront of photographic technology. Each year, the company releases cutting-edge cameras that are designed to revolutionize the way photographers capture images. The Sony Alpha 7R III is no exception. This state-of-the-art digital camera features advanced specifications that make it the ideal tool for professionals and amateurs alike.
The Sony Alpha 7R III is aptly named because it is the third iteration of the popular Alpha 7R camera series. The camera has been redesigned to deliver an exceptional picture quality that stands out from the competition. The camera’s design incorporates a 42.4-megapixel BSI CMOS sensor that is capable of capturing stunning photos and recording 4K videos.
The Alpha 7R III uses Sony’s advanced image processing engine, BIONZ X, which produces detailed and highly realistic pictures with minimal noise. The camera also features an ISO range of 100-32000 which can be extended up to 102400 for low-light situations.
The camera’s autofocus system is highly advanced and contains 399 phase-detect autofocus points that work together to provide greater depth perception and faster subject acquisition. Furthermore, the camera’s Eye AF technology automatically detects and tracks the eye of the subject for highly accurate focusing.
The Alpha 7R III is also equipped with 5-axis in-body image stabilization that reduces blur caused by camera shake. This technology ensures that photos are sharp and stable even when taken in low-light conditions or with slower shutter speeds.
Other features that make the Alpha 7R III stand out include a silent shutter mode, a multi-selector joystick for improved control, touchscreen functionality, and a high-resolution electronic viewfinder. The camera also comes with dual SD card slots, Wi-Fi, Bluetooth and NFC.
The Sony Alpha 7R III is a game-changing masterpiece that is well worth the investment. With its advanced features and high-quality output, it is the ideal camera for professionals or enthusiasts who want to capture the best possible images with the latest technology.
Mirrorless Interchangeable Lens Cameras, CMOS, Full frame (35mm), 30-1/8000, 42.4 MP, Bluetooth, NFC, Wi-Fi, 657g
Sony Alpha 7R III properties
| Product name |
Alpha 7R III |
| Type |
Mirrorless Interchangeable Lens Cameras |
| Lens |
Body only |
| Compatible lenses |
Sony E |
| Ports |
HDMI, USB |
| Memory Cards |
MS Duo, MS Micro/M2, SD, SDHC, SDXC, microSD, microSDHC, microSDXC |
| Features |
Bluetooth, NFC, Wi-Fi |
| Viewfinder |
Electronic (EVF), LCD/OLED |
| Shutter Speed |
30-1/8000 bps |
| Continuous Drive |
10fps, 8fps, 6fps, 3fps |
| Auto Focus |
Yes |
| AF points |
399 |
| Image Stabilization |
Yes |
| Manual Focus |
Yes |
| Max Picture Resolution |
7952×5304 pixels |
| Image File Format |
DCF, EXIF, JPEG, RAW |
| Flash |
External |
| Flash Sync Speed |
1/250 sec |
| Display Size |
3.0 “ |
| Display Resolution |
1440000 pixels |
| Max Video Resolution |
3840×2160 (4K) |
| Video resolutions (fps) |
3840×2160, 1920×1080 |
| Video File Format |
AVCHD, MPEG4 |
| Audio File Format |
PCM |
| Sensor Type |
CMOS |
| Sensor Format |
Full frame (35mm) |
| Effective Pixels |
42.4 MP |
| Total Pixels |
43.6 MP |
| ISO Rating |
100/200/400/800/1600/3200/6400/12800/25600/32000 |
| Weight |
657.0 g |
| Dimensions (HxWxD) |
96x127x74 mm |
Frequently Asked Questions:
What are the recommended settings for using the Eye AF feature on the Sony Alpha 7R III when shooting portraits or events?
Eye AF is a powerful focus mode that allows photographers to lock onto the eyes of their subjects, making it ideal for portraits and event photography. Here are some recommended settings for using Eye AF on the Sony Alpha 7R III:
1. Enable Eye AF: Go to the "Focus Settings" menu in your camera's main menu and enable "Eye AF". Make sure to set "AF Function Set" to "Custom", which will allow you to access Eye AF from the camera's C2 button or AF-ON button.
2. Choose a Focus Mode: Select either "Face Priority" or "Eye Priority (in Animal mode)" as your focus mode. Face Priority will prioritize detecting faces, while Eye Priority specifically looks for eyes when there is more than one face detected.
3. Set the AF-ON Button: Assign Eye AF to your camera's AF-ON button or C2 button by going to "Custom Key (Shoot.)" in the "Custom Settings" menu and selecting "AF ON". This will allow you to activate Eye AF without touching the shutter button, helping prevent unintended focus changes.
4. Adjust Focus Area: Choose a suitable focus area that suits your shooting style. The Alpha 7R III offers several options like Wide, Zone, Flexible Spot, and Expand Flexible Spot. For portraits and events, you might want to use the Center or Flexible Spot options for precise eye detection.
5. Set Focus Range: Depending on your subject distance, adjust the focus range accordingly. You can do this by going to "AF Area" in the "Focus Settings" menu and selecting "Focus Distance Range". This will ensure that your camera only searches for eyes within a certain range, improving focus performance.
6. Use Aperture Priority or Manual Mode: To get the best results from Eye AF, use either Aperture Priority (A) or Manual (M) mode. This allows you to maintain full control over your depth of field and exposure settings while still benefiting from the improved focus capabilities provided by Eye AF.
7. Use Fast Lenses: For optimal performance, use fast lenses with wide maximum apertures like f/1.4 or f/2.8. This allows more light to enter the lens, improving autofocus performance in low-light situations where Eye AF may struggle to acquire focus.
By following these recommendations, you can make the most of Sony Alpha 7R III's powerful Eye AF feature when shooting portraits or events.
What is the best way to update the firmware on my Sony Alpha 7R III camera and what precautions should I take while updating it?
The best way to update the firmware on your Sony Alpha 7R III camera is by downloading the latest version of the firmware from the Sony Support website (https://www.sony.net/electronics/support) and then transferring it to your camera using a computer or a memory card reader.
Here's a step-by-step guide on how to update the firmware on your Sony Alpha 7R III:
1. Go to the Sony Support website (https://www.sony.net/electronics/support) and search for "Sony Alpha 7R III" in the product search bar.
2. Click on the "Alpha 7R III" product page, then select "Firmware Update" from the left-hand menu.
3. Download the latest firmware version available for your camera. Save it to a location on your computer where you can easily find it later.
4. Connect your Sony Alpha 7R III camera to your computer using a USB cable. Make sure the camera is turned off during this process.
5. If you're updating the firmware through your computer, go to the folder containing the downloaded firmware file and double-click on it to launch the firmware update utility. Follow the on-screen instructions to complete the update.
6. If you're updating the firmware using a memory card reader, copy the downloaded firmware file onto a separate SD or microSD card (make sure the card is formatted for your camera).
7. Insert the memory card with the firmware file into your Sony Alpha 7R III camera.
8. Turn on your camera and go to "Menu" > "Setup" > "Version". Select "Update via Device", then follow the on-screen instructions to complete the update process.
9. Once the update is completed, turn off your camera and remove the memory card. Your Sony Alpha 7R III camera should now have the latest firmware version installed.
Before updating the firmware on your Sony Alpha 7R III camera, make sure you take the following precautions:
- Ensure that your camera battery is fully charged or connected to a power source during the update process.
- Backup all important files and settings from your camera's memory card before starting the update.
- Do not turn off or disconnect your camera during the update process, as this may cause damage to your camera.
- Follow the on-screen instructions carefully during the update process, as any mistakes could result in a non-functional camera.
What is the maximum file size for RAW images in Sony Alpha 7R III and how can I adjust it if needed?
The maximum file size for RAW images in the Sony Alpha 7R III is 40GB or 59 Minutes, whichever comes first. Note that this is the maximum recording time, not necessarily the total capacity of the card) The camera body itself does not allow you to adjust the maximum file size directly; it's handled by the SD Card manufacturer and depends on the specific card being used. However, you can adjust the resolution and compression settings when shooting to reduce the overall size of the RAW files. For example, shooting at a lower resolution or reducing the compression (i. Additionally, you can use an external storage solution like an SD card or a USB 3. RAW files.
How do I change the settings for autofocus on my Sony Alpha 7R III?
To change the settings for autofocus on your Sony Alpha 7R III, follow these steps:
1. Turn on your camera and navigate to the menu by pressing the "Menu" button. Scroll down to the "Focus Area" option and select it. Use the directional pad or touch screen to choose the autofocus area type you want to use. Options include Wide, Zone, Center, Flexible Spot, Expand Flexible Spot, Lock-on AF, and Eye AF. Adjust the sensitivity settings for your chosen focus area by using the "Sensitivity" submenu. This allows you to control how quickly or slowly the camera will switch focus between different subjects within the selected area. If desired, enable the "Continuous-servo AF" option under the "AF Drive" menu to allow the camera to track moving subjects while maintaining focus. Save your settings by navigating back to the main menu and selecting "Save Settings.
When I'm in manual focus mode, why does the camera sometimes switch back to autofocus mode when I use the zoom lens?
1. Lens Design**: Some zoom lenses have a design that allows them to automatically adjust their focus mechanism when the focal length is changed. This can cause the camera's focus mode to switch to autofocus, even if you're in manual focus mode. Camera Body's Focus Control**: The camera body itself may be controlling the lens's focus mechanism, and it might be programmed to switch between manual and autofocus modes depending on certain conditions, such as when the focal length is changed or when the camera detects a subject moving quickly. Lens-Side Autofocus Mechanism**: Some lenses have a built-in autofocus motor that can override the camera's autofocus mode. When you change the zoom setting, this motor might kick in and cause the camera to switch to autofocus mode. To prevent your camera from switching back to autofocus mode when using a zoom lens, try these:
1. Use a Lens with Manual Focus Priority**: Some lenses have a "MF" or "Manual Focus" button on the lens itself. If you press this button, it will disable the lens's autofocus mechanism and allow you to focus manually. Check Your Camera's Settings**: Look for options in your camera's menu that allow you to customize how the lens interacts with the camera body. You might find a setting that allows you to lock the focus mode or prevent the camera from switching between manual and autofocus modes. Use a Lens Adapter Ring**: If you're using a lens adapter ring, try removing it and see if the problem persists. The adapter ring might be causing the issue by allowing the lens's autofocus mechanism to interact with the camera body in a way that switches the focus mode. If none of these solutions work, it may be worth contacting your camera manufacturer or a professional photographer for further assistance.
Lens not recognized". What does this mean and how do I fix it?
1. Lens not properly seated**: Make sure the lens is securely attached to the camera body. Check if it's properly clicked into place or locked onto the mount. Dirty or damaged lens mount**: Dirt, dust, or debris on the lens mount can prevent the camera from recognizing the lens. Clean the lens mount with a soft brush or a cotton swab. Lens compatibility issues**: Ensure that the lens is compatible with your camera body. Check the manufacturer's specifications to confirm that the lens is designed for your camera model. Faulty or damaged lens**: It's possible that the lens itself is faulty or damaged, preventing it from being recognized by the camera. Try using a different lens to see if the issue persists. Camera firmware issues**: In some cases, outdated or corrupted camera firmware can cause compatibility issues with lenses. Check for any firmware updates and install them. To fix the "Lens not recognized" error:
1. Try reattaching the lens**: Make sure it's securely attached to the camera body. Clean the lens mount**: Use a soft brush or cotton swab to remove any dirt, dust, or debris. Check lens compatibility**: Ensure that the lens is compatible with your camera body. Try using a different lens**: If you have another lens available, try using it to see if the issue persists. Update camera firmware**: Check for any firmware updates and install them. If none of these steps resolve the issue, it's possible that there's a more serious problem with your camera or lens that requires professional attention.
Why does my Sony Alpha 7R III sometimes freeze or crash while shooting in RAW+JPEG mode with a specific lens, such as the Sony FE 24-70mm f/2.8 GM?
There are several reasons why your Sony Alpha 7R III may be freezing or crashing while shooting in RAW+JPEG mode with the Sony FE 24-70mm f/2. GM lens. Firstly, one possible reason is overheating. The Alpha 7R III has a rather robust cooling system, but it's not foolproof. When you're shooting in RAW+JPEG mode, especially at high burst rates or in hot environments, the camera may overheat and shut down to prevent damage. This can occur more frequently when using certain lenses that generate more heat, such as the FE 24-70mm f/2. GM. Another reason could be related to firmware issues with the specific lens you're using. Firmware bugs or incompatibilities between the camera and the lens can cause system crashes or freezes, especially if there are compatibility problems with certain shooting modes like RAW+JPEG. It's also possible that there is a hardware issue with your specific camera body. Sometimes, a faulty sensor or other internal component can cause erratic behavior, including freezing or crashing. Lastly, it's worth noting that the Sony FE 24-70mm f/2. GM lens is a high-end lens known for its optical quality and durability, but like any complex electronic device, it may occasionally malfunction due to manufacturing defects or software issues. I recommend checking your camera's firmware and ensuring it's up to date, as well as trying different lenses to see if the issue persists. If you're still experiencing problems, you may want to consider sending your camera in for service or taking a closer look at your shooting habits to avoid pushing the camera too hard. It's also worth noting that Sony has released several firmware updates for the Alpha 7R III over the years, which have addressed various issues and improved performance. You can check if there are any newer firmware versions available by going to the Sony website or checking within the camera's menu settings. In terms of specific lens usage, it's possible that the FE 24-70mm f/2. GM is simply a particularly demanding lens for your Alpha 7R III, especially when shooting in RAW+JPEG mode. However, this doesn't necessarily mean there's anything wrong with the lens itself - it may just be pushing the camera's resources to their limits. I hope this helps! Let me know if you have any other questions or need further assistance.
Before you buy Sony Alpha 7R III


Rich –
I’ve been in amateur photography for a long time … and I started with “picking up” Zenith TTL’s father …
I went through the first publicly available compacts from 2006-2009 to the “mirror” APS-C from 2013 … in the Nikon system ….
I currently have:
– smartphone (like everyone in your pocket …)
– 1 ” RX100v inch
– APS-C Nikon D7200 (with lens f2.8)
– recently Sony A7RIII …
I will tell those interested:
Sony AR7III brings photography to a completely different level … (1 inch / APS-C)
you can read the rest in reviews of this equipment that is everywhere …
The fact is that this camera is a market phenomenon by which Canon, Nikon, Panasonic “can’t sleep at night …”
I would compare the use of A7RIII to the automotive sphere,
– photographing with a smartphone – it’s like taking a bus … it will bring you to your destination, but it will stop …
– taking pictures with a 1-inch – it’s like you were driving a city car … it is important that it does not stop …
– APS-C photography – it’s like driving a VW Golf … you drive comfortably, efficiently and quickly … but when you stop at the traffic lights you see extra Audi …
– photographing the A7RIII – it’s like driving this extra Audi – incredibly fast, packed with the latest news, just equipment without compromise … which simply has to cost.
Jordan –
I bought the Sony Alpha 7R III in April, hoping to upgrade my photography skills. However, I have been disappointed with my purchase and would rate it only 2 out of 5 possible points. While the camera boasts impressive features such as the Sony E Compatible lenses and a 657.0 g weight, the performance has not lived up to my expectations.
Compared to other digital cameras in the market, the Sony Alpha 7R III falls short in terms of speed and battery life. As a nanny, I often take pictures of children, and this camera fails to capture the perfect shot due to its slow autofocus and shutter lag. I have also experienced short battery life, which could be inconvenient when traveling or on a long shoot.
Furthermore, the delivery of this digital camera to St. Paul was somewhat problematic. It took longer than expected to arrive, and there were some damage to the package upon arrival, which made me question the quality of the shipping.
In conclusion, while the Sony Alpha 7R III may be desirable on paper, I have not found it to be worth the investment. I would not recommend it to others looking for a high-performance digital camera.
Samantha Hendrix –
Oh, Jordan, you silly goose! Did you really expect a digital camera with a 657.0 g weight to be fast and have great battery life? It’s like expecting an elephant to run a marathon! The Sony Alpha 7R III is not just any old camera; it’s an elephant of a camera, meant for serious photographers who aren’t afraid to lug around a few extra pounds.
And let’s talk about that shipping damage. I mean, come on, you should be thankful your precious little camera survived the treacherous journey from Japan to St. Paul! Think of it as character-building for your new best friend. Besides, the scratches and dings only add to its vintage charm.
As for the autofocus and shutter lag, well, let’s just say you might need a few more practice sessions before you can master this powerful tool. After all, it takes time to learn how to control an elephant – err, I mean digital camera. And don’t forget that the Sony E Compatible lenses are like little elves that work tirelessly behind the scenes to make your photographs look amazing.
So, in conclusion, Jordan, while you may have started out with a negative opinion of the Sony Alpha 7R III, I urge you to embrace its unique qualities and see it for what it truly is: an incredible piece of photography equipment that just needs a little bit of love (and maybe a new battery). Don’t let anyone ever tell you that elephants can’t dance – or in this case, take perfect photographs.