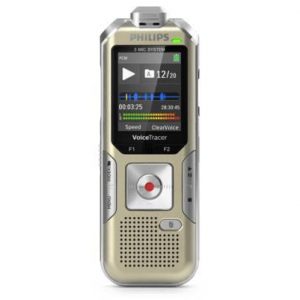
Philips, DPM7700
Rated 5.00 out of 5 based on 1 customer rating
$381.99
Introducing Philips DPM7700audio recorder – the compact, high-performance solution for seamless and reliable dictation that delivers crystal-clear sound quality.
Description
Philips has released its DPM7700 digital audio recorder, which is aimed at those in need of a reliable professional-grade dictation tool. The recorder has improved battery life, wireless connectivity, and is designed to be comfortable to hold and use.
One of the key features of the DPM7700 is its extended battery life, which allows for up to 33 hours of recording time on a single charge. This is a significant improvement over previous models and means that the device can be relied upon for long periods of use without needing to be charged. Additionally, the recorder features a rapid recharge function that allows it to fully charge in just a few hours.
Another important characteristic of the DPM7700 is its wireless connectivity, which enables recordings to be easily transferred to other devices. The recorder has built-in Bluetooth and Wi-Fi capabilities and can send files to smartphones, tablets, and laptops, ensuring easy collaboration and sharing between colleagues. With this feature, the DPM7700 is optimized for use in busy office environments that require fast and efficient workflows.
The DPM7700 also includes a large color display, which ensures that users can view and navigate through their recordings quickly and easily. The device’s ergonomic design is also noteworthy, with a non-slip housing that allows it to be comfortably held for long periods of time.
In addition to its hardware features, the DPM7700 also includes specialized software that makes it easy to manage recordings. The software allows users to quickly find and edit recordings, as well as share them with colleagues. The device also features customizable buttons that can be used to adapt the DPM7700 to specific work requirements.
Overall, the Philips DPM7700 is an effective and efficient audio recorder that is designed for professional use. With its long battery life, wireless connectivity, and user-friendly software, this device is well-suited for a wide range of industries, including healthcare, legal, and business.
Dictaphone, Built-in Microphone, MP3, PCM, DSS Microphone: Built-in Microphone Weight: 53 g
Philips, DPM7700 properties
| Product name |
DPM7700 |
| Type |
Dictaphone |
| USB Input |
1 |
| Colour |
Silver |
| Power Supply |
Battery |
| Battery Format |
Li-Ion |
| Microphone |
Built-in Microphone |
| Amount of Microphones |
2 |
| Recording Format |
DSS, MP3, PCM |
| Height |
150.0 mm |
| Depth |
18.0 mm |
| Width |
160.0 mm |
| Weight |
53.0 g |
Frequently Asked Questions:
What are the steps to set up and connect my Philips DPM7700 digital voice recorder to my computer for file transfer?
Here is a step-by-step guide to connect your Philips DPM7700 Digital Voice Recorder to a computer:
1. Install the USB cable provided with your recorder into the USB port on your computer. Make sure your computer can detect and recognizes the device.
2. Turn ON your digital voice recorder by pressing the power button.
3. The voice recorder should automatically go into playback mode and you will hear a confirmation tone indicating that it's in playback mode. Press any button to exit from this mode.
4. Press and hold down the RECORD button for about 2 seconds until the LED turns blue and then flashes once every second. This means the device is in Mass Storage Mode, ready for file transfer.
5. Your computer should recognize your voice recorder as a removable drive (E: or F: etc.). If your computer doesn't automatically recognize it, you might need to refer to your computer's manual to locate and access the USB device under storage devices.
6. Once your computer recognizes your voice recorder as an external drive, you can copy your audio files from the external drive into your computer's storage folder or vice versa.
7. When you're done transferring files, eject the device safely by right-clicking on it and selecting "Eject" or "Safely Remove".
8. Turn off your digital voice recorder by pressing and holding the power button for a few seconds until the LED turns red. This will save any settings made during this transfer session and prevent data loss.
Remember to always safely eject the device before turning it off, as it may cause data corruption or loss if you don't do so properly. Enjoy your file transfers!
What are the steps to operate and set up my Philips DPM7700 for the first time?
To operate and set up your Philips DPM7700 for the first time, follow these simple steps:
1. Unpack your device: Remove all parts from their packaging including the main unit, dust bag, brush roller, extension hose and power cord.
2. Assemble your vacuum cleaner: Attach the extension hose to the main unit. Then connect the brush roller to the end of the extension hose.
3. Install the bag: Open the bag compartment located at the bottom of the main unit by pressing on its side clips. Slide the bag inside and make sure it is properly aligned before closing the compartment again.
4. Plug in your vacuum cleaner: Connect one end of the power cord to the main unit and the other end into an electrical outlet. Ensure that the switch located near the power cord is turned off during assembly and installation.
5. Set up the filters: Open the filter compartment at the back of the machine. Pull out the pre-motor filter and post-motor HEPA filter by their tabs.
6. Clean the filters: Before using your vacuum cleaner, it's important to clean the filters. To do this, simply tap them against a surface to remove any loose dust or debris. Then rinse them under running water until the water runs clear. Squeeze out excess water and let them air dry completely before reinstalling.
7. Turn on your vacuum cleaner: Press the power button located on top of the main unit. When you hear a beep sound, it indicates that the machine is ready to use.
8. Use your vacuum cleaner: Hold the main unit with both hands and move it around your home while pushing forward. Remember to adjust the height by pressing the foot pedal located at the bottom of the main unit for optimal cleaning performance.
9. Empty the dust bag: When the dust bag is full, open the bag compartment and gently pull out the filled bag from its side clips. Tie a knot on the top edge of the bag before disposing it into a trash bin.
10. Regular maintenance: To keep your Philips DPM7700 vacuum cleaner in good condition, make sure to perform regular maintenance tasks such as cleaning the filters, emptying the dust bag and checking for any wear and tear on the brush roller or other parts.
Can you explain how I can use the voice recording feature on my Philips DPM7700 audio recorder?
Certainly! Here are the steps to use the voice recording feature on your Philips DPM7700 audio recorder:
1. Turn on the audio recorder by pressing the power button. The device will light up, and you'll see the "Power" icon on the display.
2. Press the "Mode" button until you see the "Voice Recording" icon on the display. This indicates that the voice recording mode is activated.
3. To start recording, press the red "Record" button. The device will beep, and the recording will begin. You can also set a timer for the recording by pressing the "Time Set" button, selecting the desired duration, and then pressing the "Set" button.
4. When you're ready to stop recording, press the red "Record" button again. The device will beep and stop recording automatically.
5. To play back the recorded voice message, press the "Play" button. Use the "Fast Forward" and "Rewind" buttons to navigate through the recording. Press "Stop" to stop playing the recording.
6. To save the recording to a USB drive or SD card, insert the storage device into the appropriate slot on the audio recorder. Press the "Save" button to save the recording to the device.
Remember that the Philips DPM7700 has an LCD screen with buttons for navigation and control. Follow the instructions on the screen to navigate through the different features and settings.
How do I connect my Philips DPM7700 audio recorder to a computer for data transfer?
To connect your Philips DPM7700 audio recorder to a computer for data transfer, you can follow these steps:
1. Ensure that the USB cable (not included in the package) is compatible with both devices. The USB cable should be Type A (standard USB port) to Type B (mini USB port). Connect one end of the USB cable to the USB port on your computer and the other end to the USB port on the recorder. Turn on the recorder and press the MENU button until you see "USB" highlighted in the display. Press OK/SELECT to enter USB mode. The computer should automatically recognize the device and prompt you to select a drive letter for the connected device. Select an available drive letter (e. E:) and click OK or Next. Once the connection is established, you can transfer files between the recorder and the computer by dragging and dropping them through your preferred file management software (e. Windows Explorer). When finished, safely eject the device from your computer before disconnecting the USB cable from both devices. To safely eject, right-click on the connected drive letter in File Explorer and select "Eject" or press the Windows key + X, then click "Device Manager," select the connected device under "USB controllers," right-click it, and select "Uninstall. Then disconnect the USB cable. Note: The Philips DPM7700 supports data transfer at a maximum speed of 12 Mbps (approximately 1. MB/s) due to its USB 1.
I've deleted the files from my recorder, but when I try to record again it says "Internal Memory Full". Can you help me recover my deleted recordings?
1. Check if the recorder has an SD card slot**: If it does, check if you've inserted an SD card that might be full or corrupted. Remove any SD cards and see if it works again. Try formatting the internal memory**: Formatting will erase all data on the device, so this should only be done as a last resort. However, it's possible that formatting the device will resolve the issue. To format the device, go to the settings menu (usually by pressing the Menu button and then selecting "Settings" or something similar) and look for an option to format the internal memory. Use a recovery tool**: There are several third-party tools available online that can help recover deleted files from digital recorders. These tools usually work by connecting your recorder to your computer using a USB cable and then scanning the device's memory for deleted files. Some popular options include Recuva, EaseUS Data Recovery Wizard, and Disk Drill. Try using a different recording mode**: If you're using a high-quality recording setting, try switching to a lower quality setting (e. High" to "Standard") and see if it works. As for recovering deleted recordings, I would recommend trying the third-party recovery tools mentioned above. These tools are specifically designed to recover deleted files from digital devices, so they may be more effective than other methods.
My Philips DPM7700 recorder won't turn on after being charged for several hours. Is it possible that there's an issue with the battery or is there something else I should check?
1. Check the Power Button: Ensure that the power button on your recorder is functioning correctly. It might be stuck or not working properly. Charging Port Issue: Inspect the charging port for any signs of damage, dirt, or corrosion. Try cleaning it gently with a soft brush or cloth if necessary. Faulty Charger: The charger itself could be the problem. Try using a different charger to rule out any issues with the original one. Overcharging Protection: If your recorder has an overcharging protection feature (some devices do), it might have kicked in due to prolonged charging. Check your user manual for details on how to reset this. Battery Calibration: Some devices require calibration of their batteries. This can be done by letting the device run out of power completely, then recharging it fully without turning it off until the charge is complete. Repeat this cycle a few times to see if it resolves the issue. Faulty Logic Board or ICs: In some cases, issues like this can arise from damage to the logic board or internal components. However, this would typically be seen after multiple attempts at resolving the issue with simpler solutions. Software Glitch: Although less likely, a software glitch could cause your recorder not to turn on despite being charged. You might need to perform a factory reset if you've made any recent changes to settings. Physical Damage: Check for any signs of physical damage such as cracks in the screen or casing that could affect internal components. It's always worth trying these steps before assuming that the battery is at fault, as they are more cost-effective and less invasive than replacing a battery pack.
How do I reset the battery level indicator on my recorder after changing the batteries?
1. Power Off**: First, make sure your recorder is turned off. Battery Removal**: Remove both old and new batteries from the recorder. This ensures that there's no power left in the device that could interfere with the resetting process. Button Combination**: Now comes the crucial step. You need to press a specific combination of buttons while keeping the battery compartment open or before inserting the new batteries. The exact combination can vary depending on your recorder model, so consult your user manual for details. Typically, this involves pressing and holding down two or more buttons simultaneously (e. The specific button combinations can be quite varied across different models, so it's essential to have your manual handy for this step. Power On**: After successfully resetting the battery level indicator, insert the new batteries and turn on your recorder. The battery level indicator should now accurately reflect the charge status of your new batteries. Verify**: Once you've completed these steps and turned on your recorder, check that the battery indicator is accurate. This step is crucial to ensure that the reset was successful. It's worth noting that some devices may require a slightly different procedure or specific timing for button presses. Always refer to your user manual for precise instructions tailored to your model. By following these steps, you should be able to successfully reset the battery level indicator on your recorder after changing the batteries.
Before you buy Philips, DPM7700


Ben K. –
The Philips DPM 7700 digital dictation and transcription kit works perfectly. We bought this product after the failure of a traditional voice recorder. So far we are happy with the new device! It’s easy to use.