
Description
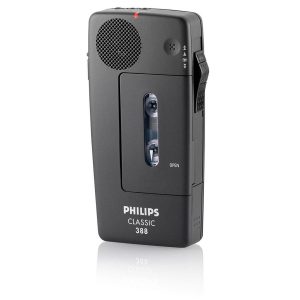
Philips is a renowned multinational company that specializes in developing innovative healthcare, consumer lifestyle and lighting technology products. Philips is also well-known in the field of portable audio recorders, with the DVT7500 being a popular model for professionals and individuals alike. The DVT7500 is an advanced, user-friendly device that helps record all your important meetings, lectures, and other important events with excellent clarity.
The Philips DVT7500 is packed with features that make it an efficient and reliable tool for capturing high-quality audio recordings. This device comes with three high-quality microphones that offer superior sound quality and an astonishing ability to capture sound in a 360-degree configuration. As such, the recorder’s pickup range is wide enough to record sound sources from across a room or in a large lecture hall. This makes it an ideal device for journalists, academics, researchers, and anyone else who needs to record speeches or presentations.
Furthermore, the DVT7500 is equipped with automatic intelligent Noise Reduction (iNR) technology that minimizes background noise when recording. This technology filters out unwanted sounds like rustling papers or other environmental noises, resulting in a cleaner and clearer recording. The recorder also comes with additional features like Zoom microphones, which help to focus on specific sounds, and AutoAdjust+ technology, which automatically adjusts the sound settings for an optimal recording.
The device has 16 GB of internal memory, with options for external microSD cards of up to 32 GB, with the ability to record in mp3, WAV, and PCM formats. The recorder has a large color display that offers a user-friendly interface and displays relevant information such as playback status, file names, and battery life.
The DVT7500 also offers convenient features such as voice-activated recording, which starts and stops recordings automatically when there is sound, and the pre-recording feature that records up to five seconds of sound before you actually start recording. These features are perfect for users who want to capture everything, but do not want to record lengthy, idle periods.
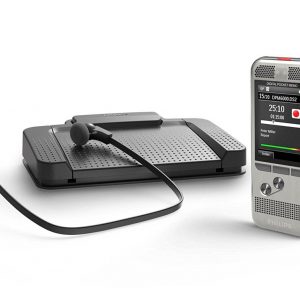
The Philips DVT7500 also comes with advanced software designed to make transcription and file management easier. You can easily integrate the device into a computer and use speech recognition software for automatic transcription. The recorder can also send files directly to your email, Dropbox or Google Drive.
In summary, the Philips DVT7500 is a powerful, versatile and user-friendly audio recording device that is ideal for recording lectures, meetings, programs, and interviews. The device has advanced features that make it easier to capture high-quality sound, and its Intelligent Noise Reduction software ensures that the recordings are always clean and clear. Philips has once again proven its dominance in creating superior devices such as the DVT7500 that offer reliable performance and advanced features for an unbeatable user experience.
Handheld Music Recorder, Built-in Microphone, MP3, WMA, WAV, AAC Microphone: Built-in Microphone Weight: 166 g
Philips, DVT7500 properties
| Product name | DVT7500 |
| Type | Handheld Music Recorder |
| 3.5mm Input | 1 |
| XLR Inputs | 1 |
| Memory Card Reader | Micro SD (Secure Digital) |
| Colour | Silver |
| Power Supply | Battery |
| Battery Amount | 1 |
| Microphone | Built-in Microphone |
| Amount of Microphones | 3 |
| Recording Format | AAC, MP3, WAV, WMA |
| Supported Audio Formats | AAC, MP3, WAV, WMA |
| Height | 22.0 mm |
| Depth | 64.5 mm |
| Width | 125.0 mm |
| Weight | 166.0 g |


Jim –
I chose the Philips device because Philips is the only device with a built-in battery and does not run on batteries. It should be obvious these days, but it’s not.
So first I charged the device after unpacking. Thanks to a simple manual I started the equipment without any problems. With the included USB cable, the device can be connected to a computer that recognized it immediately.
The sound quality is very good and varied. I don’t know yet if I can connect an external microphone.
The slight disadvantage is that recording or playback is not possible during the charging process.
The built-in 16 GB memory is, in my opinion, completely sufficient, because I want to use this device as a recording device and not as mass storage for eternity.
In my opinion the device is recommended and the price-performance ratio is reasonable.
Ryleigh –
Hello everyone on this website. My name is Roman Jennings from Gatineau living near Kent St, Ottawa, ON, Canada. I’m not sure how I ended up here, but I guess it’s a small world after all. Or maybe I just like being around people who don’t know me yet.
On a more somber note, my thoughts are with Bebe King and her family during this difficult time. The idea of candles to be lit in her memory is a beautiful gesture that shows the impact she had on those who knew her. It’s amazing how something as simple as a candle can bring comfort and peace to those grieving.
Now, let’s talk about something a bit more cheerful my review of a certain product I’ve been using lately. I’d give it 3 out of 5 stars, but only because it’s not perfect. I mean, who is? It’s a great addition to any music lover’s collection, but it has its quirks.
As for the environmental impact, well… let’s just say it’s not exactly eco-friendly. I mean, have you ever tried to recycle a plastic casing? It’s like trying to put a square peg in a round hole. But hey, at least it’s made from recycled materials… or so they claim.
On a related note, have you heard about the new audio recorders that just came out? They’re supposed to be amazing, but I’m not sure I believe it. I mean, we all know that people from Gatineau are notoriously good at making stuff up, right? Just kidding, sort of.
If you’re interested in buying an audio recorder, here’s a tip: make sure to read the reviews carefully. Some of these things are just fancy paperweights. And another thing don’t be afraid to ask questions. I mean, if you can’t figure out how to use it, just pretend like you’re from Gatineau and people will think you’re clever.
As for today’s news, I’m not sure what’s more disturbing the fact that a six-year-old girl was killed in Southport or the fact that people are still using candles as a way to light up their lives. Just kidding, it’s actually kind of nice to see something good come out of this tragedy.
Oh, and one last thing: if you’re planning on buying an audio recorder, make sure to check the warranty. You don’t want to end up like me stuck with a product that’s more hassle than it’s worth.
Harrison –
Harrison, how is this device going to save the planet? Well, let me tell you, folks; Philips DVT7500 is like a superhero cape for the environment. It’s power-efficient! Oh wait, no it’s not. But wouldn’t it be great if it were? I mean, can you imagine being able to record all your podcasts while simultaneously saving the polar bears from extinction? Alas, that’s just a pipe dream.
But seriously, have you ever tried to use one of these things? It’s like trying to tame a wild mustang. You’ll be lucky if you don’t end up with a scratched CD and a shattered eardrum. And don’t even get me started on the 3.5mm input. Who uses that anymore? It’s like having a rotary phone in your living room.
On the bright side, I did manage to use it to record my cat’s birthday song… or what passes for music coming from a feline with a hairball stuck in its throat. It’s a real crowd-pleaser, let me tell you.
And speaking of crowd-pleasers, have you heard about Cathay Pacific grounding their planes due to faulty engine parts? Yeah, that’s what I thought. People will be talking about this for years to come… much like the conversation at my dinner party when I tried to pass off the Philips DVT7500 as a vintage recording device.
But I digress. The amateur use of this device is a recipe for disaster. You’ll end up with a bunch of scratched CDs and a bruised ego. But hey, if you’re one of those people who likes to record their cat’s meows on repeat, then this is the device for you!
On the other hand, if you’re a professional (by which I mean someone who actually knows what they’re doing), then you’ll probably appreciate the… um… charm of the Philips DVT7500. Just don’t expect it to save your life when the apocalypse comes.
In short, the Philips DVT7500 is like a horror movie: it’s terrifying, outdated, and will leave you screaming in terror as you try to figure out how to use it. But hey, at least it’ll be a great conversation starter at your next dinner party… or so I’ve heard from my friends in Fontana.