Sony PXW-FS7
$4,071.99
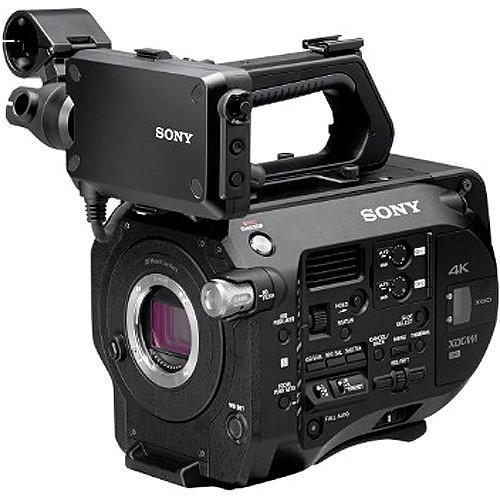
Capture stunning 4K footage with Sony’s PXW-FS7 camcorder, perfect for creating professional-quality videos with ease.
Description
The Sony PXW-FS7 is a professional camcorder designed for high-quality video recording. It is a versatile and reliable tool for filmmakers and video content creators that has gained popularity due to its advanced features and ease of use. This article will provide an overview of the Sony PXW-FS7 camcorder, its features, and benefits.
Design
The Sony PXW-FS7 is a handheld camcorder that comes with a comfortable grip and a shoulder mount. The shoulder mount helps distribute the weight of the camera, making it easier to shoot for extended periods. The camera is also customizable with different accessories, allowing you to create a personalized setup that can cater to your shooting style.
Sensor
One of the most significant advantages of the Sony PXW-FS7 is its sensor. The camera comes with a Super 35mm sensor that can capture high-quality footage with excellent clarity and depth of field. The sensor also has a high sensitivity that can shoot in low light conditions – perfect for shooting indoor or night footage. The camera’s 14 stops of dynamic range give it a higher level of versatility and color grading during post-production.
Lens
The Sony PXW-FS7 comes with an E-mount lens that can be used with a wide variety of lenses. This feature provides the flexibility to choose from different lens options based on your shooting needs. The camera also comes with a built-in ND filter that can help to control the camera’s exposure while shooting outdoors.
Codec
The Sony PXW-FS7 can record in different codecs, including XAVC-I, XAVC-L, and MPEG HD. This allows users to shoot in high or low bitrates depending on their storage requirements without sacrificing quality. The camera can also shoot internally in HD or 4K, up to 60 fps.
Media Cards
The Sony PXW-FS7 comes with two media slots that can utilize different media types. You can use SDXC cards that are widely available and affordable or use the faster and more robust XQD cards for faster data transfer speeds.
Benefits
The Sony PXW-FS7 has become a popular option for many professional filmmakers due to its many benefits. The camera’s Super 35mm sensor provides high-quality footage with a natural depth of field that helps to create a cinematic look. The multiple codec options allow for flexible shooting scenarios, including shooting in low light situations, and the camera’s build quality ensures it can withstand harsh outdoor shooting conditions.
Conclusion
Overall, the Sony PXW-FS7 camcorder is a reliable, versatile, and high-performing option for professional videographers and filmmakers. While it is an expensive option, the camera’s advanced features and quality justify its price point. The ability to customize the camera to meet shooting style and requirements, and the variety of media available to use make the Sony PXW-FS7 an excellent investment for any content creator looking to produce high-quality videos.
Sony PXW-FS7 properties
| Product name |
PXW-FS7 |
| Brand |
Sony |
| Features |
Remote Control |
| Connections |
HDMI, Headphone Jack, Line-In, USB 2.0, XLR in |
| Max Video Resolution |
2160p (4K) |
| Video Resolutions |
3840×2160 (60fps), 1920×1080 (180fps) |
| Recordable Files |
H.264, MPEG-4 |
| SD Type |
SD |
| Display Size |
3.5 inches |
| Viewfinder |
Yes |
| Display |
Yes |
| Sound |
Stereo |
| Filter Size |
90.0 mm |
| Focal Length (Wide-Tele) |
28-135 mm |
| Aperture (Wide-tele) |
4-22 |
| Sensor |
CMOS |
| Height |
239.0 mm |
| Width |
156.0 mm |
| Depth |
247.0 mm |
| Weight |
2000 g |
Frequently Asked Questions:
How do I change the recording format on my Sony PXW-FS7 camera?
Changing the recording format on a Sony PXW-FS7 camera can be done through the menu settings. Here's how to do it:
1. Turn on the camera and press the "MENU" button. Scroll down to "Shooting Settings 3" using the joystick and navigate to the desired format. Select your preferred format from the list of available options, such as XAVC-L, XDCAM or MPEG2 HD. Press the "CUSTOM SET" button to confirm your selection and save your changes. You can also access additional recording settings by pressing the "SETUP" button while in the shooting menu. From here, you'll be able to adjust bitrate, frame rate, and other parameters for the selected format.
How do I properly connect the Sony PXW-FS7 camera to a computer for data transfer using USB 3.0?
To connect your Sony PXW-FS7 camera to a computer for data transfer using USB 3. Connect one end of the supplied USB Type B (SuperSpeed USB) cable into the camera's USB terminal (located on the side of the camera) and the other end into an available USB 3. Turn ON the camera and make sure it is set to either "USB Mode" or "USB Tether Shooting" mode. To do this, press the POWER button to turn on the camera, then navigate to the SETTING MENU by pressing the SETUP button (located on the back of the camera). Scroll down and select [USB CONNECT]. Select either "[USB MODE]" or "[USB TETHER SHOOTING]" depending on your preference. If you choose "[USB TETHER SHOOTING]", your camera will automatically switch to this mode the next time you connect it to a computer via USB. On your computer, open the folder where you want to save your data and wait for the camera to be recognized by your computer. This may take a few seconds. Once connected, you can now transfer files or remotely control the camera from your computer using compatible software (such as Sony's "Remote" or "Imaging Edge" applications). To disconnect the camera from your computer, simply unplug the USB cable from both ends. Note: When transferring data via USB, it is recommended to use a high-quality USB 3. Additionally, be sure to keep the camera's battery charged or connected to an external power source during extended transfers.
How do I properly set up the recording format on my Sony PXW-FS7 camera?
To properly set up the recording format on your Sony PXW-FS7 camera, follow these steps:
1. Power on the camera and navigate to the setup menu by pressing the "SET" button located on the left grip of the camera. Scroll down to the "REC SETTINGS" option and select it using the joystick. Choose your desired recording format from the options available. The options may vary depending on the specific model of your camera, but common formats include XAVC Long GOP, XAVC Intra, and ProRes (if you have an optional external recorder). Make sure to adjust other relevant settings such as the frame rate, resolution, and bitrate according to your needs and preferences. Save your changes by pressing the "SET" button again and exiting the menu. Verify that the recording format is correctly set up by checking the display on the camera's viewfinder or LCD screen. The recording format should be displayed in the top left corner of the screen, along with other essential information such as the frame rate, resolution, and bitrate.
How do I properly adjust focus on the Sony PXW-FS7 camera for optimal results?
To properly adjust focus on the Sony PXW-FS7 camera for optimal results, follow these steps:
1. Mount the lens onto the camera and ensure it is securely attached. Switch the camera to manual focus mode by pressing the user button located at the bottom left of the camera's rear panel. Use the focus ring on the lens to adjust the focus until your desired subject comes into sharp focus. To make fine adjustments, use the focus peaking feature (if enabled) to assist in finding critical focus areas. Adjust the aperture and iris settings as needed to achieve proper exposure and depth of field. Use the zebra function (in the menu system) to ensure that your subject is not overexposed or underexposed. For longer takes, consider using focus pullers or focus motors to maintain consistent focus during shots. If working with a team, communicate clearly with your focus puller about which subjects need to be in focus and when they should come into frame. Use the camera's waveform monitor (in the menu system) to ensure that exposure is balanced throughout the shot. Record multiple takes with different focuses to have more options during editing. Regularly clean your lens to prevent dust or debris from affecting focus accuracy.
"My camera's XLR audio input is not working, and I keep getting an error message saying 'XAVC-I codec unavailable'. What could be causing this issue?"
the non-functional XLR audio input and the "XAVC-I codec unavailable" error message. For the XLR audio input not working, here are a few potential causes:
1. Faulty or loose connections**: Double-check that all your cables (XLR to camera, XLR to external device) are securely connected on both ends. Dirty or corroded connectors**: Inspect the XLR ports and surrounding areas for any signs of corrosion or debris buildup. Clean them if necessary. Faulty XLR port on the camera**: If you've recently dropped your camera or it's been exposed to moisture, it might be a damaged XLR port. Now, let's address the "XAVC-I codec unavailable" error message. This usually indicates an issue with your camera's firmware, settings, or compatibility:
1. Firmware issues**: Ensure that your camera is running the latest firmware version. Firmware updates can resolve various compatibility and bug-related problems. Incorrect XAVC-I codec settings**: Verify that the XAVC-I codec is enabled in your camera's menu (usually under Video/Audio Settings). Also, check if you have set the correct audio format for the XLR input. Incompatible recording media**: Make sure you're using a compatible memory card or storage device with your camera. Some cameras may only support specific types of SD cards or memory sticks.
Before you buy Sony PXW-FS7


Reviews
There are no reviews yet.