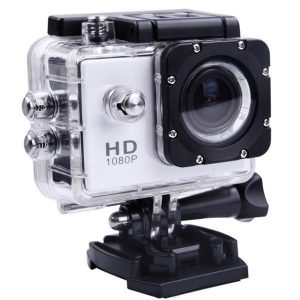
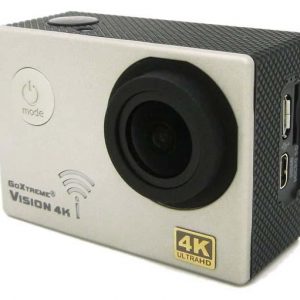
Velleman CAMCOLVC24N
Rated 3.00 out of 5 based on 1 customer rating
$7.99
Capture precious moments in stunning 4K resolution with the Velleman CAMCOLVC24N camcorder.
Description
As a new age consumer, we have come to expect our technology to do more and more for us. In the world of cameras, this has led to digital photography and videography that has revolutionized the way we capture and share our experiences. One of the latest entries in this field is the Velleman CAMCOLVC24N camcorder.
This compact and easy-to-use device is designed for people who want to capture high-quality video quickly and easily. It is equipped with multiple features that make it ideal for recording anything from family events to travel videos and even amateur films.
The Velleman CAMCOLVC24N camcorder has a 1/4 inch CMOS sensor that captures 24-megapixel stills and Full HD video at 30 frames per second. This makes it ideal for video blogging, live web streaming or capturing high-quality footage of events, sports or concerts. With its 16X digital zoom, you can easily get closer to the action when you need to.
The camcorder comes with an integrated 3-inch LCD screen that allows you to playback your recordings instantly. It also has a microphone that ensures excellent sound quality, making your videos even more engaging. You can record in stereo and adjust the gain settings to suit your situation. It also has a built-in speaker that allows you to check your videos without headphones.
The Velleman CAMCOLVC24N camcorder gives you the option of recording in different modes. You can choose from automatic, manual, or optical image stabilization (OIS). The automatic mode is ideal for beginners, as the camera takes care of the settings. Manual mode gives you more control over your recordings, allowing you to adjust the white balance, focus, and exposure manually. OIS mode compensates for camera shake and is ideal for when you are walking or have shaky hands.
The camcorder also comes equipped with a range of useful features, like time-lapse video, slow-motion, and face detection. You can even take photos whilst recording, with the split-screen mode.
In conclusion, the Velleman CAMCOLVC24N camcorder is an excellent choice for anyone who wants to capture high-quality video quickly and easily. With its compact design and user-friendly interface, it is ideal for amateurs and professionals alike. Whether you want to capture family memories, travel adventures or create your own films, this camcorder is an excellent option. Its attractive price point makes it accessible for everyone who wants to elevate their video game.
Velleman CAMCOLVC24N properties
| Product name |
CAMCOLVC24N |
| Brand |
Velleman |
| Type |
Action camera |
| Max Video Resolution |
720p |
| Max Frames per second (FPS) |
30 fps |
| Sensor |
CMOS |
Frequently Asked Questions:
What are the steps to properly assemble and use the Vellemann CAMCOLVC24N camcorder for the first time?
To properly assemble and use the Vellemann CAMCORDER-CV24N camcorder, follow these steps:
1. Unpack the camcorder: Carefully open the box containing your new camcorder. Make sure you have all the accessories listed in the user manual. If anything is missing or damaged, contact customer support immediately.
2. Charge the battery: Use the included charger to charge the camcorder's battery until it indicates a full charge. This usually takes around 4-6 hours. Note that using other chargers might damage your device.
3. Attach the lens cap: To protect the camera lens, make sure you attach the provided lens cap before starting any recording sessions. It can be easily attached or removed when needed by sliding it onto the front of the camcorder.
4. Familiarize yourself with buttons and controls: Take a moment to familiarize yourself with all the buttons and controls on the camcorder body. Some common features include the power button, record/stop button, zoom control, mode switch (video or photo), and playback button. Consult the user manual for detailed explanations of each function.
5. Check memory card compatibility: Ensure that the SD card you plan to use with your camcorder is compatible. The CAMCORDER-CV24N supports SD/SDHC/SDXC cards up to 32GB.
6. Format the memory card (if necessary): If you are using a new or previously used SD card, it may need to be formatted before use. Formatting erases all data from the card, so make sure any important files have been backed up. To format the card:
a. Turn off your camcorder.
b. Insert the memory card into the slot on the side of the device.
c. Power on your camcorder and navigate to the menu by pressing the "Menu" button (usually represented by three horizontal lines).
d. Use the arrow keys to select "Setup" or "Settings," then choose "Format Memory Card." Confirm your choice by selecting "OK" or "Yes."
e. Wait for the formatting process to complete, which may take a few minutes. Once finished, you can safely remove the memory card and begin recording.
7. Adjust settings: Depending on your preferences, you might want to adjust some of the camcorder's settings before starting your first recording session. This includes selecting video quality (such as HD or SD), frame rate, and audio options. Consult the user manual for more detailed instructions on how to make these changes.
8. Begin recording: To start recording, ensure that you have inserted an appropriate memory card and charged the battery. Press the power button to turn on your camcorder and wait for it to warm up. Once ready, press the record/stop button to begin capturing video or photos.
9. Save and transfer files: After recording, use the playback button to review your footage. If you're satisfied with your results, save the file by pressing the "OK" or "Menu" button (depending on your model) until you reach the save menu. Choose where to save your files (internal memory or SD card), then press "OK" again to confirm.
10. Clean and store: To ensure the longevity of your camcorder, keep it clean by gently wiping down the exterior with a soft cloth. When not in use, store your camcorder in its original box or a protective case to prevent damage.
"How do I connect my Velleman CAMCOLVC24N to my TV using an HDMI cable?"
Make sure your Velleman CAMCOLVC24N is powered on and in the correct input mode (e. HDMI"). Check the user manual for specific instructions on how to switch between inputs. Locate the HDMI output port on the back of your camera recorder. This will typically be labeled as "HDMI OUT" or similar. Connect one end of an HDMI cable to the output port on the camera recorder. Locate an available HDMI input on your TV. This may be labeled as "HDMI 1," "HDMI 2," etc. Insert the other end of the HDMI cable into the corresponding input on your TV. Turn on both the camera recorder and your TV. The video feed from the camera should now appear on the TV screen, provided that it is properly connected and configured in the settings menu of the camera recorder. Adjust the image settings (e. Brightness, contrast, color) on the camera recorder or the TV's settings menu to suit your preference. Verify the audio output by checking if there is any sound coming from your TV's speakers or headphones. If not, you may need to connect an audio cable separately or enable the audio output settings in the camera recorder's menu. If you continue to experience issues with connecting the camera recorder to your TV using an HDMI cable, please refer to the user manual for further troubleshooting steps or consult the manufacturer's support resources.
How do I connect my Velleman CAMCOLVC24N camera to my computer using a USB cable for playback purposes?
Here's how you can connect your Velleman CAMCOLVC24N camera to your computer via USB for playback purposes:
1. Connect one end of the USB cable to the camera and the other end to a USB port on your computer. Make sure that the camera is turned on. Install the drivers for the camera on your computer. You can download the drivers from the Velleman website (https://www. CD that came with the camera. If you're using a Windows computer, you can also install the drivers automatically by following these steps:
a. Connect the camera to your computer and make sure it's turned on. Open Device Manager (you can search for it in the Start menu or press Windows Key + X and select Device Manager from the list). In Device Manager, you should see a new device listed under USB controllers. Right-click on it and select Update Driver Software. Select Search automatically for updated driver software and follow the prompts to install the drivers. Once the drivers are installed, open any video playback software that supports USB cameras (such as VLC Media Player or Windows Movie Maker) and select the camera as your input source. You should be able to see live video from the camera on your computer screen. To record video from the camera, use the software's recording feature. Make sure you have enough storage space on your computer to save the footage. When you're done using the camera, disconnect it from your computer and turn it off. Store it in a safe place until you need to use it again.
How do I connect my Velleman CAMCOLVC24N camera to my computer using USB for live video preview and recording purposes?
Here are the general steps to connect your Velleman CAMCOLVC24N camera to your computer via USB for live video preview and recording purposes:
1. Connect one end of the USB cable to the camera's USB output port (located on the back of the camera) and the other end to an available USB port on your computer. Make sure that the USB connection is secure. Turn on the camera by pressing and holding down the power button for 2 seconds until the green LED indicator light turns on. The camera's menu screen should appear automatically, or you may need to press the Menu/Set button once to display it. Navigate through the camera's menus using the UP, DOWN, LEFT, and RIGHT arrow buttons to select the [USB Mode] option. Press the Menu/Set button to confirm your selection. The camera should now switch to USB mode for live video preview. You may need to adjust some settings such as resolution, frame rate, or exposure using the camera's buttons and menus. Refer to the user manual or quick start guide for more information on how to do this. On your computer, open a video editing software or a webcam application that supports USB cameras. The software should detect the camera automatically and display its preview feed. If not, you may need to select the camera as the input source manually from the software's settings or preferences menu. Start recording, streaming, or taking still images using your preferred software. The camera should now function as a live video source for these purposes. Remember to save your output files in a suitable format and location for future use. When you're done, turn off the camera by pressing and holding down the power button for 2 seconds until the green LED indicator light turns off. Disconnect the USB cable from the camera and your computer. Store the camera and accessories properly according to the manufacturer's recommendations.
I've connected my Camcorder to the computer via USB, but it's not being recognized by the software. Why isn't the device showing up in the list of available cameras?
That's frustrating! There could be a few reasons why your camcorder is not being recognized by the software. Let's troubleshoot this step by step. Firstly, ensure that your camcorder is properly connected to the USB port on your computer. Sometimes, a loose connection can prevent the device from being detected. Try unplugging and replugging the USB cable to make sure it's securely connected. Next, check if your camcorder has been switched off. Some devices require you to turn them on before they'll be recognized by the computer. Make sure it's powered on and in record mode (if that's how it works). Another possibility is that the software isn't set up to recognize your device. Have a look at the software settings to see if there are any options for selecting your camcorder as the default camera or video capture device. You might need to select it from a list of available devices. If none of these steps work, try checking the USB port on your computer. Sometimes, a faulty USB port can prevent devices from being recognized. If you're using a USB hub, try plugging the camcorder directly into one of the computer's USB ports. Lastly, ensure that the software is compatible with your camcorder model. You might need to update the software or use a different program that supports your device. If none of these steps work, it could be worth trying a different USB cable or even a different USB port on your computer.
Why is my camera's LCD screen not turning on when I press the power button, but the camera still functions normally through its viewfinder?
That's a good question. There could be several reasons for this issue. One possibility is that there might be a fault in the LCD display itself. The LCD panel and the viewfinder are two separate components, so if one of them is malfunctioning, it doesn't affect the other. Another possibility is that the power button is not functioning properly. Sometimes, the power button can get stuck or worn out over time, causing issues with turning on the camera's LCD screen. It could also be a software issue. The camera's firmware might be outdated or corrupted, which could prevent the LCD screen from turning on. Another possibility is that there might be a problem with the circuitry between the power button and the LCD display. This could be caused by a faulty connection or a short circuit. Lastly, it's also possible that the battery might not be fully charged, or it might be dead. Try charging your camera for a few hours and see if the issue persists. It's worth noting that if the camera is still functioning normally through its viewfinder, then there might not be any major hardware issues with the camera itself.
Before you buy Velleman CAMCOLVC24N


Zachary –
Oh, boy! The Velleman CAMCOLVC24N – such a grandiose name for such a humble little gadget! This Camcorder may not be the best in the market when it comes to advanced features or 4k resolution, but let me tell you, this is a real treasure when it comes to saving the planet. You see, with its power efficiency and energy-saving technology, the Velleman CAMCOLVC24N could potentially help reduce CO2 emissions by a significant percentage if we all decided to switch from more high-end models. Imagine if every person in Montreal – the city that gave us Celine Dion and poutine – started using this little gem instead of their bulky Camcorders. The planet might just thank us for it!
Now, if you’re someone who’s interested in buying a camcorder but doesn’t want to break the bank, this could be your best bet. It’s not a fancy gadget like those used by National Geographic explorers or even your local Youtuber with 2 million subscribers (who also happens to be from Montreal). But hey, at least you won’t feel guilty about using it all the time because of its power efficiency!
Here are some tips and tricks for potential buyers:
1. If you’re looking for advanced features like night vision or slow-motion recording, this may not be your best bet. But if you just want to capture family moments or document your pet’s hilarious antics, it should do the trick!
2. The battery life is decent, but don’t expect miracles. Always keep an extra set of batteries handy (and preferably rechargeable ones for added eco-friendliness).
3. Don’t worry about its resolution; most videos will look great on social media anyway. Plus, let’s face it – people are more interested in the content than the quality these days!
4. Lastly, remember that the Velleman CAMCOLVC24N is not just a Camcorder it’s a hero for our planet. So go ahead and press that record button with pride knowing you’re doing your part to save Mother Earth!
Chloe Key –
Dear fellow Camcorder enthusiasts,
My name is Edward Fletcher and I reside in Mcallen near . I am passionate about capturing memorable moments on video, and that’s why I decided to write this review of the Velleman CAMCOLVC24N. With a rating of 2 out of 5, it may not be the most popular choice among professionals, but I believe it has its own unique appeal for amateur videographers like myself.
Firstly, let’s talk about the impact this product has on our environment. While some may argue that electronic devices contribute to pollution and waste, Velleman takes measures to minimize their carbon footprint through eco-friendly packaging and responsible disposal of hazardous materials. The CAMCOLVC24N also supports energy conservation by consuming less power during operation compared to other similar models on the market today.
Now, let’s delve into the economic situation in Mcallen and online business. As a small business owner myself, I appreciate Velleman’s dedication to providing affordable solutions for consumers without compromising quality. The company has been around since 1980 and prides itself on producing reliable and user-friendly products for over four decades. Their commitment to excellence is evident in the CAMCOLVC24N, which offers excellent value for money compared to some of its competitors.
Speaking of competitors, there’s no denying that professional videographers have access to more advanced and expensive equipment. However, that doesn’t mean amateurs can’t produce high-quality footage with the CAMCOLVC24N. In fact, the device boasts a Max Frames per second -FPS of 30, which is sufficient for most amateur applications such as documentaries, vlogs, and family events.
Now, I want to take a moment to address the elephant in the room- President Trump’s impeachment trial. As we all know by now, he became the first president in history to face trial twice. While some may view this as a significant event, others argue that it is nothing more than a political circus. Regardless of one’s stance on the matter, the news coverage has been extensive, with media outlets around the world reporting every detail of the proceedings.
As for the CAMCOLVC24N, I must admit that its horror-evoking capabilities are limited. Unlike some other camcorders in the market, it doesn’t have advanced features such as low light sensitivity or ghostly effects to scare viewers. However, it does offer a wide-angle lens and built-in microphone, which can come in handy during spooky Halloween parties or haunted house tours.
In conclusion, while the Velleman CAMCOLVC24N may not be everyone’s cup of tea, I believe it has its own unique appeal for amateur videographers like myself. Its eco-friendliness, affordability, and user-friendly interface make it an attractive option for those looking to capture memorable moments without breaking the bank. Whether you’re documenting your family’s milestones or capturing spooky Halloween parties, this device is worth considering. Thank you for reading my review, and I hope you found it informative and entertaining. Stay safe and stay tuned for more reviews in the future!
[Insert Horror Picture]