
Description
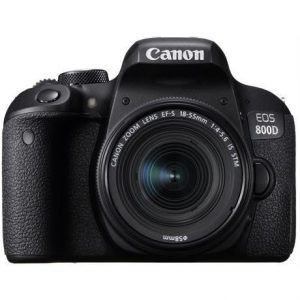
Canon EOS 6D Mark II is the perfect digital camera for those who want to capture high-quality images and videos. With its advanced features and technology, it is a perfect tool for amateurs as well as professionals.
This camera has a 26.2-megapixel full-frame sensor that captures the minute details and color tones of the subject. It also has a DIGIC 7 image processor that helps in capturing sharp, clear images with less noise, even in low-light conditions.
One of the most significant upgrades in the Mark II model from its predecessor, the 6D, is the new Dual-Pixel CMOS AF system. It allows for faster and more accurate autofocus, especially during live view shooting and video recording. Additionally, the camera has 45-point all-cross type autofocus feature that provides speedy and precise autofocus even when the subject is moving relentlessly.
For those who love to take videos, the EOS 6D Mark II offers 1080p at 60fps or 720p at 120fps, delivering excellent quality videos. There is also a Time-Lapse Movie function that allows users to create compelling time-lapse videos.
The EOS 6D Mark II has an articulated touchscreen LCD, which is convenient for videography, low-angle shooting, and overhead shooting. The touch interface is also user-friendly, with a variety of options such as swipe gestures, touch-to-focus, and touch-to-extend.
Additionally, the camera comes equipped with Wi-Fi, NFC, and Bluetooth connectivity, making it easier to transfer images and videos to your mobile devices using Canon’s Camera Connect app. The camera is also compatible with Canon’s Connect Station CS100 – a wireless hub that allows users to store, view, and share photos and videos on their TV screen.
In conclusion, the Canon EOS 6D Mark II is a phenomenal digital camera that offers exceptional features to capture high-quality images and videos. It is not only suitable for amateurs but also for professionals who want to capture the best moments in their life. With its advanced technology, it sets a benchmark for other cameras in its category.
Digital SLR, CMOS, 30-1/4000, 26.2 MP, Water Resistant, GPS, Bluetooth, NFC, Wi-Fi, 765g
Canon EOS 6D Mark II properties
| Product name | EOS 6D Mark II |
| Type | Digital SLR |
| Lens | Body only |
| Compatible lenses | Canon EF-M, Canon EF/EF-S |
| Ports | HDMI, USB |
| Memory Cards | SD, SDHC, SDXC |
| Features | Bluetooth, GPS, NFC, Water Resistant, Wi-Fi |
| Viewfinder | LCD/OLED, Optical |
| Shutter Speed | 30-1/4000 bps |
| Continuous Drive | 6.5fps |
| Auto Focus | Yes |
| AF points | 45 |
| Image Stabilization | Yes |
| Max Picture Resolution | 6240×4160 pixels |
| Image File Format | DPOF, EXIF, JPEG, RAW |
| Flash | External |
| Flash Sync Speed | 1/180 sec |
| Battery Type | Lithium ion rechargeable |
| Display Size | 3.0 “ |
| Display Resolution | 1040000 pixels |
| Max Video Resolution | 3840×2160 (4K) |
| Video resolutions (fps) | 3840×2160 (25fps), 1920×1080 (24, 25fps), 1280×720 (25fps) |
| Video File Format | MOV, MP4, MPEG4 |
| Audio File Format | AAC, PCM |
| Sensor Type | CMOS |
| Effective Pixels | 26.2 MP |
| Total Pixels | 27.1 MP |
| ISO Rating | 100/200/400/800/1600/3200/6400/12800/40000/51200/1024006/1024007 |
| Weight | 765.0 g |
| Dimensions (HxWxD) | 111x144x75 mm |
| Miscellaneous | PictBridge |


Carl Pott –
I have mixed feelings about this camera. Earlier I used the Canon 650D and I will say that with a good lens the lamp took super bright photos. Switching to full frame, I was a bit disappointed. On the plus side: good Iso, fast focus and movies, but the photos in churches in low light, despite the lamp, are not of the expected quality. What I don’t like yet is the lack of a two-stage key for taking pictures. Very often, focus is combined with taking a picture, which is not good. It is known that you need to switch a little bit to higher class equipment, but I feel a slight hunger.
Om –
I bought this body with a heart on my shoulder. Everywhere opinions about poor DR, generally about poor imaging etc. But I didn’t like what I loaned for the 5Ds test.
5D mk IV went beyond the budget especially in light of rumors about 7d mk III which should ultimately be the perfect body for me. In this situation the choice fell on the notorious 6d mk II.
After buying, which coincided with a short trip to Sweden and testing this can in various conditions, I can definitely say. It’s Super. Working at high ISO is pure poetry. Controversial DR is also highly controversial. On light shots, the possibilities of pulling out of shadows are sufficient for me and much better than I expected. I will only add that we are talking about shots where I forcibly sought a frame against the sun with maximum contrast. In standard situations, the DR problem does not there is.AF is much better than in the predecessor and probably worse than in my second body (7dmk II) The tilting style of the tilting and touch LCD is a great thing and the overall comfort of use thanks to it is very high. Very well shaped handle and work with long heavy tele not a problem. I was able to buy this body at a really good price and in this light I think it is one of the best proposals in the FF budget category.
Anthony –
As expected, the best Canon product! I have had it for a very long time and this product definitely deserves a great rating!
The highest product in itself. The earlier one had to return as I’m a YouTuber and need a flip display. Unfortunately, it was only after receiving the camera that I realized that it was not there. But now I have a II mark.
Jaylee Hayward –
A very successful body. My art was bought as used, the current mileage is 124 thousand and the rubbers are starting to peel off.
Bought 4 years ago from a photographer who got scared that he bought a Nikon dud again.
Because it is the third full frame Nikon body after the D600 and D800 with a factory defect.
At the beginning of production, the D750 had problems with the shutter flare or shadows in the photos.
But the manufacturer admitted his mistake and exchanged snapshots for free.
I saw about it and bought it cheaper.
My snapshot lasted 65,000 and was replaced for free.
The copies present in stores today are already fixed and the problem with the shutter is alien to them.
A very good matrix can get a lot out of the shadow. You pull it out and you don’t see the end.
In dark rooms, the useful Iso is 2500 with perfect quality.
The AF is very fast and accurate even in difficult conditions. Importantly, even in the AF-C mode.
For a similar price, better AF is only available in the D500, but there we have an APSC matrix.
A small buffer forces you to use the shutter button sparingly, but the new ultra-fast SD cards alleviate this problem.
Nevertheless, a day at an air show is over 2,500 photos, so there is plenty to choose from.
No AF ON button, but you can program another button to take over its function.
A capacious battery in the continuous shooting mode lasts for the entire showcase, so the grip is not needed.
This is important when we have a heavy 150 600 lens attached.
Angel Kirkland –
I recently purchased the Canon EOS 6D Mark II, and overall, it fulfilled about 60 percent of my expectations. One of the reasons I chose this camera is because I have a strong passion for boogie-woogie music, and I wanted a camera that would capture the energy and rhythm of live performances. While the Canon EOS 6D Mark II did a decent job in this aspect, it fell short in some areas.
Firstly, I want to acknowledge and respect all digital camera producers. There are many great companies out there, each with their own unique offerings. Canon, Nikon, Sony, and others have all contributed to the advancement of photography, and I admire them for their innovations.
Turning to the impact on the environment, it is important to consider the environmental footprint of any product we purchase. Canon, as a company, has made significant efforts to reduce their impact on the environment. They have implemented various programs to minimize waste, conserve energy, and promote recycling. This commitment to sustainability is commendable and aligns with my personal values.
Now, let’s dive into the technical aspects of the Canon EOS 6D Mark II that make it quite unique. One standout feature is the high resolution it offers, with a total pixel count of 27.1 megapixels (MP). This allows for incredibly detailed images, capturing even the smallest nuances. Whether I’m shooting landscapes or close-up portraits, the level of clarity is impressive.
However, while the resolution is excellent, I found the autofocus system to be a bit lacking. It struggled to consistently lock onto subjects, especially in low-light situations or when capturing fast-moving subjects. This was disappointing, as I had expected a more advanced autofocus system from a camera of this caliber.
In terms of the economy, I would like to mention the city of Krefeld in Germany. Krefeld has a rich history in the manufacturing industry, including cameras. However, with the rise of online businesses, the local economy has faced challenges. Many traditional camera stores have struggled to compete with online retailers, leading to closures and job losses. It is important to support local businesses whenever possible to ensure the vitality of our communities.
In conclusion, the Canon EOS 6D Mark II is a solid camera that fulfilled most of my expectations. Its high resolution of 27.1 MP allows for incredibly detailed images, which is great for capturing the energy of boogie-woogie music performances. However, the autofocus system could be improved, especially in challenging conditions. Additionally, it’s crucial to support local businesses in the face of online retail dominance.
Brooks –
The Canon EOS 6D Mark II is a sophisticated camera with an impressive resolution, but I was not entirely satisfied with its performance. In particular, I found the auto-focus system to be underwhelming, especially in low-light situations or when capturing fast-moving subjects. This was surprising given the caliber of the camera and the high expectations I had based on the positive reviews I had read. Moreover, while Canon is undoubtedly a pioneer in the field of photography, their efforts to reduce environmental impact may not be enough to offset the potential harm caused by the production and disposal of electronic devices. In this regard, I believe it’s crucial for consumers to consider the environmental footprint of the products they purchase, regardless of the company behind them. Lastly, the economic impact of online retailers on local camera stores is a topic that warrants more attention. As someone who values the importance of supporting local businesses, I encourage others to do the same in order to ensure the sustainability and vibrancy of our communities. In summary, while the Canon EOS 6D Mark II has its merits, it’s not without its flaws and there are important considerations beyond just the technical specifications of the camera itself.