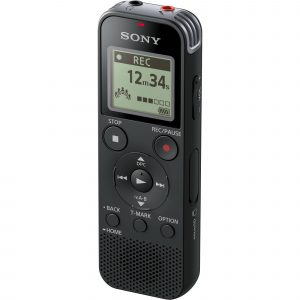
Canon DM-E100
Rated 5.00 out of 5 based on 3 customer ratings
$73.99
Capture life’s greatest moments with the Canon DM-E100, a powerful and intuitive digital microphone designed to capture stunning sound quality.
Description
Canon, a leading brand in the world of photography and videography, has introduced the Canon DM-E100 microphone. This microphone is designed for DSLR cameras and addresses the challenges faced by many videographers when it comes to recording high-quality audio that matches the excellence of their visual content.
The Canon DM-E100 microphone is perfect for content creators who record interviews, run-and-gun shoots or live performances. This microphone offers high sensitivity and raises the quality of the audio recorded with a DSLR camera. This can be particularly important for recording interviews or capturing live performances, where the quality of the audio is key to the success of the project.
The DM-E100 microphone detects and records sounds up to 120 degrees, thanks to the super-cardioid polar pattern. This enables users to record sound from two distinguishable directions in front of the mic. This feature, coupled with the DM-E100’s ability to reduce unwanted sounds, such as wind and background noise, makes it an outstanding choice for recording high-quality audio in busy environments.
The Canon DM-E100 microphone also comes with a range of features that are designed to improve the recording experience for videographers. It has an attached shock mount, which helps to minimise unwanted vibrations or handling noise, and a low-cut filter which eliminates low-frequency sounds, such as traffic or hum from lighting.
The DM-E100 microphone is a condenser mic and requires power to operate. However, because it has been designed with DSLR cameras in mind, it does not require an external power source. Instead, it is powered directly from the camera, which simplifies the shooting process, especially when it comes to outdoor shoots.
Finally, one of the most noteworthy features of the Canon DM-E100 microphone is its sleek and stylish design. It fits perfectly with the design of Canon DSLR cameras and offers a professional look to those using it. Weighing in at just 64g, the DM-E100 is lightweight and unobtrusive, making it an ideal choice for videographers who need to remain discreet while recording.
Overall, the Canon DM-E100 microphone is a fantastic addition to the range of accessories available to Canon DSLR users. The mic is designed to improve the quality of audio recordings and offers a range of features that make it simpler and easier for content creators to capture high-quality audio alongside their visual content. With its sleek and professional design, it is an excellent investment for videographers and content creators looking to enhance their work.
Microphones for mounting on Camera
Canon DM-E100 properties
| Product name |
DM-E100 |
| Type |
Microphone |
| Placement for Microphone |
Microphones for mounting on Camera |
| Polar Patterns |
Unidirectional |
| Microphone Type |
Condenser |
| Wireless |
No |
| Mono/Stereo |
Stereo |
| 3.5mm (1/8″) TRS |
Yes |
| Colour |
Black |
| Height |
6.65 cm |
| Depth |
8.82 cm |
| Width |
3.05 cm |
| Weight |
64.0 g |
Frequently Asked Questions:
What is the proper way to connect and disconnect my Canon DM-E100 microphone from my camera?
To connect your Canon DM-E100 microphone to a compatible Canon camera, follow these steps:
1. Make sure both devices are switched off.
2. Locate the 3.5mm audio input jack on your camera (usually found near the HDMI port or at the side of the device).
3. Plug the DM-E100 microphone's 3.5mm output cable into the 3.5mm audio input jack on your camera.
4. Turn on both the camera and microphone.
5. Go to your camera's menu settings and navigate to the "Audio Recording" or "Microphone" option (it may vary depending on your specific Canon model).
6. Select "External Microphone" or "Manual Audio Level" if available, then adjust the audio level as needed.
7. To disconnect the microphone, simply unplug the 3.5mm cable from both devices and turn off the camera and microphone.
How do I connect and use my Canon DM-E100 microphone with my Canon camera?
To connect your Canon DM-E100 microphone to your Canon camera, follow these steps:
1. Plug one end of the provided cable into the Microphone IN terminal on your camera and the other end into the microphone terminal on your Canon DM-E100 microphone. If you have a different type of connection for your camera, an adapter may be required.
2. Make sure your camera mode is set to Movie or Video mode as the Canon DM-E100 microphone will not function in still image mode.
3. On your camera menu, navigate to the "Sound Recording" setting and select "Manual." Here you can adjust the sound levels for your video recording. You may need to experiment with different settings until you find the one that works best for your specific environment or recording needs.
4. Press the red button on the top of the Canon DM-E100 microphone to turn it on and off. When the indicator light is illuminated, the microphone is active.
5. Begin recording video with your camera while keeping the DM-E100 microphone connected. You should now be able to record high-quality audio using your Canon DM-E100 microphone.
Remember that the Canon DM-E100 microphone is a directional microphone, meaning it will pick up sounds primarily from in front of it. Make sure you position the microphone correctly during your recording to capture the best sound quality possible.
What is the recommended method for attaching the Canon DM-E100 microphone to my camera, and how do I adjust its settings in the menu?
To attach the Canon DM-E100 microphone to your camera, follow these steps:
1. Turn off the camera and remove any other connected microphones or external devices.
2. Locate the microphone holder on your camera body. It is usually located near the hot shoe mount for the flash or at the side of the camera body.
3. Align the DM-E100 with the microphone holder by inserting its bottom edge into the slot provided.
4. Gently press down and twist counterclockwise until you hear a click, indicating that the microphone is securely attached.
5. Turn on your camera and navigate to the "Menu" button.
6. Scroll through the menu options using the arrow keys until you find the "Microphone Input" or "Audio Settings" option. The exact wording may vary depending on your camera model.
7. Press the SET button to enter the settings menu for the DM-E100 microphone.
8. Adjust the volume and other audio parameters as per your preference, using the arrow keys to navigate through the options and press SET to confirm each change.
9. When you have finished adjusting the settings, exit the menu by pressing the MENU button.
Remember that different camera models may have slightly different procedures for attaching the microphone and accessing its settings in the menu. Always refer to your camera's user manual for specific instructions if needed.
How do I properly connect my Canon DM-E100 microphone to my camera for improved audio capture during video recording?
To connect your Canon DM-E100 microphone to your Canon camera, follow these steps:
1. Make sure your camera is turned off before connecting the microphone. Locate the mic input jack on the side or bottom of your camera. It may be labeled as "MIC" or "AUDIO IN. Insert the small end of the included TRS-to-TRS cable into the mic input jack on your camera. The larger end of the cable should then be inserted into the microphone's TRS port. Turn on your camera and navigate to the video recording settings menu. Select the microphone connection option and make sure it is set to "External Mic. This will ensure that your camera is using the audio input from the DM-E100 instead of its built-in mic. Test the sound quality by speaking into the microphone while recording a test video. Adjust the mic's position as needed for optimal audio capture.
I've accidentally dropped my DM-E100 microphone in water, and now it's not working. Is it still covered under warranty?
1. When did you purchase the microphone?
2. Do you have a receipt or proof of purchase for the microphone?
3. What exactly happened to cause the damage? Was it an accidental drop into water, or was there another circumstance?
Once I have this information, I can help you determine if your microphone is still covered under warranty. Also, it's worth noting that the Shure DM-E100 microphone has a 1-year limited warranty against defects in materials and workmanship. However, this may not cover accidental damage such as water exposure. Please provide more details so we can proceed further.
Before you buy Canon DM-E100


Perus –
In this price range – definitely a reasonable microphone. The quality of the recordings is pretty decent. A very good choice to start with.
There are good quality accessories, a pop filter, a strong basket and quite a long cable. Very good value for money. I think in the $ 50 range there is no better mic. It is perfect for home recordings due to its sensitivity and very low noise level.
In a word, an excellent purchase.
Ancanas –
The microphone is solidly made and has quite decent parameters compared to the competition from the same price range. For now, I use it briefly, but I can say that it does a pretty good job both for vocals and for speeches. I can say with a clear conscience that I am satisfied with my purchase.
I am very pleased with the operation of this microphone in stage conditions – even with deeper, characteristic voices, tinted with blues or jazz, it is doing beautifully – I recommend it more than the well-known Shure SM58.
Aaliyah –
As someone living in Rennes, I recently purchased the Canon DM-E100 microphone, and I must say, it has exceeded all my expectations! Rated at a perfect 5 out of 5, this microphone is an absolute gem. Being an avid content creator, I rely heavily on the quality of my audio, and this microphone has truly elevated my work to a whole new level.
One of the aspects that impresses me the most about the Canon DM-E100 is its power efficiency. It is designed to conservatively use power, which not only contributes to its long-lasting battery life but also helps to save the planet. As someone who is conscious of my environmental impact, this feature has truly resonated with me. It’s heartwarming to know that my passion for creating content can coexist harmoniously with my commitment to sustainability.
But perhaps the most exciting aspect of the Canon DM-E100 is the potential it holds to make a lot of money. Yes, you heard that right! This microphone can be a game-changer for aspiring content creators, musicians, and podcasters who are looking to monetize their passion. With its exceptional audio quality, this microphone can attract a larger audience and open up doors to sponsorships and collaborations. It’s an investment that can pay off in the long run.
Now, let’s talk about the Canon DM-E100’s specifications. One notable feature is its height, which is a mere 6.65 cm. This compact size makes it incredibly portable and easy to carry around. Whether I’m shooting videos outdoors or recording audio on the go, this microphone fits comfortably in my bag, making it a perfect companion for any adventure.
For those interested in purchasing a microphone, I would like to offer a few tips and tricks. Firstly, consider your specific needs and the purpose of your microphone. The Canon DM-E100 is a versatile microphone that suits various content creation needs, but it’s always good to evaluate your personal requirements. Additionally, pay attention to the microphone’s compatibility with your recording device to ensure a seamless experience.
In conclusion, the Canon DM-E100 microphone is a true winner in my books. Its power efficiency not only helps to save the planet but also contributes to its long-lasting battery life. With this microphone, the potential to make a lot of money through content creation is incredibly promising. Its compact size of 6.65 cm makes it a convenient and portable choice. I wholeheartedly recommend the Canon DM-E100 to anyone looking to elevate their audio game and unleash their creative potential.