Sennheiser MK 4
$216.99
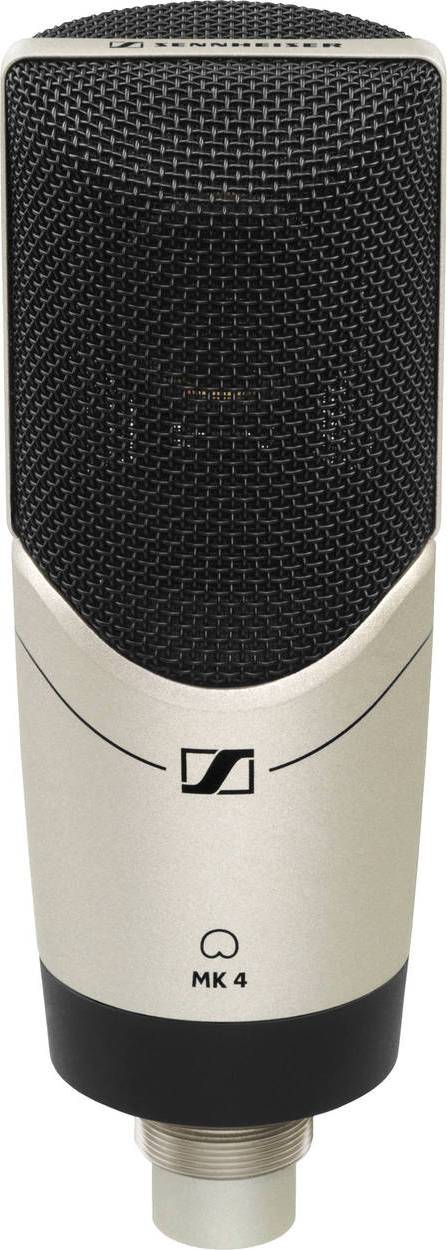
Experience studio-quality sound in the comfort of your own home with the Sennheiser MK 4 microphone, delivering professional-grade audio for all your recording needs.
Description
The Sennheiser MK 4 microphone is a powerhouse in the world of professional audio recording. Designed with precision and fine craftsmanship, this microphone delivers unparalleled sound quality and clarity, making it a top choice for both seasoned professionals and budding musicians.
One of the standout features of the MK 4 is its large-diaphragm capsule, which captures incredible detail and ensures a rich and balanced sound. This feature sets it apart from many other microphones on the market, providing a level of depth and warmth that is difficult to achieve with smaller diaphragm microphones. Whether you are recording vocals, acoustic instruments, or even podcasts, the MK 4’s ability to reproduce sound faithfully makes it a versatile tool for any recording scenario.
Another notable aspect of the MK 4 is its low self-noise. With a noise level of only 10 dB(A), this microphone ensures that unwanted background noise is kept to a minimum. This low self-noise is especially crucial when recording in a home studio or a less-than-ideal acoustic environment, as it allows the true essence of the recorded sound to shine through without interference. The MK 4’s ability to capture even the slightest nuances of a performance is a testament to Sennheiser’s dedication to producing high-quality audio equipment.
Durability is also a key feature of the MK 4 microphone. The all-metal body construction and robust design ensure that it can withstand the rigors of daily use, whether in a professional studio or on the road. This durability makes the MK 4 a reliable and long-lasting investment for any audio enthusiast.
Additionally, the MK 4 comes with a range of accessories to enhance its performance. The included shock mount provides excellent isolation from vibrations, ensuring that any handling noise is minimized. The microphone also comes with a sturdy carrying case, offering protection during transportation and storage.
In summary, the Sennheiser MK 4 microphone is a top-of-the-line choice for anyone in need of professional-grade audio recording. Its large-diaphragm capsule, low self-noise, and durability set it apart from other microphones on the market. With its ability to capture the true essence of a performance, the MK 4 is a reliable and versatile tool for musicians, podcasters, and audio professionals alike. Whether you are recording vocals, instruments, or any other audio source, the MK 4 will undoubtedly deliver exceptional results.
Frequently Asked Questions:
How do I properly connect and use the Sennheiser MK 4 microphone for recording purposes?
To connect and use the Sennheiser MK 4 microphone for recording purposes, follow these steps:
1. Make sure your audio interface or mixer has a microphone input that supports phantom power. The Sennheiser MK 4 requires phantom power to operate. Connect the microphone to the input using an XLR cable. Make sure the polarity is correct by matching the pin configurations of both ends of the cable. Turn on your audio interface or mixer and select the input source as "Microphone". Adjust the gain level using the mic preamp on your audio interface or mixer to ensure that the signal is not too loud or too soft. A good starting point is around 60% of the maximum gain. Test the microphone by speaking into it and checking the output level in your recording software. Make sure the signal is clear and doesn't have any unwanted noise or distortion. Adjust the position of the microphone to capture the desired sound. The Sennheiser MK 4 has a cardioid polar pattern, which means it picks up sound from the front and rejects sounds from the sides and rear. This makes it ideal for recording dialogue or vocals in a studio environment with minimal background noise. If you're using the microphone for live performances or presentations, make sure to position it at a distance that allows for clear communication without excessive proximity effect (bass buildup). Clean the diaphragm and capsule of the microphone regularly with a soft, dry cloth to prevent dust and moisture accumulation that can affect sound quality or damage the microphone's internal components. By following these steps, you should be able to connect and use the Sennheiser MK 4 microphone for recording purposes effectively.
How should I properly calibrate my Sennheiser MK 4 microphone for optimal audio performance?
To ensure optimal audio performance from your Sennheiser MK 4 microphone, it is essential to perform regular calibration procedures. Calibration involves adjusting the microphone's sensitivity and frequency response to match the requirements of your specific application or recording environment. Here are the steps for properly calibrating your Sennheiser MK 4 microphone:
1. Choose a suitable calibration source - For optimal results, use a high-quality audio source with a flat frequency response. This could be a CD player, digital audio file player, or an audio generator that provides a consistent signal. Connect the microphone to your audio interface or mixer using a high-quality XLR cable. Make sure the connection is secure and free from any interference. Adjust the microphone's sensitivity - Depending on the application, you may need to adjust the microphone's sensitivity level. For example, if you are recording vocals, you may want a lower sensitivity setting to minimize background noise. On the other hand, if you are recording drums or amplified instruments, you may need a higher sensitivity setting to capture all the details. Adjust the frequency response - The MK 4 microphone has a flat frequency response, but it may require minor adjustments based on your specific application. For example, if you are recording vocals in a live performance setting with a lot of bass frequencies, you may need to boost the low-frequency response to ensure clarity and intelligibility. Test the microphone - After making any sensitivity or frequency response adjustments, test the microphone's performance using your chosen calibration source. Listen carefully for any distortion, noise, or unwanted artifacts in the audio signal. If you notice any issues, repeat the calibration process until you achieve optimal results. By following these steps, you can ensure that your Sennheiser MK 4 microphone is performing at its best and delivering high-quality audio output for all your recording needs. Remember to perform regular calibration checks to maintain optimal performance over time.
How do I properly calibrate my Sennheiser MK 4 microphone for optimal performance?
To calibrate your Sennheiser MK 4 microphone for optimal performance, follow these steps:
1. Set up your recording environment to minimize background noise and reflections. Use acoustic treatment or isolation techniques as needed. Connect the microphone to your audio interface or mixer using an XLR cable. Make sure it is securely connected and that the polarity switch on the microphone is set correctly for your specific application. Adjust the microphone's position so that the diaphragm is approximately 1-2 inches away from your desired sound source, such as a vocalist or instrument. The angle of the microphone should be aimed at the sound source. Turn on your recording software and select the input for your microphone. Make sure it is set to the correct sample rate and bit depth for your project. Play some audio through your system to ensure that the microphone is capturing sound accurately. Adjust the gain level of the microphone as needed to achieve a good signal-to-noise ratio without distortion or clipping. Test the microphone's response by speaking, singing, or playing an instrument at various distances and angles. Observe how the tone changes and adjust the position and angle of the microphone accordingly for your desired sound. Check the polar pattern of the microphone to ensure that it is picking up only the desired sound source and not unwanted background noise or reflections. Save your calibration settings as a preset in your recording software for easy recall later. Regularly check and adjust the calibration settings as needed, particularly if you are using the microphone in different environments or with different sound sources. By following these steps, you can ensure that your Sennheiser MK 4 microphone is calibrated for optimal performance and captures high-quality audio.
"How do I properly calibrate the frequency response of my Sennheiser MK 4 microphone for optimal performance in recording applications?"
To properly calibrate the frequency response of your Sennheiser MK 4 microphone for optimal performance in recording applications, follow these steps:
1. Gather your equipment - You will need a high-quality audio interface or mixing console, a microphone stand, and a pop filter. Connect your microphone to the input of your audio interface or mixing console. Make sure it is securely fastened with a screw-on adapter or a clip. Launch your digital audio workstation (DAW) software and create a new session. Insert an EQ plugin in your DAW's signal chain, after the microphone input but before the master output. This will allow you to adjust the frequency response of the microphone. Play a test sound or use a tone generator to produce a consistent and stable tone at different frequencies. Adjust the EQ plugin to compensate for any peaks, dips, or deviations in the microphone's frequency response. Repeat this process with various types of sounds, such as vocals, instruments, or speech, to ensure optimal performance across a range of applications. Save your settings and test the microphone's calibrated frequency response by recording a sample track in your DAW software. Compare the results with uncalibrated recordings to verify that the calibration process has improved the overall quality and accuracy of the sound. If necessary, adjust your EQ settings further until you achieve the desired frequency response for your specific recording needs. Remember to always handle your microphone with care and avoid exposing it to extreme temperatures or moisture, as this can affect its performance and longevity over time. By following these calibration steps and maintaining proper use and handling, you can ensure that your Sennheiser MK 4 microphone delivers optimal results in your recording applications.
Before you buy Sennheiser MK 4




Riley Kerr –
Dear fellow shoppers,
As I pick up my new Sennheiser MK 4 headphones today, I can’t help but feel a sense of excitement. But it’s not just because of the crisp and clear sound quality that these headphones promise – it’s also because of the news I heard earlier today: GB has broken the women’s team sprint world record in qualifying at Paris 2024!
Now, you might be wondering how this is related to my new purchase. Well, let me tell you a little secret: I believe that having high-quality headphones like these Sennheiser MK 4 could actually help me save money in the long run. How, you ask? By allowing me to fully immerse myself in my favorite electro-industrial music and get lost in the rhythm, I find that I’m less likely to make impulsive purchases or spend money on unnecessary items!
But enough about my personal story – have any of you tried making potato chowder with your Sennheiser MK 4 headphones? It’s a funny story, but apparently some serviceman once used his MK 4 headphones to listen for the sound of potatoes boiling over in the kitchen! While I wouldn’t recommend using these headphones for cooking (they are intended for professional use after all), it just goes to show how versatile and useful they can be in unexpected ways.
Speaking of professional use, I’ve noticed that some of my musician friends swear by their Sennheiser MK 4 headphones when recording and mixing music. It’s clear that these headphones are a favorite among both amateur and professional users alike!
So if you’re in the market for a new pair of headphones, I highly recommend checking out the Sennheiser MK 4. With their superior sound quality and versatility, they could be just what you need to enhance your listening experience – whether you’re a music lover or a professional audio engineer!
Thanks for reading my review, and don’t forget to check out some of the other products in this shop as well. Have a great day and happy shopping!
Best regards,
Riley Kerr