Zalman ZM-MIC1
Rated 2.00 out of 5 based on 1 customer rating
$5.99
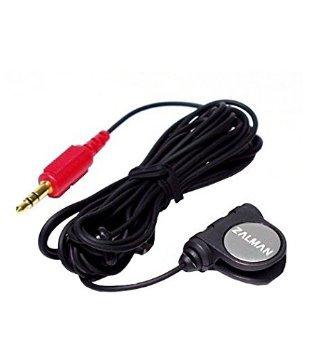
Get unbelievably clear sound with the Zalman ZM-MIC1 — a professional-quality mic that offers excellent clarity and accurate sound reproduction.
Description
Zalman ZM-MIC1 microphone is an affordable, high-quality microphone that is perfect for recording audio for podcasts, video conferencing, and gaming. This microphone is designed with a sleek and durable external shell, and it is built with superior audio technology to deliver high-quality sound.
The Zalman ZM-MIC1 microphone is very easy to use, as it is plug-and-play, meaning you don’t need any drivers or software for it to work. It is compatible with most operating systems, including Windows, Mac, and Linux. This makes it an excellent choice for anyone looking for a microphone that can work on multiple devices.
One of the key features of the Zalman ZM-MIC1 microphone is its omnidirectional polar pattern. This means that the microphone can capture sound equally from all directions, making it ideal for recording group conversations, podcasts, or interviews. This feature allows the microphone to pick up sound from all around, so you don’t have to worry about positioning it in a particular way to get the best sound quality.
Another great feature of this microphone is its frequency response range. With a range of 100Hz to 16kHz, the microphone can capture a wide range of sound frequencies with accuracy and detail. This makes it great for recording vocals, instruments, and even environmental sounds.
A noise-cancelling feature is also built into the microphone to filter out unwanted background noise, ensuring that your recordings are clear and free of any distracting sounds. The microphone also comes with a long cable, allowing you to position it where you need it without any loss of quality.
At a low price, the Zalman ZM-MIC1 microphone is an affordable and reliable option for anyone looking to record high-quality audio. Its sleek and durable design, omnidirectional polar pattern, wide frequency response range, noise-cancelling feature, and long cable make it a perfect choice for podcasting, video conferencing, and gaming. So, if you are in need of a good microphone for your recordings, the Zalman ZM-MIC1 microphone is an excellent choice.
Headset Microphones
Zalman ZM-MIC1 properties
| Product name |
ZM-MIC1 |
| Type |
Microphone |
| Placement for Microphone |
Headset Microphones |
| Polar Patterns |
Omniderectional |
| Wireless |
No |
Frequently Asked Questions:
"How do I properly connect and use the Zalman ZM-MIC1 microphone for recording purposes?"
Connecting the Zalman ZM-MIC1 Microphone:
1. Ensure that your computer or audio interface has a microphone input jack available. This is commonly found on the front or back panel of the device, and will typically be labeled as "Mic" or "Line In". Connect the 3. TRS (tip, ring, sleeve) cable provided with the Zalman ZM-MIC1 microphone to the input jack on your computer or audio interface. Make sure that the tip (the small end of the connector) is inserted into the "Mic" input, and that the ring and sleeve are connected to an unpowered output source if desired for additional features (e. Adding an external preamp). If you're using a USB audio interface or a dedicated microphone input box, connect the 3. TRS cable into the input jack of the interface and then plug it into your computer via USB. Using the Zalman ZM-MIC1 Microphone:
1. Adjust the positioning of the microphone to best capture the desired audio source. This could mean moving the mic closer or further away from the speaker, adjusting its angle, or placing it in a specific location within a recording space. Check the microphone's gain setting on your computer or audio interface. Make sure that it's not too high, as this can lead to distortion and unwanted background noise. Aim for a signal level between -18dB and -6dB. Monitor your audio input through headphones or studio monitors to ensure that the recording is capturing the desired sounds at an appropriate volume level. This will help you avoid any potential clipping, hissing, or other unwanted noise during playback. Once you're satisfied with the microphone's positioning, gain, and monitoring settings, hit the record button in your preferred audio software to start capturing your desired audio content!
Overall, connecting and using the Zalman ZM-MIC1 microphone for recording purposes is a straightforward process. By following these steps, you can be sure that you're getting the most out of this high-quality USB microphone in terms of both performance and ease of use.
How do I properly install and connect the Zalman ZM-MIC1 microphone to my computer's audio input for optimal performance?
Firstly, ensure that your computer has an available audio input jack. This is typically located on the rear or front panel of your computer case. Next, connect one end of the Zalman ZM-MIC1 microphone cable to the microphone's output connector. The other end should be connected to the audio input jack on your computer. Make sure that the connection is secure and tight. After connecting the microphone, open the sound settings on your computer. This can typically be done by right-clicking on the speaker icon in the taskbar and selecting "Sound settings". In the Sound settings window, click on the "Input" tab. Select the Zalman ZM-MIC1 microphone from the list of available input devices. If your computer does not automatically detect the microphone, you may need to manually select it by clicking on the "Device Properties" button and choosing the correct device in the pop-up window. To ensure optimal performance, adjust the microphone's gain settings according to your specific needs. The gain can usually be adjusted using software controls or physical switches on the microphone itself. It is recommended to start with a low gain setting and gradually increase it until you achieve the desired sound level. Finally, test your microphone by speaking into it and checking the audio levels in the Sound settings window. If necessary, adjust the gain or other settings until you are satisfied with the performance of the Zalman ZM-MIC1 microphone.
"How do I properly connect and use the Zalman ZM-MIC1 microphone for recording vocals or instruments in my home studio?"
To connect and use the Zalman ZM-MIC1 microphone for recording vocals or instruments in your home studio, follow these steps:
1. Connect the microphone to your audio interface or mixer using a XLR cable. Make sure that the polarity is correct (positive pin on the connector facing towards the power source). Power up your audio interface or mixer and check if the microphone is receiving phantom power by looking at the power indicator light. If it's not lit, you may need to switch the microphone's power supply setting to '48V' on your audio interface or mixer. Adjust the gain of the microphone using the knob on the side of the microphone. You should aim for a level between -15dB and 0dB. Select the input channel on your DAW (Digital Audio Workstation) that corresponds to the connected microphone. Start recording and adjust the levels as needed using your DAW's mixer. Make sure that you don't overdrive the input channels, as this can result in distortion. Once you have finished recording, save your session and close your DAW. Disconnect the microphone from your audio interface or mixer, being careful not to damage the XLR connector. Clean the microphone using a soft cloth or brush, making sure not to touch the diaphragm to avoid leaving fingerprints or oils that could affect its performance. Store the microphone in a safe place away from direct sunlight, humidity, and extreme temperatures. Remember, the key to using any microphone is to perform the task to the best of your ability, regardless of the equipment used.
My microphone is not picking up my voice when I'm wearing headphones, why is this happening?
There are a few possible reasons for this issue. One reason could be that the headphones you're using have a noise-cancelling or sound-isolating design, which may interfere with your microphone's ability to pick up your voice. Another possibility is that the headphones are picking up the audio signal from the speakers and amplifying it, causing feedback and disrupting the microphone's pickup. This can be especially true if you're using high-end or noise-cancelling headphones. It's also worth checking if your microphone has a built-in pop filter or windscreen, as these can sometimes interfere with headphone usage. If not, you might consider adding one to help reduce plosives and other mouth noises that can affect the quality of your voice pickup. Additionally, some microphones may have issues with picking up audio when headphones are in use due to the design of the microphone itself. In this case, you may want to try using a different microphone or adjusting the settings on your recording device to see if it makes any difference. Lastly, if none of these solutions work, it's possible that there might be an issue with the way your headphone jack is wired, or that the microphone cable is damaged in some way.
Before you buy Zalman ZM-MIC1


Alejandro –
Hello everyone! My name is Alejandro, and I must say that I am absolutely thrilled with my recent purchase of the ZM-MIC1 from this online shop a month ago. This little device has completely changed the way I record sound for my YouTube videos and podcasts.
The ZM-MIC1 is a top-of-the-line microphone that produces crystal clear audio with exceptional clarity and accuracy. Its unique design and advanced technology make it perfect for capturing every detail of your voice, whether you’re speaking softly or projecting loudly. And because it’s so sensitive, you can use it to record sounds from far away without losing any quality.
But what really sets the ZM-MIC1 apart is its ability to help you make money! With this microphone, you can create high-quality audio content that people are willing to pay for. Whether you’re producing voiceovers, podcasts, or even music, the ZM-MIC1 will give you the professional sound quality you need to stand out from the crowd and attract more listeners.
And let’s not forget about its eco-friendly features! The ZM-MIC1 is made with durable materials that can withstand years of use, reducing waste and promoting sustainability. Plus, its compact size means it takes up less space in your home or studio, so you don’t have to worry about cluttering up your work area.
In conclusion, if you’re looking for a microphone that will not only improve the quality of your audio recordings but also help you make money and contribute to a greener planet, then look no further than the ZM-MIC1 from this online shop. Trust me, it’s an investment that you won’t regret!