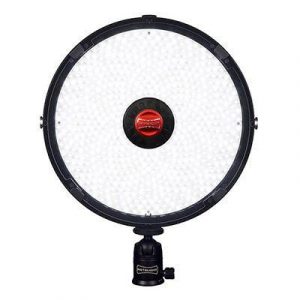
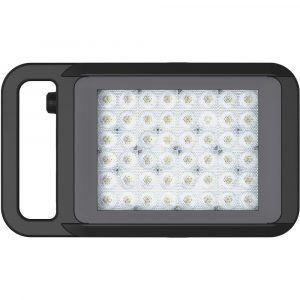
Godox LR160
Rated 2.00 out of 5 based on 1 customer rating
$133.99
Description
Godox LR160 properties
| Product name |
LR160 |
| Type |
Studio Lightning |
| Ringlight |
Yes |
| Colour |
Black |
| Material |
Plastic |
| Effect |
18.0 W |
| Number of Lamps |
160.0 |
| Temperature (K) |
8000.0 |
| Type of Lighting |
LED |
| Weight |
1.21 kg |
| Height |
59.0 cm |
| Width |
49.2 cm |
| Depth |
4.0 cm |
Frequently Asked Questions:
How do I update the firmware on my Godox LR160 flash?
To update the firmware on your Godox LR160 flash, follow these steps:
1. Download the latest firmware for your LR160 flash from the official Godox website (https://www.godox.com/). You can find the firmware under the "Downloads" section of their product page.
2. Once you have downloaded the firmware, extract it to a folder on your computer. You should now have a file with an ".upd" extension.
3. Turn on your LR160 flash by pressing the power button. Wait for about 5 seconds until the flash's LED light is flashing.
4. Connect one end of a USB cable to your computer and the other end to the USB port on your LR160 flash. Make sure the cable is compatible with your computer (most standard USB cables should work).
5. Open the folder where you extracted the firmware in step 2. Right-click on the ".upd" file and select "Open with" > "Choose another app". Find the program called "Godox Updater" or something similar, then click "OK".
6. The Godox Updater application should now open automatically. If it doesn't, navigate to the same folder where you extracted the firmware and double-click on the "Godox Updater" executable file.
7. In the Godox Updater application, click on the "Browse" button and select the ".upd" file that you downloaded in step 1.
8. Click on the "Update" button to start the firmware update process. The LED light on your LR160 flash will start flashing rapidly during the update.
9. Once the update is complete, the LED light should stop flashing and turn off. Your LR160 flash has now been updated with the latest firmware.
"How do I sync my Godox LR160 with my camera for wireless flash photography?"
To sync your Godox LR160 with your camera for wireless flash photography, follow these steps:
1. Make sure that both the Godox LR160 and your camera are set to the same channel and group number. The default settings are channel 36 and group A, but you can change them by pressing the "SET" button on the LR160 until "CH" or "GR" is displayed on the screen. Use the "-" or "+" buttons to adjust the values as needed. Set your camera to the appropriate mode for wireless flash photography. This will vary depending on your camera model, but it's typically either ETTL (Canon) or i-TTL (Nikon). Make sure that your camera's flash is disabled so that only the Godox LR160 is firing. Turn on both the Godox LR160 and your camera, making sure that they're within range of each other. The default sync speed is 1/250 second, but you can change it by pressing the "MENU" button twice to enter the settings menu. Use the "-" or "+" buttons to adjust the sync speed as needed. Frame your shot and press the shutter button on your camera to take the photo. The Godox LR160 should fire simultaneously with the camera's shutter, providing even lighting across your subject. If you're experiencing any issues with synchronization or communication between the Godox LR160 and your camera, make sure that both devices are fully charged and within range of each other (within 30 meters). You can also try resetting the LR160 by pressing and holding the "SET" button for five seconds. With these steps, you should be able to sync your Godox LR160 with your camera for wireless flash photography. Remember to always follow safe lighting practices, such as using a diffuser or reflector to prevent overexposure or harsh shadows.
How do I sync my Godox LR160 with my camera's flash trigger for studio lighting?
To synchronize your Godox LR160 flash trigger with your camera's flash trigger for studio lighting, follow these steps:
1. Ensure that both the Godox LR160 and your camera's flash trigger are set to the same channel (1-24) using their respective settings menus. Set the Godox LR160 to the appropriate mode for studio lighting, such as "M" or "TTL" depending on your preference. Mount the Godox LR160 onto your camera's hot shoe or use an optional remote flash trigger. Attach a Godox AD200 Pro Studio Lighting Flash to the sync port of the Godox LR160 using the appropriate cable, such as the Godox FLJ-36 for Canon or TTL-FLJ-36 for Nikon cameras. Set your camera's flash trigger to "Remote" mode and ensure that it is compatible with the Godox LR160 (check the manufacturer's specifications). Test the synchronization by firing both the camera's flash and the Godox AD200 Pro Studio Lighting Flash simultaneously using your camera's shutter release button or wireless remote control (if applicable). Adjust the power level and other settings of the Godox AD200 Pro Studio Lighting Flash using its display screen and controls, as needed. Repeat the synchronization process with any additional Godox AD200 Pro Studio Lighting Flashes you plan to use in your studio lighting setup.
How do I properly sync my Godox LR160 with my camera for studio lighting purposes?
To synchronize your Godox LR160 with your camera for studio lighting, follow these steps:
1. Ensure that both the camera and the flash are set to the same shooting mode (e. Set the camera's shutter speed to match the sync speed of the LR160 (usually 1/250 second). Attach the Godox X1-S transmitter to your camera's hotshoe and ensure that it is set to the correct channel and group for the LR160. Mount the LR160 on its stand or bracket and turn it on. Press and hold the "Sync" button on the X1-S until the red LED blinks, indicating that it has entered sync mode. Take your desired shot while pressing the camera's shutter release. The Godox LR160 should fire simultaneously with the exposure, providing even and controlled lighting for your subject. After finishing your shoot, exit sync mode on the X1-S by holding down the "Sync" button until the red LED stops blinking.
Before you buy Godox LR160


Adriana –
I recently purchased the Godox LR160 and unfortunately, my experience with it has been less than satisfying. As a general manager working in New Orleans, I rely heavily on studio lighting for all of my professional photography projects. However, the Godox LR160 fell short of my expectations.
Firstly, the temperature range of 8000.0-K was not impressive at all. It barely made a difference in my photography projects and seemed to have minimal impact on the lighting. Secondly, the LED type of lighting was not as great as I was expecting. Although it had good brightness, the colors did not appear as vibrant as I had hoped.
In comparison to other known studio lighting, such as Profoto, the Godox LR160 was a disappointment. The quality of the lighting did not match up, and the overall product felt cheap.
To top it off, the delivery of this studio lighting to New Orleans was delayed. I had to follow up several times on the order, which added further frustration to my experience.
Overall, I would not recommend the Godox LR160. It was a complete letdown, and I would advise fellow photographers to invest in other, more reliable, studio lighting options.
Liliana –
I just set up this amazing new light that I’m absolutely obsessed with – it’s so easy to use and connect, like a charm!
As for the setup, I have to say it was pretty smooth sailing. One thing I did struggle with was figuring out how to sync my lights properly, but after some trial and error, I found this super helpful YouTube tutorial that explained everything in detail.
Speaking of tutorials, if you’re interested in buying studio lighting like me, I would definitely recommend checking out some online courses or workshops – it’s so much easier to learn when someone is showing you step by step!
I also want to say that having a good light has made all the difference in my photoshoots. Like yesterday, for example, Kaia Gerber posted this gorgeous pic of herself on Instagram wearing this teeny blue swimsuit and I was like, wow, her skin looks so flawless!
And get this – it turns out she rang in 2025 with sun-kissed smiles and no Austin Butler in sight! Guess some people just aren’t meant to be!
But anyway, back to my light – one of the best things about it is that it’s super cost-effective. I mean, think about how much you can save by not having to buy expensive lighting equipment all the time. It’s like a whole new world of possibilities opens up!
My advice would be to definitely invest in some good quality lights if you’re serious about photography or videography – trust me, it’ll be worth every penny!
Rating: 5/5 stars
P.S. I just realized that today’s news is all about Kaia Gerber’s NYE celebrations, and I’m still reeling from the fact that she didn’t invite Austin Butler! Guess you win some, lose some, right?