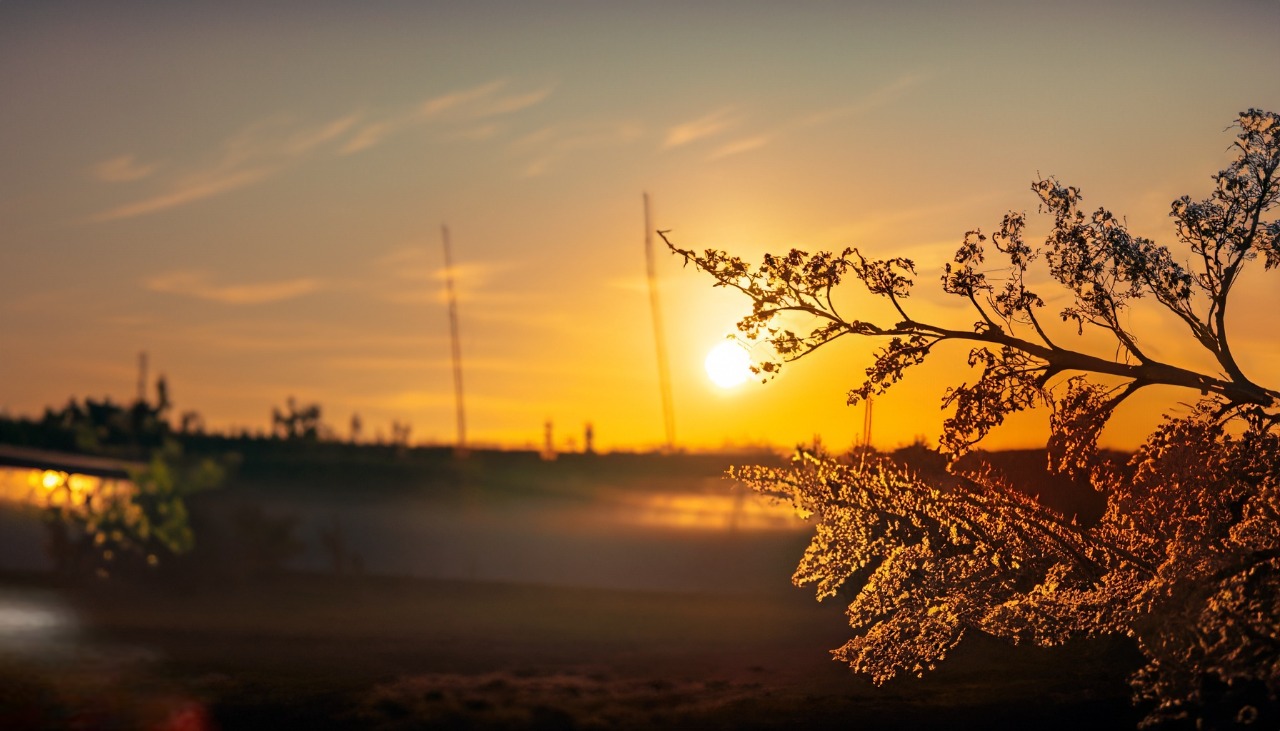
The Golden Hour is a term commonly used in photography to describe a specific time of day when the natural lighting conditions are optimal for capturing stunning images. Also known as the Magic Hour, it refers to the period shortly after sunrise or before sunset when the quality of light is warm, soft, and diffused, creating a magical and ethereal atmosphere. The Golden Hour is highly cherished by photographers and is widely recognized as a prime time for outdoor photography.
The duration of the Golden Hour is relatively short, usually lasting around an hour, although it can vary depending on the time of year, weather conditions, and geographical location. It occurs when the sun is low on the horizon, and its light travels through a thicker portion of the Earth’s atmosphere, resulting in longer wavelengths and a softer, golden glow. During this time, the sunlight is less harsh and intense compared to the midday sun, producing more flattering and gentle lighting conditions.
The Golden Hour presents several distinct characteristics that make it particularly appealing to photographers. The angle at which the sunlight reaches the Earth creates long, soft shadows, adding depth, dimension, and visual interest to the composition. The warm, golden hues cast by the sun can enhance the overall mood and atmosphere of the scene, evoking a sense of tranquility, warmth, and nostalgia.
One of the key advantages of shooting during the Golden Hour is the ability to capture breathtaking landscapes, cityscapes, portraits, and various subjects with a captivating, almost magical quality. The soft, diffused light results in even illumination, reducing contrast and minimizing harsh highlights and deep shadows. This balanced lighting allows for a wider dynamic range and brings out intricate details and textures in the subject, enhancing its visual appeal.
The Golden Hour is particularly popular for photographing portraits. The warm, flattering light creates a beautiful glow on the subject’s face, softening imperfections and providing a natural, romantic quality. The gentle lighting also makes it easier to achieve a balanced exposure, avoiding overexposure or underexposure of the subject.
Photographers often plan their shoots around the Golden Hour, carefully considering the timing and location to maximize the potential of the available light. They take advantage of the warm hues and soft shadows to create captivating compositions, emphasizing the interplay of light and shadow, and capturing the magical atmosphere that this time of day offers.
Understanding the Golden Hour
Understanding the Golden Hour in photography is essential for any photographer who wants to make the most of natural lighting conditions and capture stunning images. The Golden Hour refers to the period shortly after sunrise or before sunset when the light is soft, warm, and diffused, resulting in a magical and captivating atmosphere. Here’s a deeper exploration of the key elements to consider when understanding the Golden Hour:
Timing: The Golden Hour occurs within a specific timeframe each day, typically lasting around an hour. The exact duration may vary depending on factors such as geographical location, time of year, and weather conditions. It is important to check the sunrise and sunset times for your specific location to plan your photography accordingly.
Quality of Light: During the Golden Hour, the sun is low on the horizon, and its light must pass through a thicker portion of the Earth’s atmosphere. This path lengthens the wavelengths of light, making them softer and warmer in tone. The result is a diffuse and gentle illumination that flatters subjects and creates a sense of warmth and tranquility in the scene.
Warmth and Color: The Golden Hour is known for its warm, golden hues that cast a beautiful glow over the landscape or subjects. The color temperature of the light is typically warmer, ranging from orange to reddish tones. This warm light can evoke a sense of emotion and enhance the mood of the photograph, creating a captivating visual impact.
Soft Shadows and Depth: As the sun sits lower on the horizon, it creates longer shadows and enhances the three-dimensional aspect of the scene. These elongated shadows can add depth, texture, and visual interest to the composition. The softness of the shadows during this time can help reduce contrast and create a more even illumination across the frame.
Dynamic Range: The Golden Hour provides photographers with a favorable dynamic range. The softer, diffused light minimizes harsh highlights and deep shadows, resulting in a more balanced exposure. This allows for greater detail and tonal range in the image, making it easier to capture intricate textures and subtle nuances in the scene.
Composition and Creativity: Understanding the Golden Hour enables photographers to explore various creative possibilities. The warm and soft light can transform a simple scene into something magical and ethereal. It enhances the colors, textures, and shapes, providing an opportunity to experiment with different compositions, use backlighting to create silhouettes, or capture dramatic landscapes with a sense of awe.
Planning and Preparation: To make the most of the Golden Hour, planning and preparation are crucial. Research the local sunrise and sunset times and scout potential locations in advance. Consider how the light will interact with the environment and think about the desired mood and atmosphere you want to convey in your images. Arriving early and setting up your equipment ahead of time will allow you to take full advantage of this precious window of opportunity.
Planning for the Golden Hour Shoot
Planning for a Golden Hour shoot in photography is crucial to make the most of this magical time of day and capture stunning images. Here are some key steps to consider when preparing for a Golden Hour shoot:
- Research: Start by researching the sunrise and sunset times for your specific location and date. Numerous websites, smartphone apps, or even weather services provide this information. Knowing the exact timing of the Golden Hour helps you plan your shoot accordingly.
- Location Scouting: Scout potential locations in advance to identify the best spots to shoot during the Golden Hour. Consider the type of landscape or subject you want to capture and how the light will interact with it. Look for interesting compositions, leading lines, or elements that will complement the warm, soft light of the Golden Hour.
- Check Weather Conditions: Weather plays a crucial role in photography, so keep an eye on the weather forecast for the day of your shoot. Clear skies often provide beautiful golden light, but clouds can add drama and texture to the scene. Prepare alternative locations or backup plans in case the weather doesn’t cooperate.
- Arrive Early: The Golden Hour is relatively short, so arrive at your chosen location well in advance to set up your equipment and get ready. This will give you time to compose your shots, make any necessary adjustments, and familiarize yourself with the surroundings before the magic begins.
- Equipment Check: Ensure that your gear is in proper working order and fully charged. Check your camera settings, including ISO, aperture, and white balance, and make adjustments according to the lighting conditions. Bring a sturdy tripod to keep your camera stable during longer exposures, especially in low light situations.
- Visualize and Plan Shots: Before the Golden Hour starts, visualize the shots you want to capture. Plan your compositions, consider the angles, and envision how the light will interact with the scene. This preparation will help you work efficiently and make the most of the limited time available.
- Capture the Entire Golden Hour: While the Golden Hour typically lasts around an hour, the light and colors change dynamically during this period. Don’t limit yourself to capturing only the moments of peak intensity. Start shooting early, experiment with different compositions and subjects, and continue shooting until the light fades away.
- Experiment with Techniques: The Golden Hour presents a great opportunity to explore various photographic techniques. Experiment with backlighting, silhouettes, long exposures, or using the soft light to enhance textures and details. Be open to trying new techniques and be creative with your compositions.
- Be Patient and Flexible: Nature is unpredictable, and lighting conditions can change rapidly during the Golden Hour. Be patient and flexible, ready to adapt to any changes that occur. Embrace unexpected moments and take advantage of unique lighting situations that arise.
- Enjoy the Experience: Finally, remember to enjoy the experience. The Golden Hour is a magical time in photography, and the soft, warm light creates a captivating atmosphere. Take a moment to soak in the beauty around you, appreciate the wonders of nature, and let your creativity flow.
By carefully planning for a Golden Hour shoot, you maximize your chances of capturing breathtaking images. Researching the timing, scouting locations, preparing your equipment, and visualizing your shots will help you make the most of this precious time and create photographs that showcase the enchanting qualities of the Golden Hour.
Composition and Lighting Techniques
Golden Hour Composition and Lighting Techniques in photography are key aspects to consider when shooting during this magical time of day. The soft, warm light and long shadows during the Golden Hour offer unique opportunities for creating stunning compositions and utilizing creative lighting techniques. Here are some techniques to enhance your compositions and make the most of the beautiful lighting:
- Rule of Thirds: The Rule of Thirds is a classic composition technique that applies to any time of day, including the Golden Hour. Divide your frame into a grid of nine equal parts using two horizontal and two vertical lines. Position your main subject or points of interest along these lines or at the points where they intersect. This technique creates a balanced and visually pleasing composition.
- Leading Lines: Take advantage of the long shadows and directional light during the Golden Hour to incorporate leading lines into your composition. Paths, roads, fences, or even natural elements like tree branches can serve as leading lines that guide the viewer’s eye through the frame, creating depth and adding visual interest to your photograph.
- Silhouettes: The Golden Hour provides a perfect opportunity to capture striking silhouettes. Position your subject against the bright background, such as the setting sun or a colorful sky. Expose for the highlights, which will result in the subject appearing as a dark shape against the vibrant background. Silhouettes can add drama and mystery to your images, emphasizing the contours and shapes of the subject.
- Backlighting: Backlighting during the Golden Hour can create a magical and ethereal effect. Position your subject between your camera and the light source, such as the sun, and use the soft, warm light to create a glowing halo around them. This technique can add a sense of depth and highlight the details and textures of the subject, resulting in visually captivating images.
- Lens Flare: Embrace lens flare as a creative element during the Golden Hour. When shooting towards the sun, allow the light to enter your lens, causing flare and beautiful streaks of light. Position the sun just outside the frame or use an object to partially block it, creating interesting shapes and patterns. Lens flare can add a dreamy and romantic feel to your photographs.
- Golden Reflections: If you have access to water bodies, such as lakes, rivers, or even puddles, take advantage of them during the Golden Hour. The soft, warm light can reflect off the water, creating golden reflections that add a touch of magic to your composition. Incorporate the reflections as leading lines or as a way to highlight specific elements within the frame.
- Fill Flash: While the Golden Hour is characterized by soft, flattering light, it can sometimes result in shadows on your subject’s face. To fill in these shadows and create a more balanced exposure, consider using fill flash. Use a flash unit or an off-camera flash to provide a subtle burst of light, ensuring that your subject is evenly illuminated while still preserving the warm tones of the Golden Hour.
- Long Exposures: Experiment with long exposures during the Golden Hour to capture the movement of clouds, water, or other elements. Use a tripod to stabilize your camera, select a slow shutter speed, and capture the movement over time. This technique can add a sense of tranquility and smoothness to your images, enhancing the overall mood of the scene.
Remember, the Golden Hour provides a unique and limited window of opportunity, so it’s essential to plan your compositions and lighting techniques in advance. Incorporate leading lines, utilize silhouettes and backlighting, and explore other creative techniques to make the most of the soft, warm light and magical atmosphere that the Golden Hour offers.
Capturing Landscapes during the Golden Hour
Capturing landscapes during the Golden Hour is a favorite among photographers, as the soft, warm light and enchanting atmosphere can transform a scene into something truly magical. Here are some tips to help you make the most of this special time and create stunning landscape photographs:
- Plan Ahead: Research the sunrise and sunset times for your location and plan your shoot accordingly. Arrive at the location well before the Golden Hour begins to scout for potential compositions and set up your gear.
- Find a Focal Point: Look for a focal point or point of interest in your landscape composition. It could be a prominent tree, a rock formation, a body of water, or any other element that draws the viewer’s attention. Use this focal point as an anchor for your composition and build the rest of the scene around it.
- Utilize Leading Lines: Incorporate leading lines into your landscape composition to guide the viewer’s eye through the frame and create a sense of depth. Use natural elements such as paths, rivers, or fences to lead the viewer into the scene and towards your main subject.
- Frame the Scene: Look for natural frames within the landscape to add depth and context to your photograph. It could be overhanging branches, arches, or openings through which you can capture the scene. Framing your composition can create a sense of discovery and draw the viewer further into the image.
- Experiment with Foreground Elements: Including foreground elements can add interest and depth to your landscape photographs. Look for interesting rocks, flowers, or other objects that can be placed in the foreground to create a sense of scale and add visual appeal. These elements can also provide a natural leading line towards the main subject.
- Capture the Colors: One of the distinctive features of the Golden Hour is the warm, golden light that bathes the landscape. Be sure to capture and emphasize these beautiful colors in your photographs. Compose your shot in a way that showcases the warm hues and use the soft light to bring out the textures and details in the scene.
- Play with Shadows and Highlights: The low angle of the sun during the Golden Hour creates long shadows and soft highlights. Use these elements to your advantage to add depth and dimension to your landscape compositions. Shadows can define shapes and textures, while highlights can bring attention to specific areas of the scene.
- Consider the Sky: During the Golden Hour, the sky often takes on beautiful hues of orange, pink, and purple. Include the sky as part of your composition, whether it’s a vast expanse or a small portion peeking through trees or mountains. Pay attention to the cloud formations and how they interact with the light for added drama and interest.
- Use a Tripod: As the light becomes softer during the Golden Hour, the exposure times may lengthen. To ensure sharp images, use a tripod to stabilize your camera and minimize camera shake. This will allow you to use lower ISO settings and smaller apertures for maximum image quality.
- Stay After Sunset: Don’t pack up as soon as the sun dips below the horizon. The period immediately after sunset, known as the Blue Hour, can also provide stunning opportunities for landscape photography. The soft blue light can create a serene and otherworldly atmosphere. Experiment with longer exposures and capture the transition from day to night.
Remember, the Golden Hour is a fleeting and precious time, so be prepared, patient, and ready to capture the beauty of the landscape during this magical period. With careful planning, thoughtful compositions, and an eye for the interplay of light and shadow, you can create landscape photographs that showcase the enchanting qualities of the Golden Hour.
Portraiture and Golden Hour
Portraiture and the Golden Hour are a match made in heaven for photographers. The soft, warm light and enchanting atmosphere during this time of day create a flattering and ethereal quality that enhances portraits. Here’s how you can make the most of the Golden Hour when capturing portraits:
- Timing is Key: Research the precise timing of the Golden Hour for your location and plan your shoot accordingly. Aim to start your session about an hour before sunset to allow ample time to capture various poses and compositions in the beautiful light.
- Positioning the Subject: Position your subject with the light coming from the side or slightly behind them. This placement creates a warm, soft glow on their face, highlighting their features and providing a natural, romantic look. Experiment with different angles and positions to find the most flattering lighting for your subject.
- Embrace Backlighting: During the Golden Hour, backlighting can produce stunning results in portraiture. Position your subject in front of the setting sun, allowing the light to create a halo effect around them. This technique can add a dreamy and magical quality to the portrait, emphasizing the subject’s silhouette and creating a sense of depth.
- Capture Golden Reflections: If there is water nearby, such as a lake or a river, take advantage of the Golden Hour to capture reflections. The soft, warm light can reflect off the water’s surface, creating a golden glow that can beautifully illuminate your subject’s face. Incorporate these reflections as a compositional element to add depth and visual interest to your portraits.
- Soft Shadows and Depth: The long shadows created by the low angle of the sun during the Golden Hour can add depth and dimension to your portraits. Utilize these shadows creatively to enhance your composition and highlight certain features or expressions. The soft, diffused light minimizes harsh contrasts and creates a more even and pleasing illumination across the subject’s face.
- Use a Wide Aperture: Take advantage of the available light during the Golden Hour by using a wide aperture (small f-number). This technique helps you achieve a shallow depth of field, resulting in a blurred background that allows the subject to stand out and creates a more visually appealing and intimate portrait.
- Engage with the Environment: Incorporate the stunning landscapes or natural surroundings during the Golden Hour as a backdrop for your portraits. This can add context, visual interest, and a sense of place to the images. Experiment with different compositions that highlight both the subject and the beautiful scenery.
- Communicate and Direct: As a photographer, effectively communicate and direct your subjects to achieve the desired mood and poses. Encourage them to relax, be themselves, and enjoy the serene atmosphere of the Golden Hour. Capture candid moments and genuine expressions that reflect their personalities and emotions.
- Experiment with Warm White Balance: Adjust the white balance settings on your camera to enhance the warm tones of the Golden Hour. Consider using the “Cloudy” or “Shade” white balance presets to accentuate the rich, golden hues. This adjustment can further enhance the overall mood and atmosphere of your portraits.
- Capture the Golden Hour Transitions: Don’t limit your portraits to just the peak intensity of the Golden Hour. Explore the transitions from daylight to dusk, as the light changes and the colors intensify. The soft, warm light during this period can create a truly magical and unique atmosphere for your portraits.
Golden Hour offers a perfect setting for capturing captivating and enchanting portraits. The soft, warm light and the magical atmosphere create a flattering and ethereal quality that enhances the beauty and emotion of your subjects. By considering the timing, utilizing the available light creatively, and engaging with your subjects, you can create stunning portraits that showcase the enchanting qualities of the Golden Hour.
Conclusion
Mastering the Golden Hour in photography is a skill that can elevate your images to new heights. It requires a deep understanding of the unique lighting conditions, thoughtful composition, and the ability to capture the essence of this magical time of day. By following the tips and techniques discussed, you can unlock the full potential of the Golden Hour and create breathtaking photographs.
The Golden Hour offers a range of possibilities across various genres of photography, from landscapes to portraits. Its warm, soft light creates a beautiful and flattering glow, enhancing textures, colors, and emotions within your images. Understanding the timing, researching your location, and planning your shoots ahead of time are essential to making the most of this limited window of opportunity.
When capturing landscapes during the Golden Hour, careful composition, the use of leading lines, and framing techniques can add depth and interest to your photographs. Experimenting with silhouettes, backlighting, and capturing reflections can create a dreamlike atmosphere that transports viewers into a magical world.
For portraits, positioning your subjects with the side or backlighting, embracing the warm glow, and utilizing the soft shadows can result in flattering and ethereal images. Engaging with your subjects and capturing candid moments can bring out their genuine emotions and personalities.
Mastering the Golden Hour also involves technical considerations, such as adjusting your camera settings, utilizing a tripod, and experimenting with different lenses and focal lengths. Being patient, flexible, and open to unexpected moments and changing lighting conditions can lead to unique and remarkable images.
Ultimately, mastering the Golden Hour in photography is a combination of technical expertise, creative vision, and a deep appreciation for the beauty of natural light. With practice, observation, and a willingness to experiment, you can capture breathtaking images that evoke emotions, tell stories, and leave a lasting impression on viewers. So, embrace the magic of the Golden Hour and let it inspire your photographic journey to new heights.