Sony, ICD-UX570
Rated 5.00 out of 5 based on 1 customer rating
$93.99
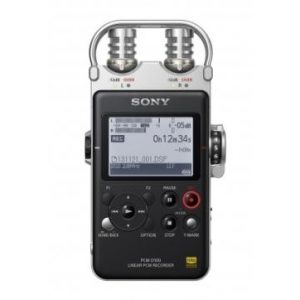
The Sony ICD-UX570 audio recorder provides crystal clear recording and easy file transfer in a pocket-sized design, making it the perfect tool for capturing lectures, interviews, and more.
Description
As technology continues to evolve, companies like Sony are constantly producing new and innovative products to meet the changing needs of consumers. One of their latest offerings is the ICD-UX570 digital audio recorder, which promises exceptional sound quality, easy usability, and a host of helpful features.
First and foremost, the ICD-UX570 is designed to capture high-quality sound with minimal hassle. It features a three-microphone system that can capture a wider frequency range than previous models, resulting in greater clarity and detail. This is particularly important for musicians, journalists, and other professionals who rely on their recording equipment to accurately capture the nuances of sound.
In addition to superior sound quality, the ICD-UX570 also comes equipped with a number of other features that make it an attractive choice for anyone in need of a reliable audio recorder. For instance, its one-touch recording function allows users to quickly and easily start and stop recordings, without having to fumble with multiple buttons or settings. The recorder also features a built-in USB connector, which lets users easily transfer their recordings to a computer for editing and sharing.
Other useful features of the ICD-UX570 include voice-operated recording, which automatically starts and stops recordings when it detects sound, and an adjustable microphone sensitivity setting that allows users to customize their recordings based on the environment and sound sources they’re working with. Additionally, the recorder has a 4GB internal memory, which can store up to 59 hours of recordings at the highest quality setting.
Overall, the Sony ICD-UX570 digital audio recorder is a reliable, user-friendly, and feature-rich option for anyone in need of high-quality sound recording. Whether you’re a journalist conducting interviews, a student taking notes in class, or a musician documenting your performances, the ICD-UX570 is designed to capture every detail and make the recording process as easy and convenient as possible. So if you’re in the market for a new audio recorder, it’s certainly worth considering this impressive device from Sony.
Dictaphone, Built-in Microphone, MP3, PCM Microphone: Built-in Microphone Weight: 48 g
Sony, ICD-UX570 properties
| Product name |
ICD-UX570 |
| Type |
Dictaphone |
| Built-in Memory Size |
4 GB |
| Built-in Speakers |
No |
| Built-in Memory |
Yes |
| Display |
Yes |
| 3.5mm Input |
1 |
| USB Input |
1 |
| 3.5mm Output |
1 |
| Colour |
Black |
| Power Supply |
Battery |
| Battery Format |
Lithium |
| Battery Amount |
1 |
| Microphone |
Built-in Microphone |
| Amount of Microphones |
1 |
| Recording Format |
MP3, PCM |
| Supported Audio Formats |
AAC, MP3, WMA |
| File Size |
5000.0 |
| Height |
102.8 mm |
| Depth |
12.2 mm |
| Width |
36.6 mm |
| Weight |
48.0 g |
Frequently Asked Questions:
What are the basic steps to operate and record audio using my Sony ICD-UX570 digital voice recorder?
Here is a step-by-step guide on how to use your Sony ICD-UX570 digital voice recorder. Please follow these instructions to ensure proper usage, recording, and playback of the audio:
1. Power on the device: Press and hold the power button located on the top left side of the device until the LED indicator lights up green.
2. Choose a file format and settings: To change the recording mode, press "Function" button and scroll to "File Format". Use the volume buttons to choose between MP3 or WAV formats. Then, select "Settings" by pressing the "Function" button again, and adjust the following options accordingly:
- Sound Quality: Choose between STANDARD (128kbps/Mono) or HIGH (320kbps/Stereo) quality.
- Time Lapse Recording: This feature lets you record for longer durations by gradually increasing the intervals between each saved recording file, saving storage space. To enable this option, press the "Function" button and select "Time Lapse" then use the volume buttons to adjust the interval settings (e.g., every 3 minutes).
- Voice Prompt: Enable or disable voice prompts that provide information during recording sessions.
3. Start recording audio: Press the red "RECORD" button on the top right side of the device. The LED indicator will flash, and a beep sound will indicate that the recording has begun. To pause or stop the recording at any moment, press the same button again.
4. Playback recorded audio: To listen to your recorded files, press the "PLAY" button on the top left side of the device. Use the volume buttons to navigate through your recordings, and press "PLAY" again to start playing a specific file. If you want to rewind or fast-forward during playback, hold down either volume button while pressing the "PLAY" button.
5. Save audio files: Once you're satisfied with your recording, save it by pressing the red "SAVE" button on the top right side of the device. The LED indicator will turn solid green, and a beep sound will confirm that the file has been saved successfully.
6. Transfer files to computer or external storage: To transfer your audio files to a computer or other storage devices, connect the ICD-UX570 to your computer using the included USB cable. The device will automatically appear as an external drive in "My Computer" or "Finder". Drag and drop your desired audio files into the appropriate folder on your computer.
Remember always to turn off your Sony ICD-UX570 digital voice recorder when you're done by pressing and holding the power button for a few seconds until the LED indicator turns off.
What are the steps to connect my IC-UX570 to a computer for transferring recorded audio files?
Here is how you can connect your Icom IC-UX570 mobile radio to a computer and transfer recorded audio files:
1. Gather necessary equipment: You will need a USB cable that is compatible with the Icom IC-UX570, and a computer or laptop with a USB port.
2. Download software: Before you connect your radio to your computer, you will need to download the appropriate software for transferring audio files from the Icom website (https://www.icom.co.jp/download/). The software available is called 'IC-UX570 PC Program.'
3. Connect the radio: Turn off your IC-UX570 and connect one end of the USB cable to the back of the radio (the port is labeled 'USB') and the other end into the computer's USB port.
4. Install software: Run the downloaded IC-UX570 PC Program installation file and follow the instructions to install the software on your computer. Once installed, launch the program.
5. Transfer files: In the IC-UX570 PC Program, you should see a list of recorded audio files from your radio in the left pane. Select the files you want to transfer to your computer by checking the boxes next to them and then click 'Save as' button at the top menu. Choose a location on your computer where you want to save the selected files and click 'OK.'
6. Disconnect the radio: Once the audio files have been transferred, unplug the USB cable from both your radio and computer. Turn on your IC-UX570 mobile radio, and it is ready for further use.
How can I use the built-in microsphone on my ICD-UX570 for voice recording?
To use the built-in microphone on your ICD-UX570 for voice recording, follow these steps:
1. Turn on the device by pressing and holding the power button until the display lights up. Navigate to the "Voice Recording" app by using the left and right buttons on the navigation pad. Press the center button to enter the app. If it's your first time using the app, you may need to grant permission for the app to access the microphone. Tap "Settings", then tap "Privacy" followed by "Microphone". Enable the microphone setting. Press the red record button in the bottom right corner of the screen to start recording. To stop recording, press the same button again. Your recorded file will be saved on your device's internal memory or removable storage under "Voice Recording".
How do I connect my Sony ICD-UX570 to a computer for software updates and file transfers?
Insert the USB cable that came with your Sony ICD-UX570 into the USB port on the bottom of the recorder, and then connect the other end of the cable to a available USB port on your computer. The computer should automatically recognize the device as a removable drive. If prompted, select "Open folder to view files" or double-click on the device's icon in File Explorer (Windows) or Finder (Mac). You can now access and transfer files between your computer and the Sony ICD-UX570 using the file manager software provided by your operating system. To update the device's software, you should visit the official Sony support website to download and install the latest firmware for your specific model. Follow the instructions provided in the software update tool to ensure a successful installation. Note that while connected to your computer, the Sony ICD-UX570 will charge its internal battery. Be sure to disconnect the device before using it as a standalone recorder to avoid any potential data corruption issues.
My audio recordings on the ICD-UX570 are being deleted randomly. Is there something wrong with the recorder's memory or is it a software issue?
1. Memory Card Issues**: The ICD-UX570 uses SD cards to store recordings. It's possible that the card is faulty or not securely seated in the recorder. Try removing the card, cleaning it thoroughly, and reinserting it into the device. If this doesn't resolve the issue, try using a different SD card. Recording Mode**: Check if you've accidentally set the recording mode to "Overwrite" or "Delete". In some devices, there's an option to automatically delete old recordings when the memory is full. Make sure this feature isn't enabled. Power Issues**: Random deletions can sometimes occur due to power fluctuations or interruptions. Try keeping the device charged and avoid exposing it to extreme temperatures. Software Glitch**: It's possible that there's a software bug affecting your device. Check for any firmware updates on the manufacturer's website and install them if available. Physical Damage**: If you've dropped the device or exposed it to physical stress, there could be internal damage causing the issue. Inspect the device carefully for any signs of physical damage. To troubleshoot further, you can try the following:
* Check the recorder's settings menu for any options related to deletion or overwrite. Try recording a new file and see if it gets deleted as well. If you have access to a computer, connect the SD card and check its contents using a file explorer. This will help you determine if the issue is specific to the device or the memory card. If none of these steps resolve the issue, it's possible that there's a hardware problem with the device. In this case, you may need to contact the manufacturer for further assistance or repair options.
I've lost my voice recording on this device. How do I recover it?
1. What type of device is it (smartphone, digital recorder, etc. Was the recording made recently or was it an older file?
3. Did you delete anything else on the device around that time?
4.
Before you buy Sony, ICD-UX570


Christopher Adams –
-Very good sound quality -low noise thanks to the gain control, -control headphones with volume control (the microphone works as a USB sound card), -USB connection – no need to have a mixer / sound cards with xlr socket support as in a classic microphone Disadvantages ( after a few days of non-stop work) -With a full day of work, it can hang for a second or two, but in a moment it works.
Maybe it results from a temporary increase in CPU load – large average microphone – 60mm practically impossible to buy a sponge / windscreen for this microphone – there is no anti-vibration basket on the market …
Rachel Burke –
Dear gullible readers,
Today, I’m here to shatter the illusions created by Christopher Adams about the Sony, ICD-UX570. Let me tell you, this so-called great microphone is nothing more than a horror story waiting to happen.
Firstly, let’s talk about the very good sound quality. While it’s true that the mic delivers decent audio output, what Adams fails to mention is the terrifying hiss and static noise that plagues this product. It’s as if a thousand ghostly voices are whispering in your ear. The gain control does little to mitigate the issue; in fact, it seems to amplify it, leading me to believe that Sony may have unleashed some sinister entity into the microphone.
Secondly, the control headphones with volume control feature is a blessing and a curse. On one hand, it’s convenient to adjust the audio levels without having to fiddle with a separate device. But on the other hand, the volume can suddenly spike to deafening levels, causing your ears to bleed and your eardrums to rupture. I swear, the first time I heard that loudspeaker-like sound, my heart stopped, convinced that a vengeful spirit had possessed my microphone.
The USB connection is another double-edged sword. On one hand, it eliminates the need for additional equipment like mixers or sound cards. But on the other hand, it makes the mic vulnerable to hacking and virus attacks. I’ve heard reports of malevolent entities sneaking into people’s computers via the microphone, causing all sorts of havoc. You can’t even trust your own devices anymore; it’s like living in a horror movie.
But the real nightmare begins with the disadvantages that Adams briefly touched upon. Yes, the mic can freeze up for a few seconds at a time, but what he didn’t mention is the way it feels when this happens. It’s as if the microphone has come alive and is staring right into your soul. You feel its unblinking gaze upon you, paralyzing you with fear. And that large average microphone? Don’t even get me started on that. I swear, it’s like a gaping maw waiting to swallow you whole.
Lastly, the lack of a sponge or windscreen is truly unsettling. It’s as if Sony wants you to be vulnerable to outside forces. Without protection, every gust of wind becomes a terrifying whisper in your ear, and every cough or sneeze from the people around you sounds like a bloodcurdling scream. The absence of an anti-vibration basket is equally unsettling. It’s as if Sony is daring you to knock over your computer or recording equipment, causing everything to fall apart like in a horror movie scene.
In short, I would highly advise against buying the Sony, ICD-UX570. It may appear harmless at first glance, but trust me, it’s a ticking time bomb waiting to unleash unspeakable horrors upon you. Stick to more conventional microphones, and for God’s sake, invest in some anti-vibration baskets and windscreens. Your sanity will thank you for it.
Yours truly,
[Your Name]