Rode Wireless PRO

$276.99

Experience professional-grade audio quality and freedom of movement with the Rode Wireless PRO microphone, delivering crystal-clear sound for your videos, interviews, and live performances.

SKU: 6416222694 Category: Tags: , , ,

Description

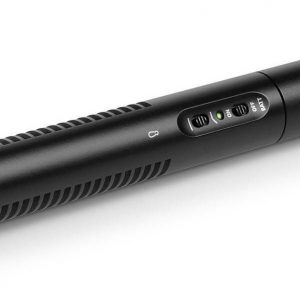
The Rode Wireless PRO microphone is a top-of-the-line wireless microphone system that is highly regarded by professionals in the audio industry. This microphone system offers excellent sound quality, ease of use, and a wide range of features that make it a versatile choice for a variety of applications.

One of the standout features of the Rode Wireless PRO microphone is its exceptional sound quality. The microphone captures crystal-clear audio with a high level of detail, allowing for professional-quality recordings. The system utilizes a high-quality condenser microphone capsule that delivers a wide frequency response and low noise levels, ensuring that every nuance of the audio is captured accurately.

The Rode Wireless PRO microphone system is also incredibly easy to set up and use. It operates on a wireless frequency range of 2.4 GHz, which provides a reliable and interference-free signal. The system includes a receiver and a transmitter, both of which are compact and lightweight, making them easy to transport and use in various settings.

The transmitter features a high-quality built-in microphone, allowing for convenient recording without the need for an external microphone. It also has a 3.5mm input, allowing for the connection of an external microphone if desired. The receiver has a clear LCD screen that displays important information such as signal strength, battery life, and frequency settings. Additionally, the system has a range of up to 100 meters, providing plenty of flexibility for recording in various situations.

Another notable feature of the Rode Wireless PRO microphone is its versatility. The system is compatible with a wide range of devices, including cameras, smartphones, and audio recorders. This makes it the ideal choice for professionals in fields such as videography, journalism, podcasting, and live event production. The microphone system also supports multiple transmitters, allowing for the recording of multiple sources simultaneously.

In terms of durability and reliability, the Rode Wireless PRO microphone is built to last. It features a rugged metal construction that can withstand the rigors of daily use, making it suitable for both indoor and outdoor recording. The system also includes a rechargeable battery that provides up to 10 hours of continuous use, ensuring that it can handle long recording sessions without any issues.

Overall, the Rode Wireless PRO microphone is a top-notch wireless microphone system that delivers exceptional sound quality, ease of use, and versatility. Its professional-grade features make it a reliable choice for professionals in various audio-related fields. Whether you are recording interviews, podcasts, or capturing audio for video productions, the Rode Wireless PRO microphone is a worthy investment that will undoubtedly elevate the quality of your recordings.

Additional information

Product name

Brand

Product type

Polar Patterns

Wireless

Clip-On

Volume Control

Reviews

There are no reviews yet.

Be the first to review “Rode Wireless PRO”

Your email address will not be published. Required fields are marked *

Frequently Asked Questions:

What is the recommended microphone distance for the best sound quality when using Rodel Wireless PRO with a lavalier mic?

We recommend placing your lav mic about 1-2 inches away from the speaker’s mouth and at a 45-degree angle to their mouth. This will give you the best sound quality while minimizing popping sounds or wind interference. However, it is essential to experiment with different distances and angles as individual voice characteristics may require slight adjustments for optimal performance.

How can I properly set up and connect my Rodelink Rode Wireless GO transmitter and receiver for optimal performance?

Setting up and connecting the Rodelin Rodent Wireless GO transmitter and receiver is relatively straightforward. Here are some steps to follow:
1. Power on both the transmitter (the one with the camera) and the receiver (the one with the screen). The power button is located on the bottom of each device. On the transmitter, press the "MODE" button until it displays "TX" mode. This mode will allow you to send a wireless signal to the receiver. On the receiver, press the "MODE" button until it displays "RX" mode. This mode will receive the wireless signal from the transmitter. Ensure that both devices are within range of each other (within 10 meters). The range can be extended by using an external antenna on the receiver. Align the camera lens with the receiver's screen to capture the video feed wirelessly. Adjust the focus and brightness on the receiver as needed. You may also adjust the volume of the audio if your transmitter has a built-in microphone. To disconnect, simply press the "POWER" button on either device to turn it off. If you're having trouble connecting or experiencing any issues with the devices, try restarting both the transmitter and receiver by turning them off and then back on again. You may also want to check for firmware updates for your devices, as this can help resolve any compatibility issues.

"How do I properly pair my Rode Wireless PRO transmitter and receiver for the first time?"

To pair your Rode Wireless PRO transmitter and receiver for the first time, follow these steps:

1. Turn on both the transmitter and receiver by pressing and holding the power button until the LED light turns green. The transmitter's LED will be located on the top of the unit, while the receiver's LED is located on the front panel. Set the transmitter to its default channel (Channel 1) by pressing and holding the CHNL button until the LED flashes rapidly three times. This indicates that the transmitter is in pairing mode. On the receiver, press and hold the CHNL button until the LED begins to flash rapidly. Release the button when the LED starts flashing rapidly again. The receiver will now be searching for a paired transmitter. When the receiver has found the transmitter, the LED on the receiver will stop flashing rapidly and stay solid green. The LED on the transmitter will also stop flashing rapidly and remain solid green. You can now adjust the volume level on both the transmitter and receiver using the corresponding buttons. To check that the devices are properly paired, press and hold the CHNL button on either the transmitter or receiver to enter pairing mode again. Both LEDs should flash rapidly three times to indicate a successful pairing. If you wish to change the channel, press and hold the CHNL button until the LED flashes rapidly twice. The current channel will be displayed on both devices' LED lights (1-14). Use the up/down arrows to select your desired channel, then release both buttons to confirm the selection. To turn off either device, press and hold the power button for two seconds until the LED turns red. The unit will power off.

Related Products