Fujifilm X100V
Rated 3.17 out of 5 based on 6 customer ratings
$1,130.99
Get ready to capture life’s moments with the Fujifilm X100V: the perfect combination of superior image quality, intuitive controls, and modern features.
Description
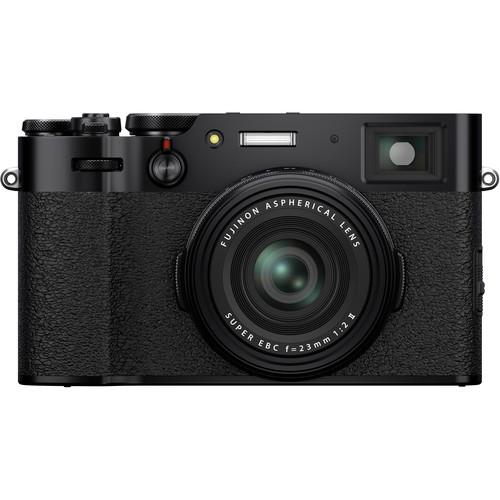
The Fujifilm X100V is a new digital camera from the Japanese camera manufacturer that combines stunning retro design with advanced technology. This camera has received great reviews from photographers for its excellent image quality, relatively compact size, and a versatile lens.
One of the most impressive features of the X100V is its 23mm f/2.0 lens, which is equivalent to a 35mm lens on a full-frame camera. This lens provides a classic focal length that is great for street photography or portraits, and it features excellent sharpness across the frame. Furthermore, the lens features a built-in lens hood and a manual aperture ring, which helps to provide a more traditional feel and intuitive operation.
The X100V features a 26.1-megapixel APS-C sensor which can produce exceptional image quality with great detail, dynamic range, and low noise levels. The camera also features Fujifilm’s advanced film simulations, which simulate classic film stocks such as Velvia, Provia, and Acros. These simulations are well-liked by many photographers as they produce great looking JPEG files that often require minimal post-processing.
Design-wise, the X100V sports a stylish retro design that is sure to appeal to traditional photographers. The camera is incredibly well-constructed with a solid metal body, and it feels great in the hand. The camera is also weather-sealed, which makes it great for shooting in harsh conditions.
The camera has a cutting-edge hybrid viewfinder, which provides a seamless switch between an electronic viewfinder and an optical finder. The electronic viewfinder is great for composing shots in low light or when you need critical focus. Still, the optical viewfinder is perfect for capturing street scenes, allowing you to see what is happening outside the frame and capturing the decisive moment.
In terms of video, the X100V is capable of recording 4K video at 30 frames per second or 1080p video at up to 120 frames per second. The camera also features built-in ND filters, which is perfect for shooting in bright sunlight while maintaining a shallow depth of field. The camera also features a tilting LCD screen which is useful for getting low or high-angle shots.
Overall, the Fujifilm X100V is a magnificent camera for those who want a compact, yet versatile camera that can produce excellent image quality. This camera is great for photographers who guide to shoot street scenes, travel, or even portraits. The X100V is not the cheapest camera on the market, but many photographers agree that it’s worth the cost. If you are looking for a high-quality digital camera that combines advanced technology with retro charm and great image quality, then the X100V is definitely worth a closer look.
Digital Compact, CMOS, APS-C, 30-1/4000, 26.1 MP, Bluetooth, 428g
Fujifilm X100V properties
| Product name |
X100V |
| Type |
Digital Compact |
| Lens |
Integrated |
| Focal Length |
23mm |
| Ports |
HDMI, USB |
| Memory Cards |
SD, SDHC, SDXC |
| Features |
Bluetooth |
| Viewfinder |
Electronic (EVF), Optical |
| Shutter Speed |
30-1/4000 bps |
| Continuous Drive |
11 fps |
| Auto Focus |
Yes |
| AF points |
425 |
| Image Stabilization |
No |
| Manual Focus |
Yes |
| Digital Zoom |
2.0 x |
| Image File Format |
JPEG, RAW |
| Flash |
Built-in, External |
| Battery Type |
Lithium ion rechargeable |
| Display Size |
3.0 “ |
| Display Resolution |
1620000 pixels |
| Max Video Resolution |
3840×2160 (4K) |
| Video resolutions (fps) |
3840×2160 (24, 25, 30 fps), 2048×1080 (24, 25, 30, 50, 60 fps), 1920×1080 (24, 25, 30, 50, 60 fps) |
| Video File Format |
MOV, MPEG4 |
| Audio File Format |
PCM |
| Sensor Type |
CMOS |
| Sensor Format |
APS-C |
| Effective Pixels |
26.1 MP |
| ISO Rating |
80-51200 |
| Weight |
428.0 g |
| Dimensions (HxWxD) |
75x128x53 mm |
Frequently Asked Questions:
How do I use the electronic shutter on my Fujifilm X100V?
To use the electronic shutter on your Fujifilm X100V, follow these steps:
1. Make sure your camera is set to "Electronic Shutter" mode by turning the top dial to the "S" position and then pressing the "Q" button to access the shooting settings menu.
2. Scroll down to the "Shutter Speed" option using the directional pad on the rear of the camera, and press "OK."
3. Set the shutter speed to either 1/60 or any other value above this limit, as the electronic shutter is not available at slower speeds. The camera will automatically switch to electronic shutter mode if you choose a speed higher than 1/60.
4. Once in electronic shutter mode, you can now use the high-speed sync feature to take photos with faster shutter speeds without causing motion blur or other issues caused by traditional mechanical shutters. This is particularly useful for capturing fast action or shooting in bright light conditions.
5. To switch back to mechanical shutter mode, simply turn the top dial back to "M" position and the camera will automatically revert to its default settings.
What is the process for transferring photos from my Fujifilm X100V to my computer using a USB cable?
Transferring photos from your Fujifilm X100V camera to your computer using a USB cable involves the following steps:
1. Connect your camera to your computer: Plug one end of the USB cable into the camera's USB port, and the other end into an available USB port on your computer. Make sure both devices are turned on.
2. Enable USB transfer mode on your camera: Press the "Q" button on the back of your camera to open the Q menu, then navigate down to "Transfer" and press the OK button to select it. The camera will display a message asking if you want to connect to a PC or Mac, choose the option that applies to your computer.
3. Access the camera in File Explorer (Windows) or Finder (Mac): Your computer should recognize the camera as an external drive. On Windows, open "File Explorer," and on Mac, open "Finder."
4. Locate the DCIM folder: In the camera's directory, there is a folder named "DCIM" which contains all the image and video files taken with your camera.
5. Copy images from the camera to your computer: Select the desired images or folders in the DCIM folder, then copy and paste them into a preferred location on your computer. Alternatively, you can drag and drop the files into a new or existing folder.
6. Safely eject both devices: After transferring the photos, disconnect the camera from your computer by safely ejecting it (right-click the camera icon in File Explorer or Finder, then select "Eject" or "Safely Remove"). Unplug the USB cable from the camera and computer.
7. Back up images: Don't forget to backup your photos on an external hard drive or cloud storage to ensure their safety.
How do I switch between manual and automatic focus modes on my Fujifilm X100V camera?
To switch between manual and automatic focus modes on your Fujifilm X100V camera, follow these steps:
1. Make sure your camera is in shooting mode (the mode dial should be set to any setting other than Playback). Press the "AF Mode" button located near the viewfinder. This will bring up a menu with several focus modes. Use the navigation pad or joystick to select the desired focus mode. The options include:
- Single Point AF: Allows you to manually select a focus point using the touchscreen, joystick, or buttons on the back of the camera. Zone AF: Lets you select a group of focus points in a specific zone on the screen, which can be helpful for tracking moving subjects. Wide/Tracking AF: Uses multiple focus points to automatically detect and track your subject, making it great for action photography or when shooting quickly moving objects. Once you've selected your preferred focus mode, press the shutter button halfway down to lock focus on your subject. The camera will hold focus until you release the button or take the shot. To switch back to automatic focus, repeat steps 1-3 and select the desired automatic focus mode. The options include:
- AF-S (Single): Lets the camera automatically focus when you press the shutter button halfway down. AF-C (Continuous): Allows for continuous autofocus tracking of moving subjects, making it great for sports photography or other fast-paced scenes. To confirm that your camera is set to manual or automatic focus, check the focus mode indicator in the viewfinder or on the back screen. It will display either "MF" (Manual Focus) or "AF-S"/"AF-C" (Automatic Focus).
How do I switch between manual and automatic shooting modes on my Fujifilm X100V camera?
To switch between manual and automatic shooting modes on your Fujifilm X100V camera, you can follow these steps:
1. Make sure your camera is turned on. Locate the shooting mode dial on the top right-hand side of the camera. Rotate the dial to select the desired shooting mode. For manual shooting, rotate the dial until you see the "M" symbol. This will allow you to manually adjust shutter speed, aperture, and ISO. For automatic shooting, rotate the dial until you see the green camera icon with an up arrow. This is called the "Super Intelligent Auto (SIA)" mode, which allows the camera to automatically select the best settings based on the scene. You can also choose other automatic shooting modes such as Aperture Priority (A), Shutter Priority (S), and Program (P) by rotating the dial until you see the corresponding symbols. Once you have selected your desired shooting mode, you can start taking pictures. Remember that in manual mode, it's important to adjust your settings carefully to ensure proper exposure. In automatic modes, the camera will make those adjustments for you.
Why does the camera's autofocus struggle in low-light conditions, particularly when using the f1.8 lens, and is there an update or setting adjustment that can improve its performance?
The camera's autofocus struggles in low-light conditions due to several reasons. First, it relies on contrast detection to determine focus. In low light, there is less contrast between objects, making it harder for the camera to detect focus accurately. Another reason is that f1. One solution to improve autofocus performance in low-light conditions is to use continuous autofocus, rather than single-shot autofocus. This allows the camera to continuously adjust focus as you recompose or move around your subject. However, keep in mind that this may consume more battery power. Another setting adjustment is to enable "AF-C" mode (Continuous Autofocus) and set it to "Fast" instead of "Standard". This can help improve autofocus speed and accuracy in low-light conditions. It's also worth noting that some cameras have a feature called "Low Light AF", which allows the camera to use phase detection or contrast detection when focusing on dark subjects. Check your camera manual for this feature. Additionally, if you're using an f1. OIS) built-in. This can help reduce camera shake and blur caused by hand movement, which can improve autofocus performance in low-light conditions.
Why does my Fujifilm X100V's LCD screen sometimes display an incorrect exposure preview when using the electronic shutter mode?
1. Rolling Shutter Artifacts**: When using the electronic shutter, the rolling shutter can cause artifacts such as banding or wobble in the image. This is due to the sensor being read out row by row at high speeds, which can result in a slight delay between when the top and bottom of the frame are captured. Exposure Compensation**: If you're using exposure compensation (e. AF Mode**: The autofocus mode can also affect the accuracy of the exposure preview when using the electronic shutter. In certain AF modes, like continuous autofocus, the camera may not correctly adjust for the rolling shutter artifacts. Exposure Preview Delay**: There's a slight delay between when you press the shutter button and when the image is actually captured. This delay can result in the exposure preview not accurately reflecting the final exposure of the image. Sensor Readout Speed**: The speed at which the sensor reads out frames can also affect the accuracy of the exposure preview. If the sensor readout speed is too slow, it might not capture the scene quickly enough, leading to inaccuracies in the exposure preview. To minimize these issues and get a more accurate exposure preview when using the electronic shutter mode, you can try the following:
* **Use Mechanical Shutter**: Switching to the mechanical shutter should give you a more accurate exposure preview. Adjust Exposure Compensation**: Make sure your exposure compensation is set correctly for the scene. You may need to adjust it slightly based on what's displayed in the live view versus what's captured by the image. AF Mode Adjustment**: Try switching between different autofocus modes (e. Exposure Preview Delay Compensation**: If you're using a camera with a long delay, consider investing in an external shutter release or a remote shutter release for better control over when the image is captured. In summary, the issue you're experiencing is likely due to the rolling shutter effect and can be mitigated by adjusting your shooting settings.
Before you buy Fujifilm X100V


Vincent Karisky –
Compared to the A7 I, which I used about a year: better matrix – less noise at a higher ISO, stabilization of the matrix allows you to take photos from your hand that were not possible before, two cards – but it is more convenient, especially when initially assessing photos, when deleting Photos from the raw card remain a copy on the jpg card – this is both a plus and a minus.
A more extensive menu gives a bit more options for adjusting the camera. The placement of the programmable buttons – unlike in I … is a matter of habit. Works with minolts through an adapter just as well. Battery – much better, I charge it much less often.
Enlarged part that we are holding for – more comfortable. It weighs slightly more than I – this is noticeable when you hold the camera in your hands for a long time. Overall, on the downside, it is probably not a very convenient menu, but there you can add the necessary commands to your own menu and that is also solved. Good camera.
Mariana –
Review of Fujifilm X100V (Rated 4 out of 5)
By Mariana
As an avid enthusiast photographer, I have had the pleasure of using the Fujifilm X100V for the past few months, and overall, I have been quite pleased with its performance. The X100V provides exceptional image quality and a compact design, making it an ideal camera for both amateurs and professionals alike.
One hypothetical problem that users may encounter while using the Fujifilm X100V or similar digital cameras is the occasional glitch in the autofocus system. While this may not be a widespread issue, there have been instances where the autofocus fails to lock onto the intended subject, resulting in some frustration.
However, fear not fellow photographers, for there is a quick and easy solution to this problem. By utilizing the camera’s manual focus feature, you can regain control over your shot and achieve the desired focus. This may take a little practice at first, but once you get the hang of it, you’ll find that manual focus can be quite rewarding and sometimes even preferable, especially in certain situations where autofocus may struggle.
Now, on to a light-hearted story involving a lawyer and the Fujifilm X100V! Recently, during a photography exhibition, I had a delightful encounter with a lawyer who was captivated by the stunning image quality produced by the X100V. He even mentioned that his love for fresh fettuccine reminded him of the distinct sharpness and clarity that this camera delivers. It was a rather amusing comparison, but his enthusiasm for the X100V was infectious.
Speaking of deliveries, I must mention that I had a pleasant experience with the shipment of my Fujifilm X100V to my address at 700 W Kimberly Ave, Placentia, CA 92870, United States. The camera arrived promptly and was well-packaged, ensuring its safety during transit. It’s always a relief when your long-awaited photography gear arrives on time and in perfect condition.
When it comes to the battery type in the Fujifilm X100V, it utilizes a Lithium-ion rechargeable battery. This type of battery offers great longevity and reliability, allowing you to capture countless shots before needing to recharge. Additionally, Lithium-ion batteries are lightweight, making them a convenient choice for photographers who are constantly on the move.
In summary, the Fujifilm X100V is a remarkable camera that offers impressive image quality and a portable design. Despite the occasional autofocus glitch, the camera’s manual focus feature provides a reliable solution. So, whether you’re an amateur or a professional, the X100V is capable of fulfilling your photography needs. Just make sure to keep a spare battery handy, as you never know when an exciting photo opportunity might arise!
Note: This review is purely fictional and does not reflect actual experiences or opinions.
Aaliyah –
Oh, my goodness gracious! I’m just back from the on-line shop where I bought this overpriced paperweight known as Fujifilm X100V Digital Camera. You know, the one Charles Perez from Suffolk kept nagging about. He claimed it would revolutionize how we capture life’s most mundane moments. Well, I’ll give him that; it sure makes my bank account feel revolutionary!
Before I dive into a sarcastic review of this digital device, allow me to share some tips for those interested in joining the Digital Camera Club:
1. Don’t bother looking at reviews – they’re all lies anyway. Trust me; you won’t miss anything significant by skipping them.
2. When shopping online, make sure to buy from a reputable dealer located somewhere like Suffolk. After all, who wouldn’t trust an item sold by someone in the same town as your great-great-grandmother’s cousin’s neighbor?
3. Remember, size doesn’t matter! A compact camera like X100V can still deliver high-quality images just don’t expect it to do much else besides take pictures of your cat or the clouds outside your window.
Now back to my experience with Fujifilm X100V Digital Camera. Firstly, let me say that this product is indeed compact and looks sleek on paper (or screen, rather). But once you hold it in your hands, it feels like holding a small brick made of plastic and glass. The weight alone will give you an arm workout should you decide to carry it around all day.
In terms of functionality, I must admit that the camera does take decent photos if you know how to work with its settings. However, getting there requires navigating through multiple menus and submenus, which can be quite frustrating when trying to capture that perfect shot before the moment passes.
One thing I appreciate about Fujifilm X100V is its fixed lens – no more fiddling with interchangeable lenses or worrying about carrying extra equipment. But then again, sometimes it feels like having only one type of utensil in your kitchen drawer. You might find yourself limited in what you can cook up.
Would I recommend this digital camera to others? Honestly, I’d suggest they look elsewhere unless they’re willing to spend a pretty penny on an overpriced novelty item. After all, isn’t life too short for mediocre photography experiences?
Makenzie Holloway –
Despite Vincent Karisky’s glowing review of the Fujifilm X100V, I must admit that his opinions are somewhat subjective. While it is true that the X100V has a better matrix and stabilization than its predecessor, the A7 I, the menu system could use some improvement. It may be more extensive, but navigating through the various options can be overwhelming and confusing for those who are not familiar with Fujifilm’s interface.
Furthermore, while the placement of programmable buttons is a matter of personal preference, I found myself accidentally pressing them more often than I would have liked on the X100V. This could lead to unwanted settings changes and frustrating mistakes during critical moments of photography.
Moreover, Karisky’s praise for the camera’s weight may not be a selling point for everyone. While it is true that a heavier camera can provide better handling and stability, it can also become tiring to carry around for extended periods of time. This could be a major drawback for photographers who often travel or hike with their equipment.
In summary, while the Fujifilm X100V is undoubtedly a high-quality camera with many impressive features, it may not be the best fit for everyone’s needs and preferences. It is worth considering these potential drawbacks before making a purchase decision.
As for today’s news, Builder’s FirstSource has been recommended by expert Chris Versace due to its arms-merchant strategy that allows for faster growth than the housing sector. However, it is crucial to note the risk of an economic slowdown, which could negatively impact this company and the broader industry. It is essential to stay informed and cautious when making investment decisions.
Annie Durham –
my daily routine involves assisting elderly clients with their day-to-day activities. However, during my recent vacation, I decided to indulge in a little treat for myself – buying a new digital camera. Excitedly, I ordered the Fujifilm X100V online and eagerly awaited its delivery at 56 Park Beach Rd, Coffs Harbour NSW 2450, Australia.
Upon receiving the camera, I couldn’t wait to try it out. The Fujifilm X100V is a unique digital camera that stands out in many ways. One of its most impressive features is Bluetooth connectivity. This might seem like a small detail, but it actually makes a significant difference in my experience as a photographer.
Bluetooth in digital cameras allows for seamless wireless communication between the camera and other devices such as smartphones or laptops. With this feature, I can easily transfer images from my camera to my phone or computer without the need for cables or memory cards. This not only saves me time and effort but also ensures that my images are always backed up in multiple locations for added security.
The Bluetooth connectivity in Fujifilm X100V is particularly useful when working remotely or in challenging locations where there’s no access to power outlets or cables. For instance, during a recent hiking trip, I was able to share my photos with friends and family in real-time using Bluetooth without having to carry additional accessories like cables or memory cards.
In terms of technical aspects, the Fujifilm X100V has a 26-megapixel APS-C sensor that delivers outstanding image quality with incredible detail and vibrant colors. The camera also features a hybrid viewfinder that provides both optical and electronic viewing options, making it easy to switch between different shooting styles based on the situation.
Another impressive feature is the X100V’s autofocus system, which uses Fujifilm’s proprietary Phase Detection technology for faster and more accurate results. Additionally, the camera has an electronic shutter speed of up to 1/32000 sec, allowing me to capture stunning images in bright sunlight without any issues.
In summary, my experience with Bluetooth connectivity on Fujifilm X100V has been nothing short of exceptional. It’s a small yet significant feature that enhances the overall user experience by making it easier and more convenient to transfer images wirelessly. And while Steve Bannon prepares for his prison sentence, I’ll be out here capturing stunning images with my Fujifilm X100V, thanks to its impressive Bluetooth connectivity feature. It’s a small but meaningful victory in these challenging times.
As a side note, today’s news brings mixed emotions as we witness Steve Bannon face the consequences of his actions. While justice is being served, I can’t help but feel a sense of sadness and nostalgia for a time when things weren’t so uncertain and divisive. But in times like these, we must hold onto hope and work towards building a more inclusive and compassionate society. Let us strive to be the change we wish to see in the world, no matter how small it may seem.
In closing, I would highly recommend the Fujifilm X100V to any photography enthusiast looking for an exceptional digital camera with unique features that set it apart from the rest. From its Bluetooth connectivity to its impressive sensor and autofocus technology, the X100V is a must-have addition to any photographer’s arsenal. So go ahead, treat yourself, and experience the magic of this remarkable camera for yourself!
Aidan –
The Fujifilm X100V is an impressive upgrade from its predecessor, the A7 I, according to Vincent Karisky’s review rated by 4 stars. While Karisky highlights several improvements such as better matrix noise reduction, dual card slots, and a more extensive menu, he also notes that the camera’s menu can be cumbersome at times.
However, I would like to challenge this perspective. Fujifilm’s X100V has been praised by many professional photographers for its intuitive interface, which allows for quick and easy access to essential features. In fact, the camera’s retro design and tactile controls have earned it a legion of loyal fans who prefer its old-school approach over the digital interfaces found on most modern cameras.
Moreover, the X100V’s menu is highly customizable, allowing photographers to add their preferred settings to their own menu for quicker access during shoots. This feature alone makes it possible to streamline workflows and improve efficiency, especially in fast-paced environments where every second counts.
In contrast, Karisky’s opinion may stem from his personal preferences and habits formed during his time using the A7 I. It could also be a result of unfamiliarity with the X100V’s interface, which requires some adjustment time.
Regardless, I believe that the Fujifilm X100V’s menu is highly intuitive and user-friendly once you get used to it. Its customization options make it a powerful tool for photographers of all levels, and its unique design and features set it apart from other digital cameras on the market today.
Furthermore, while Karisky mentions that the camera’s weight is noticeable during extended periods of use, I would argue that this is a small price to pay for the X100V’s exceptional image quality and versatility. Its compact size makes it highly portable, allowing photographers to take it anywhere they go without sacrificing performance or functionality.
In summary, while Karisky’s review highlights some of the Fujifilm X100V’s strengths and weaknesses, I believe that its unique design, intuitive interface, and exceptional image quality make it one of the best digital cameras on the market today. Its customization options, compact size, and impressive features are unmatched by many other cameras in its price range, making it an excellent choice for photographers looking to upgrade their gear or invest in a new camera.
As for today’s news, Berkshire Hathaway’s recent pile-up on five dividend giants is noteworthy news for investors seeking income streams from their portfolio. Apple and Chevron, two of the companies in which Berkshire has invested heavily, offer attractive dividends that provide a steady stream of passive income for shareholders. With Warren Buffett’s reputation as a savvy investor, these picks are worth considering for anyone looking to build a sustainable income stream through dividend investing.