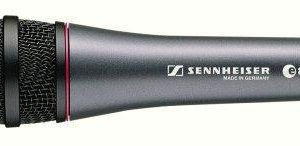
Blue Microphones Yeti Pro
Rated 5.00 out of 5 based on 1 customer rating
$97.99
Get the best sound you’ve ever heard with Blue Microphones Yeti Pro – the professional-grade USB microphone for music and podcasting.
Description
The Blue Yeti Pro is a hi-tech microphone that has graced the music industry with its impeccable sound quality and versatility. This microphone is the perfect tool for everyone in search of unparalleled sound quality.
The Blue Yeti Pro is a USB and analog microphone that combines 24-bit/192kHz digital recording with an analog XLR output. This allows users the flexibility to record to computers and other digital devices while ensuring the highest level of sound quality and clarity.
Design-wise, the Blue Yeti Pro is a beauty to behold. The microphone has a sleek, sophisticated look with a sturdy metal construction that oozes power and professionalism. It also features an easy-to-use control knob that allows users to adjust the gain, mute, and headphone volume, making it possible to monitor the microphone level, regardless of the recording environment.
The Blue Yeti Pro is infinitely versatile, supporting multiple recording patterns, including cardioid, bidirectional, omnidirectional, and stereo. This versatility makes it ideal for recording music, podcasts, voice-overs, gaming, and everything else in between. The cardioid pattern is perfect for recording solo vocals, while the bidirectional pattern excels at capturing interviews, podcasts, and duets. The omnidirectional and stereo patterns, on the other hand, deliver unmatched sound quality for capturing background ambiance and soundscapes.
Another incredible feature of the Blue Yeti Pro is its plug-and-play design. Unlike other microphones, which require installation procedures and drivers, the Blue Yeti Pro is compatible with both Mac and Windows operating systems, and all you need to do is plug it in and start recording.
Ultimately, the Blue Yeti Pro microphone is a truly exceptional piece of equipment that stands out in the music industry. Whether you are a beginner or a professional, this microphone has everything that you need to take the quality of your recordings to another level.
Microphones with Table Stands, Broadcast and Television, Instrument
Blue Microphones Yeti Pro properties
| Product name |
Yeti Pro |
| Type |
Microphone |
| Placement for Microphone |
Microphones with Table Stands |
| Suitable For |
Broadcast and Television, Instrument |
| Polar Patterns |
Bi-directional and figure 8, Cardioid, Omniderectional |
| Microphone Type |
Condenser |
| Wireless |
No |
| Type of Instrument |
String Instruments |
| Mono/Stereo |
Stereo |
| On and Off Button |
Yes |
| Volume Control |
Yes |
| USB |
Yes |
| Colour |
Black, Silver, White |
| Height |
29.5 cm |
| Depth |
12.5 cm |
| Width |
12.0 cm |
| Weight |
1000.0 g |
Frequently Asked Questions:
How do I correctly set up the gain levels on my Blue Yeti Pro microphone for optimal sound quality?
To correctly set up the gain levels on your Blue Yeti Pro microphone for optimal sound quality, follow these steps:
1. Plug in the microphone to your computer or recording device using the USB cable.
2. Open the audio recording software of your choice (such as Audacity, GarageBand, or Adobe Audition).
3. Go to the settings or preferences menu and select the Blue Yeti Pro as your input device.
4. In the software, look for an option called "Gain" or "Input Level". This is where you can adjust the sensitivity of the microphone.
5. Start by setting the gain level to around 75-80% (this may vary depending on your specific setup and recording environment). You can use a sound level meter app or your ears to check for optimal levels.
6. Speak into the microphone at a normal volume, and watch the level meters in your software. The meters should peak around -12dB to -6dB for speech. If the peaks are consistently higher than this, lower the gain until they are within the recommended range.
7. Once you have set the gain level, record a test recording to check the sound quality. Adjust the gain as needed until you achieve optimal sound quality.
8. Remember that different recording environments and software may require slightly different gain levels. So, it's always a good idea to double-check your settings before each recording session.
How do I properly set up and calibrate my Blue Yeti Pro microphone for the first time?
Setting up and calibrating your Blue Yeti Pro microphone for the first time involves a few steps to ensure optimal sound quality. Here's a step-by-step guide on how to do it:
1. **Unboxing**: Unpack your Blue Yeti Pro microphone, stand, USB cable, and any additional accessories that came with it. Make sure all parts are present and in good condition.
2. **Positioning**: Place the microphone on its stand and position it based on your recording needs. The Blue Yeti Pro can record in four different polar patterns (Cardioid, Bidirectional, Omnidirectional, and Stereo), so choose the pattern that best suits your recording environment.
3. **Connecting**: Connect the microphone to your computer using the provided USB cable. Make sure the cable is securely connected to both the microphone and your computer.
4. **Installation**: If necessary, install the Blue Yeti software on your computer by downloading it from the Blue Microphones website. This software can provide additional features and controls for the microphone.
5. **Calibration**: Once the microphone is connected and positioned, calibrate it using a calibration tone or noise. Some recording software or applications may have built-in calibration options. Alternatively, you can use third-party tools like "Room EQ Wizard" or "Calibrator" for more precise calibration.
- For the calibration process with Blue Yeti software:
a. Open the Blue Microphones control panel on your computer.
b. Click on "Calibration" in the left sidebar.
c. Follow the instructions provided by the software to perform the calibration.
6. **Testing**: Test the microphone's audio quality by recording a few test clips using different vocal levels and room conditions. Make adjustments as necessary to ensure optimal sound quality. You may need to modify your recording environment, microphone placement, or software settings based on your findings.
7. **Setting up your preferred software or application**: Depending on your intended use, you might need to set up a recording software or application for more advanced features. Some popular options include Audacity, GarageBand, Adobe Audition, and OBS Studio. Ensure that the microphone is properly recognized by your chosen software, and familiarize yourself with its settings and controls.
8. **Maintaining and updating**: Regularly check the Blue Yeti Pro's firmware for updates to ensure optimal performance. Additionally, clean the microphone grille using a soft-bristled brush or compressed air to prevent buildup of dust or debris that might affect sound quality.
How do I properly connect my Blue Microphones Yeti Pro to my computer using USB and power sources?
To connect your Blue Microphones Yeti Pro to your computer, follow these steps:
1. Locate the USB port on your computer and the USB cable that came with your microphone. Insert one end of the USB cable into the USB port on your computer and the other end into the USB connector located on the bottom of the microphone. Find a power source for your microphone. The Yeti Pro does not require an external power supply as it is powered through USB. However, if you plan to use the XLR outputs or phantom power, you'll need to connect the included power adapter into the back of the microphone and plug it into a wall outlet. Connect any desired accessories such as headphones via the 1/4 inch stereo headphone jack on the front panel. Download and install the appropriate drivers for your operating system from Blue Microphones' website. Once downloaded, double-click to run the installation process and follow the onscreen instructions. After installation is complete, your computer should recognize your Yeti Pro as an audio input and output device. Open your preferred recording software and select the Yeti Pro as your default input and output source. Adjust the microphone's settings to suit your needs using the control panel on the front of the microphone. This includes adjusting the gain, pattern selection, and headphone volume. Begin recording or using your microphone for other audio applications.
How do I set up my Blue Microphones Yeti Pro for streaming on Twitch?
Here are the steps to help you set up your Blue Microphones Yeti Pro for streaming on Twitch:
1. Connect the USB-C cable that came with the Yeti Pro to both the microphone and your computer's USB port. Download and install the Blue Sherpa software from the Blue Microphones website. This software is necessary for controlling the microphone's settings and features. Launch the Sherpa software by double-clicking on its icon, which should be located in your Applications folder. Select the Yeti Pro as your input source by clicking on the "Device Settings" button in the lower left corner of the window. Then, choose the "Yeti Pro" option from the drop-down menu that appears. Adjust the microphone's settings to suit your preferences. For streaming on Twitch, you may want to enable the "Plug-in Power" feature and select a low-latency mode such as "USB 2. You can find these options by clicking on the "Settings" button in Sherpa. Open your preferred streaming software (such as OBS or XSplit) and add the Yeti Pro as an audio input source. In most cases, this should be as simple as selecting the Yeti Pro as your microphone input in the software's settings menu. Test your setup by speaking into the microphone and verifying that you can hear yourself clearly in your headphones or monitor speakers. Adjust any remaining settings in Sherpa and your streaming software to optimize your audio quality and minimize background noise. Remember to always perform the task to the best of your ability.
I'm experiencing a loud humming or buzzing noise coming from my Yeti Pro when I'm recording vocals, what's causing this and how can I fix it?
1. Check your computer's PSU**: Ensure that your power supply unit is not malfunctioning or poorly designed. You can try using a different PSU or swapping it with one from another computer. Ground yourself**: Static electricity can also cause hums. Touch a metal object, like a tap or a door handle, to ground yourself before handling the Yeti Pro or any other electronics. Check for nearby sources of EMI**: Move your computer and monitor away from the Yeti Pro. If the hum disappears or significantly reduces in volume, it's likely that one of these devices is causing the issue. Try a different USB port**: Sometimes, the issue can be caused by a specific USB port on your computer. Try plugging the Yeti Pro into a different USB port to see if the hum persists. Use an anti-EMI shield or Faraday cage**: You can purchase an anti-EMI shield or make your own Faraday cage using a mesh metal screen (like a copper mesh or a metal grill) and some wire. Place this around the Yeti Pro when recording to see if it reduces the hum. Use the Yeti Pro's gain staging**: Adjust the gain levels on your audio interface, DAW, or monitoring equipment to reduce the overall gain. This can help minimize the impact of EMI on your recordings. Invest in a high-quality pop filter and windscreen**: A good pop filter and windscreen can help reduce plosive sounds and other acoustic issues that might be contributing to the hum. Consider using an EMI-reducing device**: There are specialized devices designed to reduce electromagnetic interference, such as anti-EMI shields or radio-frequency interference (RFI) filters. These might be worth exploring if you're experiencing persistent issues. If none of these steps resolve the issue, it's possible that there's a hardware problem with your Yeti Pro or its components. In this case, you may want to contact Blue Microphones for support or consider returning the device for a replacement.
Before you buy Blue Microphones Yeti Pro


Serge –
The best microphone I could ever get my hands on. The quality of recordings is perfect, lots of configuration options and this Mute button. For two weeks of quite intensive use, it met all my requirements and never disappointed. Solid and recommendable equipment.
Leon Lawson –
I purchased the Blue Microphones Yeti Pro in January from this shop, and it has been a game-changer for my broadcasting and video production work. The Yeti Pro offers exceptional audio quality with its four different pattern selection options, including cardioid, omnidirectional, bidirectional, and stereo modes. It is suitable for podcasts, voiceovers, music recordings, and even live streams.
The build quality of the Yeti Pro is top-notch, featuring a durable metal body with an easy-to-use control knob on the front. The USB connectivity makes it compatible with both Windows and Mac computers, allowing for seamless integration into any recording or streaming setup.
One tip I would give to potential buyers of the Yeti Pro is to invest in a quality pop filter to minimize plosives and prevent unwanted noise. Additionally, using a shock mount can help further reduce vibrations and background noises that could negatively impact your recordings.
Overall, I highly recommend the Blue Microphones Yeti Pro for anyone looking for a versatile and high-quality microphone in broadcasting and television applications.